Creating a reservable product in WooCommerce with ARB takes eight steps. You set ARB's Reservable Product type, then configure its five tabs: General, Availability, Costs, Persons, and Resources. The finished booking form runs inside your existing WooCommerce cart and checkout, with no separate system to manage.
This guide sets the product type, works through every field on those five tabs, then chooses a booking workflow. It ends with how to display the finished product and manage bookings after you publish.
What Is a Reservable Product in WooCommerce?
A reservable product, also called a bookable product, is a WooCommerce product that sells time slots, dates, or capacity instead of physical stock. ARB adds this product type under the name Reservable Product, with its own booking form, calendar, and pricing rules built into five configuration tabs.
This is different from reserving a physical item that is still in stock, which WooCommerce handles through its separate Pre-Orders feature, not a Reservable Product. Here is how to create one in ARB, step by step. For the tool-agnostic overview first, see how to add online booking to WordPress.
What You Need Before You Start
You need four things in place before Step 1: WooCommerce, ARB itself, its activation token, and a starting point in your dashboard.
- WooCommerce installed and active. ARB is a WooCommerce extension, so WooCommerce has to run first.
- ARB installed, activated, and its 9-digit Activation Token Number saved in WooCommerce > Settings > ARB Settings.
- A license that matches your use. ARB is a one-time license, about $55, and every core booking feature is included in it. Developers building a reservable product for a paying client need the Extended license instead. Google Calendar sync and SMS notifications are separate paid add-ons. See ARB's one-time pricing for the full breakdown.
- Your starting point: Products, then Add New, is where Step 1 begins.
For the broader store-level setup, including plugin installation and payment gateways, see how to add booking to your WooCommerce store. Or start faster with ARB's bundled demo data. It recreates the live demo products, such as the spa-treatment and movie-ticket forms, so you can reverse-engineer a working setup.
See it working before you build: try ARB's live demo.
How to Create a Reservable Product in ARB: Step by Step
Eight steps take a bare WooCommerce product to a fully configured, publishable reservable product. Set its type, then work through the five tabs in order, then choose a workflow and go live.
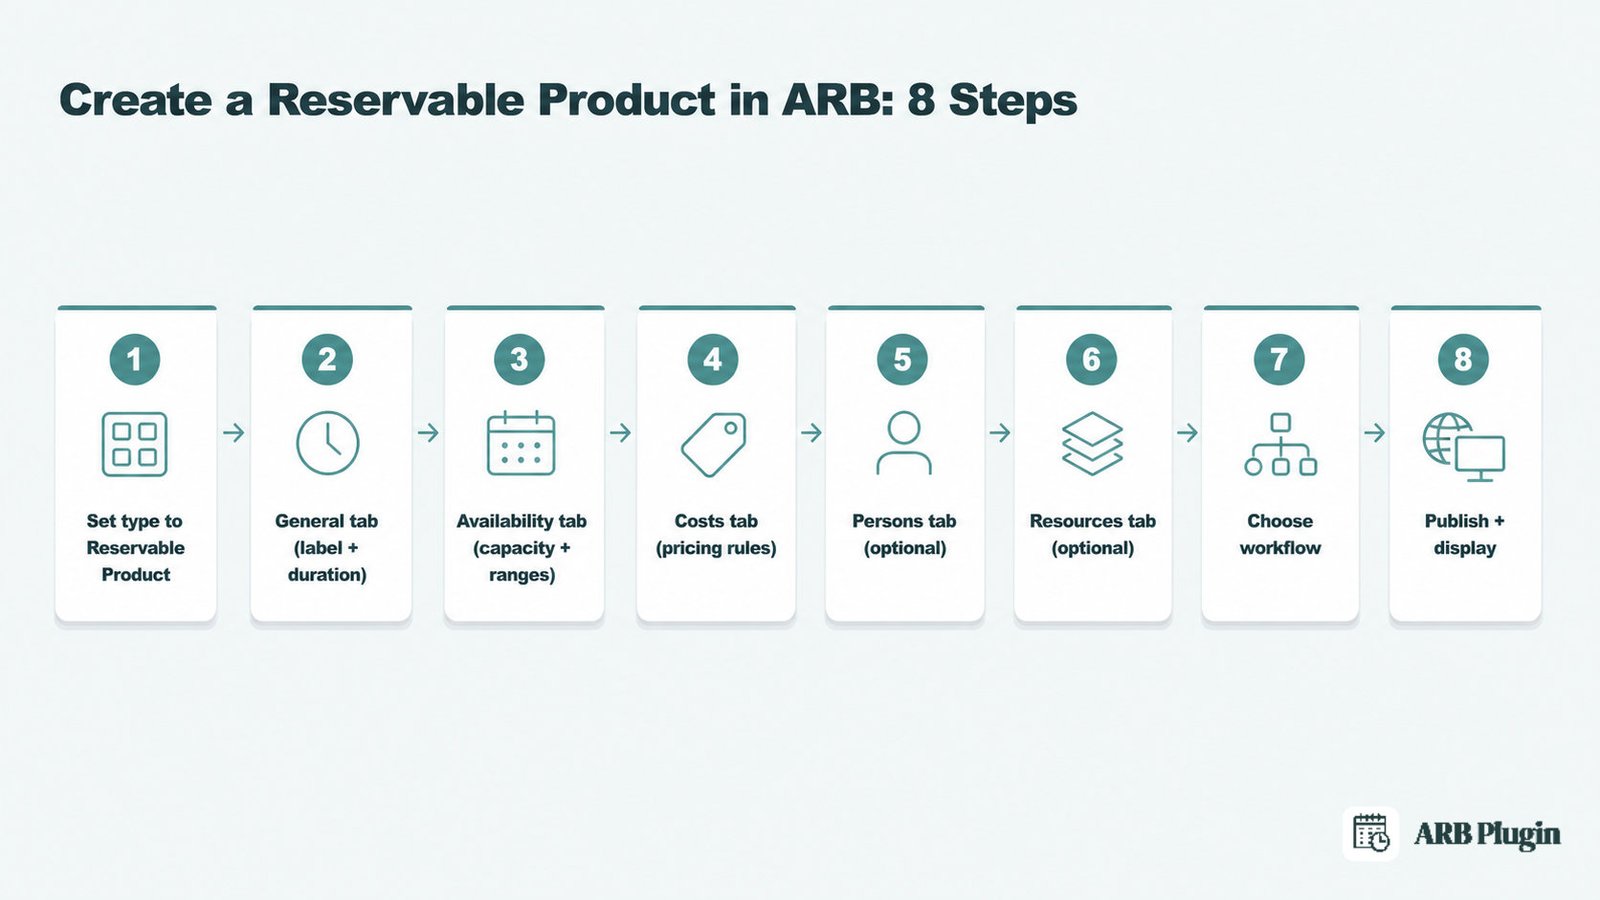
Step 1: Add a New Product and Set the Type to Reservable Product
Creating a reservable product starts with a normal WooCommerce product, then switching its type. Five booking tabs appear once you make that switch.
Go to Products > Add New, then add a title and description. Scroll to Product Data and choose Reservable Product from the dropdown menu.
[Screenshot: Product Data dropdown with "Reservable Product" selected and the five booking tabs visible] Alt: WooCommerce Product Data dropdown open, showing Reservable Product selected and the General, Availability, Costs, Persons, and Resources tabs.
Done: five booking tabs, General, Availability, Costs, Persons, and Resources, appear inside Product Data.
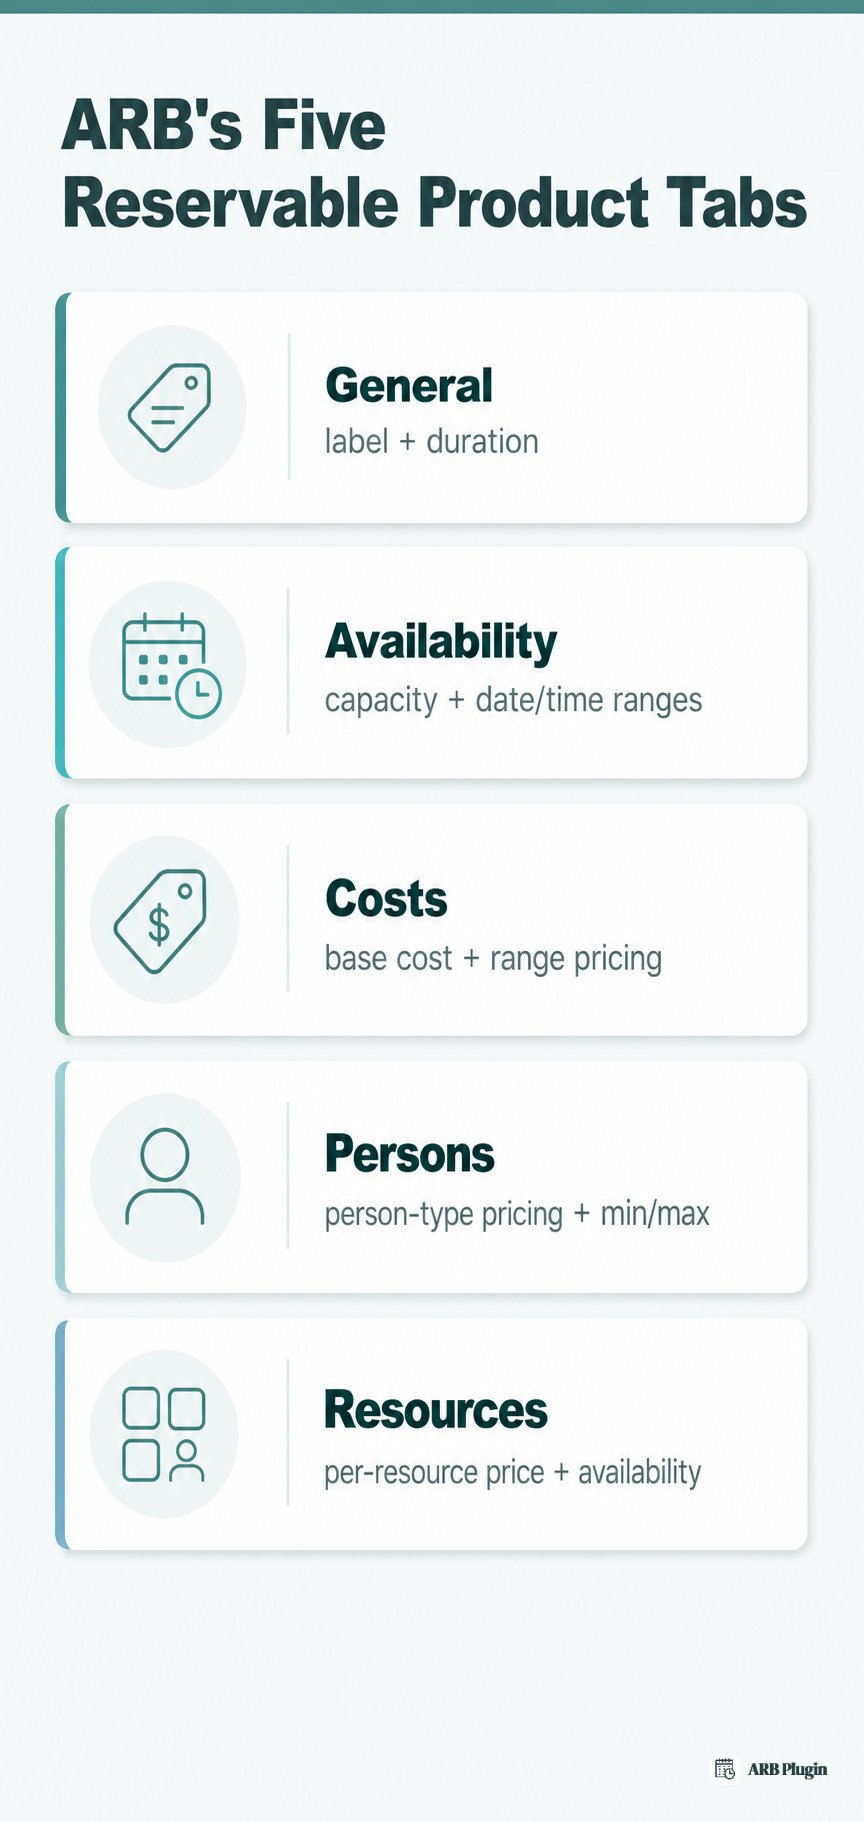
Step 2: Set the Label and Duration on the General Tab
The General tab controls what customers see on the cart and checkout, and how long one reservation lasts.
Set the Label field to the word shown in cart, checkout, and emails, such as Duration, Ticket, or Course. A hotel stay might use Duration; a movie-ticket product might use Ticket instead.
Set Reservation Duration to customer-defined or admin-defined and fixed. Customer-defined lets the customer pick how many units within a min and max you set. Admin-defined and fixed books one slot at a time. Duration units can be minutes, hours, days, or months.
Turn on Count Duration as Item for quantity products, such as a food-delivery order, where the field counts items rather than time. Set the confirmation and cancellation checkboxes, plus an optional note, as needed.
���� Tip: use Count Duration as Item when the field is a count, not a time unit, such as a "Quantity" label on a delivery product.
Done: the front-end form shows your chosen label and lets the customer pick a valid duration.
Step 3: Set Availability and Capacity on the Availability Tab
The Availability tab caps how many customers can book one slot, and which days and times are open at all.
Set Max Reservations per Slot to the number of bookings one slot can hold. Set it to 1 for one-at-a-time bookings, or higher for shared capacity like a class or a tour.
Set A slot is reservable after minimum for lead time; 0 books immediately. Set A slot is reservable till for how far ahead customers can book. Turn on Show quantity of left available time slots for a remaining-slots counter. Set Requires a vacant period of for a buffer between bookings, and 1st slot starts at for the day's first bookable time.
Click Add Range to set exactly which dates and times are bookable. ARB groups these into five range types.
| Add Range type | What it sets |
|---|---|
| Date range | A fixed start and end date |
| Range of months, weeks, or days | Recurring months, weeks, or specific days, such as Monday to Friday |
| Time Ranges | The same hours across the whole week |
| Date Range with Time | Specific dates paired with a time window; also used to block out a holiday or closed period |
| Monday to Sunday | Per-day hours across the full week |
For the deeper mechanics of lead time, horizon, and buffers, see setting up booking availability and time slots. For the full field reference, see booking availability rules.
[Screenshot: Availability tab with Max Reservations per Slot and an Add Range row] Alt: ARB Availability tab showing the Max Reservations per Slot field and an Add Range row set to a date range.
[Screenshot: Add Range options dropdown] Alt: ARB Add Range dropdown listing Date range, Range of months, Range of weeks, and Range of days. Also shown: Time Ranges, Date Range with Time, and Monday to Sunday.
���� Tip: block out a holiday or a closed period with a single Date Range with Time entry, instead of editing every other availability rule.
Done: the front-end calendar shows only your intended dates and times, and capacity and buffers are enforced.
The finished calendar is what customers see on the WooCommerce booking calendar at the front end.
Step 4: Set Pricing on the Costs Tab
The Costs tab sets the base price, plus any rules that raise or lower it for specific dates, times, or group sizes.
Set Base Cost for a flat charge added on top of every resource or person price, such as a $5 delivery fee. Leave Display Cost empty so the form calculates and shows the real total; only fill it in for a cosmetic "from" price.
Click Add Range to raise or lower the price for a condition. ARB supports six pricing-range bases.
| Range base | Example |
|---|---|
| Slot Count | $5 discount for bookings over 4 slots |
| Person Count | $10 discount for bookings over 1 person |
| Date Range | Plus $20 for Saturday to Sunday |
| Time Range | Minus $10 for 7 PM to 10 PM |
| Date Range with Time | A specific date and time window priced on its own |
| Range of Days | A recurring day-of-week rule, such as every Friday |
The price recalculates in real time through AJAX as the customer changes date, time, or quantity. See dynamic booking pricing for more worked examples.
[Screenshot: Costs tab with Base Cost and an Add Range pricing rule] Alt: ARB Costs tab showing the Base Cost field and an Add Range pricing rule applied to a weekend date range.
���� Tip: use Base Cost for a flat per-booking fee, and Add Range for anything that changes by date, time, or group size.
Done: the front-end price recalculates correctly as the customer changes date, time, or quantity.
Step 5: Add Person Types (Optional)
Person types let you price and cap different kinds of bookers, such as adults, children, or tickets, on the same product.
Tick Enable Persons, then set a minimum and maximum value and an individual price for the default person type. Click Add Person Type for more, such as Adult, Child, Ticket, or Soft Drinks. A person type does not need to be an actual person.
Turn on Count Persons as Items if you want each booker to consume a slot of capacity. With it on, a 5-person booking uses 5 slots, not 1.
[Screenshot: Persons tab with two person types and their prices] Alt: ARB Persons tab showing two person types, each with its own price and its own minimum and maximum values.
Done: the booking form shows each person type with its own price and its own minimum and maximum.
Step 6: Add Resources (Optional)
Resources are the specific things customers choose from, such as a room, a staff member, or a course type.
Tick Enable resources, then click Add/link Resource for each one. Set a price for each resource, then click Edit resource to set that resource's own availability and available quantity.
A school could set one lecturer available Tuesday and Thursday, and a second lecturer available Friday and Saturday, each at a different rate. Learn more about booking resources.
[Screenshot: Resources tab and the Edit resource availability panel] Alt: ARB Resources tab showing two linked resources, plus the Edit resource panel with availability and quantity fields.
Done: the front-end dropdown lists your resources, and picking one shows only that resource's own availability and price.
Step 7: Choose the Booking Workflow (Instant, Confirmation, or Quote)
A reservable product can auto-confirm on payment, wait for your approval, or work as a quote request instead of a normal booking.
Leave confirmation required off for instant booking, where payment completes the reservation right away. Turn it on for approval-first bookings. No payment method shows at checkout until you confirm the order. The customer then pays from their My Account page.
To turn the form into a quote request instead, go to WooCommerce > Settings > ARB Settings and enable ARB Quote Request. Then open the product, find the Quote Request setting in the sidebar, and set it to On. You can then set custom pricing for each request.
[Screenshot: confirmation-required checkbox and the ARB Quote Request setting] Alt: ARB product editor showing the confirmation-required checkbox and the Quote Request On/Off setting in the sidebar.
Every WooCommerce payment gateway works here once payment is due, so setting up accepting payments for bookings is a normal part of this step.
Done: the product behaves as instant-book, approval-first, or quote-request, exactly as you intended.
Step 8: Publish and Display the Reservable Product
Publishing makes the product live. Displaying it correctly is what puts the booking form in front of customers.
Click Publish. The product's own page already shows the booking form. To place it elsewhere, paste the shortcode [product_page id="ID"], with your product's real ID, into any page, into Elementor's Shortcode widget, or into WPBakery.
Adjust the form's colors and other styling in WooCommerce > Settings > ARB Settings.
[Screenshot: published reservable product page showing the live booking form] Alt: Published WooCommerce product page displaying the ARB booking form with a calendar and pricing.
A WooCommerce feature-request thread makes this case plainly. Without shortcode support, a store built in Elementor has no way to display a booking calendar on a custom page. ARB's shortcode and Elementor widget support close that exact gap.
Done: the booking form is live on the page you chose, and it takes real bookings through WooCommerce checkout.
Ready to build one? Work through these eight steps once, end to end, on a real product from your own catalog.
ARB Features That Make Reservable Products More Flexible
Beyond the eight setup steps, three ARB capabilities go further than a plain date-picker plugin: multi-axis dynamic pricing, per-resource scheduling, and quote-first booking.
Range-Based Dynamic Pricing
ARB prices a booking by slot count, person count, date, time, and day of week, all at once. It uses the same Add Range rules covered on the Costs tab above, and the total recalculates live through AJAX. A weekend surcharge, an off-peak discount, and a group discount can all apply to the same reservable product at the same time.
Per-Resource Availability
Each resource carries its own schedule and its own price, so two resources on one product can run on entirely separate rules. One lecturer can be available Tuesday and Thursday, while a second is available Friday and Saturday. Each can be priced differently, exactly as set up in Step 6 above.
Request-for-Quote and Approval-First Booking
A reservable product does not have to auto-confirm on payment. Quote Request mode turns the form into a request for custom pricing. Confirmation-required mode instead lets you approve a booking before payment is due. Both are covered in Step 7 above.
Tips for Building a Better Reservable Product in ARB
The single highest-impact ARB tip: leave Display Cost empty. The form then always shows the real, calculated total, instead of a price that can drift out of sync.
- Leave Display Cost empty. The form auto-calculates and shows the actual total. Only fill it in for a cosmetic "from" price on the product page.
- Use Count Duration as Item for quantity products. Label the field Quantity for something like a food-delivery order, where the number is a count, not a time unit.
- Hide the calendar for resource-only bookings. Keep at least one dropdown, resource or persons, so the AJAX cost calculation still fires.
- Block a single date and time with Date Range with Time. Use it for a holiday or a maintenance window, without touching any other availability rule.
- Start from the bundled demo data. It recreates ARB's own live demo products, such as the spa-treatment and movie-ticket forms, so you can reverse-engineer a working setup.
Want one of these differentiators applied to your own resources or pricing next? The dynamic pricing and resources pages above walk through both in more depth.
How to Manage Reservations After You Publish
Every booking lands in one admin screen, where you can search, edit, confirm, and remind customers automatically.
Go to WP-Admin > Reservations > All Reservations to view every booking, filtered by date or by product, or searched directly. Open an individual order to add a private note, email the invoice, or change its status.
Use Edit/Update reservation to change the resource, dates, number of persons, or cost on an existing order. Setting status to Confirmed on an unpaid order emails the customer a payment link to their My Account page. The Daily Agenda view shows one day's bookings at a glance.
Send reminders in bulk from Reservations > Send Notification, using dynamic tags like {customer_name} and an optional attached iCalendar (.ics) file. For reminder timing and copy, see send appointment reminders.
[Screenshot: WP-Admin All Reservations list with filters] Alt: WP-Admin All Reservations screen showing a filtered list of bookings with status, date, and search controls.
ARB exports that iCalendar file in the core plugin at no extra cost. Always-on syncing instead needs a separate paid add-on. See how to sync bookings to Google Calendar; that sync runs one way only, from ARB to Google Calendar.
FAQs
Do I need WooCommerce to create a reservable product with ARB?
Yes. ARB is a WooCommerce extension, not a standalone plugin, so an active WooCommerce installation comes first. The Reservable Product type only appears in the Product Data dropdown once WooCommerce and ARB are both active.
How much does ARB cost, and is there a free version?
ARB is a one-time license, about $55 on CodeCanyon, with no plan tiers and no recurring fee for any core booking feature. There is no free or lite version on WordPress.org, so evaluate ARB through the live demo before you buy.
Can I charge different prices for weekends or per person type?
Yes. The Costs tab's Add Range rules add or subtract a price by date, so a Saturday-to-Sunday surcharge is one rule. The Persons tab prices each person type individually, so an adult ticket and a child ticket can cost different amounts on the same booking.
How do I stop the same slot from being double-booked?
Set Max Reservations per Slot on the Availability tab to the number of bookings one slot can actually hold. Set it to 1 for one-at-a-time bookings, or a higher number for shared capacity like a class or a tour.
Can customers request a quote instead of paying right away?
Yes. Enable ARB Quote Request under WooCommerce > Settings > ARB Settings, then set Quote Request to On for that specific product. The booking form becomes a quote request, and you set custom pricing for each one afterward.
Can I set different availability for different staff or resources?
Yes. Enable resources on the Resources tab, then add each staff member or room as its own resource. Click Edit resource to set that resource's own availability and quantity. Each resource keeps a fully separate schedule.
Does ARB sync reservations to Google Calendar?
ARB's core plugin exports an iCalendar (.ics) file with every booking notification, importable into Google Calendar manually. Automated, ongoing syncing instead needs the separate paid ARB Google Calendar add-on, and that sync runs one way, from ARB to Google Calendar only.
Why don't payment methods show at checkout?
Confirmation required is turned on for that product. While it is on, no payment method appears until you approve the booking, and the customer then pays afterward from their My Account page. Turn the setting off for instant payment instead.
Can I display the reservable product with Elementor or a shortcode?
Yes. Every Reservable Product supports the [product_page id="ID"] shortcode, which works pasted directly into a page, into Elementor's Shortcode widget, or into WPBakery. All three display methods ship in the core license.
Building a reservable product in WooCommerce comes down to five tabs: name, timing, cost, persons, and resources. ARB configures every one of them inside your existing WooCommerce checkout, for a one-time license instead of a yearly subscription. See the full ARB feature set, or try the live demo above and build your own reservable product today.