Booking availability on a WordPress or WooCommerce store is the set of rules deciding which days, hours, and how many customers a reservable product accepts. Setting it up takes eight steps: create a bookable product, cap capacity, and set your booking window. Then choose bookable hours, add buffer time, block dates, set per-resource rules, and show remaining slots.
This guide walks through each control inside a WooCommerce Reservable Product, so no booking ever slips through when you are closed, understaffed, or already full.
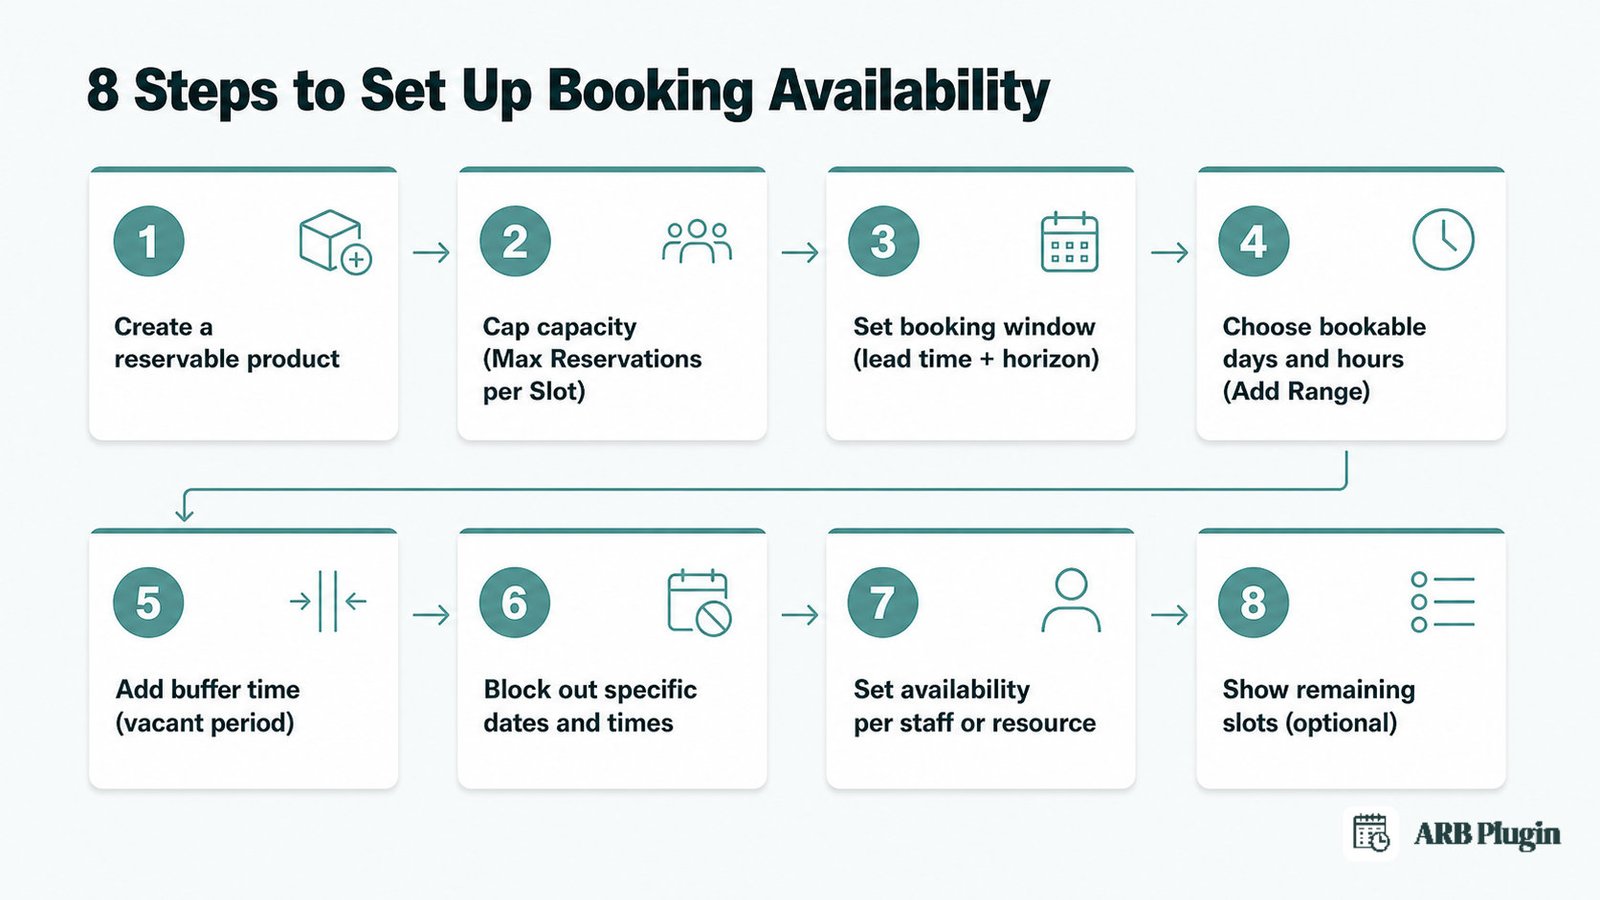
What Is Booking Availability?
Booking availability is the set of rules that decide which days, times, and how many customers a booking system accepts for a given time slot. It produces two outcomes: a calendar that only shows bookable openings, and a hard stop against double-booking.
A time slot is the bookable unit these rules govern. It might be an hourly consultation, a nightly hotel stay, or a monthly rental period. Capacity sets how many bookings one slot can hold.
WooCommerce ships no booking calendar or availability logic on its own. A reservable-product plugin adds that logic, and a store owner configures it once per product, then updates it as hours or capacity change.
What You Need Before You Start
The prerequisite most people miss: a bookable product has to exist before you can set availability rules on it. Availability lives inside that product's own settings, not in a separate calendar app.
Before you start, gather these four things.
- Role: the store owner or admin who manages WooCommerce settings.
- Time: about 15 to 20 minutes for a first product, once your hours and capacity are decided.
- Inputs: your real opening hours, your capacity per slot, and any recurring closed days.
- Tool: a WooCommerce booking plugin that adds a bookable product type. Any major one works.
If you have not set up bookings at all yet, start with our full guide to adding online booking to WordPress.
Step 1: Create a Reservable Product and Open the Availability Tab
Booking availability rules live on a bookable product's Availability tab, so you create that product first. Getting there takes three actions.
Follow these steps to create a Reservable Product and open its Availability tab.
- Go to Products, then Add New, and give the product a title.
- Scroll to Product Data and choose Reservable Product from the dropdown.
- Open the Availability tab, one of five booking tabs: General, Availability, Costs, Persons, and Resources.
This guide demonstrates each setting in ARB, the WooCommerce booking plugin that adds the Reservable Product type. I create a reservable product first for every new bookable service. Every availability rule below lives on that one product.
Done: the product shows five configuration tabs, and the Availability tab is open and ready for its first setting.
Step 2: Cap Capacity with Max Reservations per Slot
Capacity is the single setting that prevents double-booking, the most damaging booking-availability mistake a store owner can make. ARB's Max Reservations per Slot field sets that cap.
Set Max Reservations per Slot to 1 for one-at-a-time bookings, like a doctor, consultant, or single-chair barber. Raise it for shared capacity, like a class, a tour, or a multi-seat venue.
I set a 4-chair salon's Max Reservations per Slot to 4. Four customers can then book the same hour before the slot closes.
Done: the slot's Availability tab shows your chosen number, and a fifth booking attempt for that same slot cannot go through.
Step 3: Set Your Booking Window (Lead Time and Horizon)
Your booking window has two edges: how soon customers can book, and how far ahead they can book. ARB sets both from the Availability tab.
Lead time is the minimum notice a booking needs before it starts. The field A slot is reservable after minimum sets it in hours, days, or weeks. Setting it to 0 means a slot is bookable immediately.
Booking horizon is the furthest future date customers can select. The field A slot is reservable till sets it. Setting it to 1 week means the calendar shows exactly 7 reservable days, and every later date is not selectable.
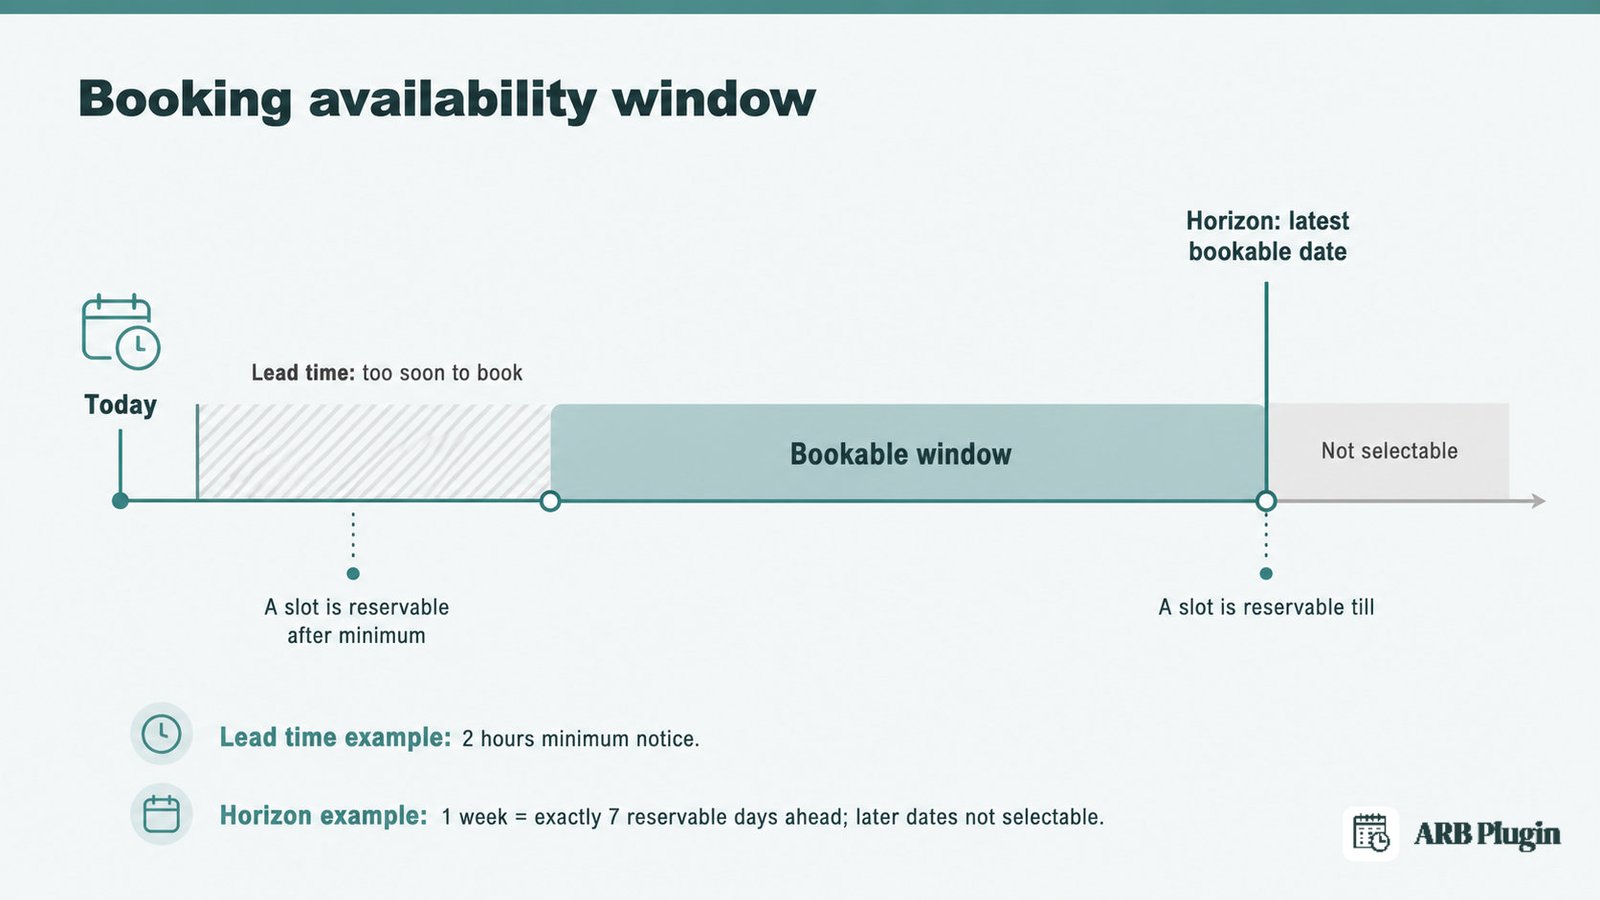
I set a spa's lead time to 2 hours. A same-day walk-in cannot book five minutes before arrival. I also set its horizon to 1 month, so the calendar never lets a customer jump six months ahead.
Done: the calendar's earliest and latest selectable dates match your lead time and horizon exactly.
Step 4: Choose Your Bookable Days and Hours
Bookable days and hours come from ARB's Add Range menu, one control that covers day-of-week, date-range, and time-range rules together.
Follow these steps to set your bookable days and hours.
- Open the Availability tab and click Add Range.
- Choose a range type: Date range, Range of months, Range of weeks, Range of days (for example, Sunday to Monday), Time Ranges for the whole week, Date Range with Time, or Monday to Sunday.
- Add as many ranges as you need. Each one stacks on the others.
- Set 1st slot starts at to the day's first bookable time.
To open Monday through Friday only, add one Range of days from Monday to Friday with your hours, then leave the weekend out.
Most booking tools split this job across several settings screens when a search asks about different hours per day. Expect a per-day dropdown list, a separate per-service override, and a store-wide business-hours toggle. ARB folds day-of-week, date-range, and time-range rules into one Add Range menu, added as many times as a schedule needs.
See every range option in WooCommerce booking availability rules.
Done: the front-end calendar only opens the days and hours your ranges define, and every other day shows as unavailable.
Step 5: Add Buffer Time Between Bookings
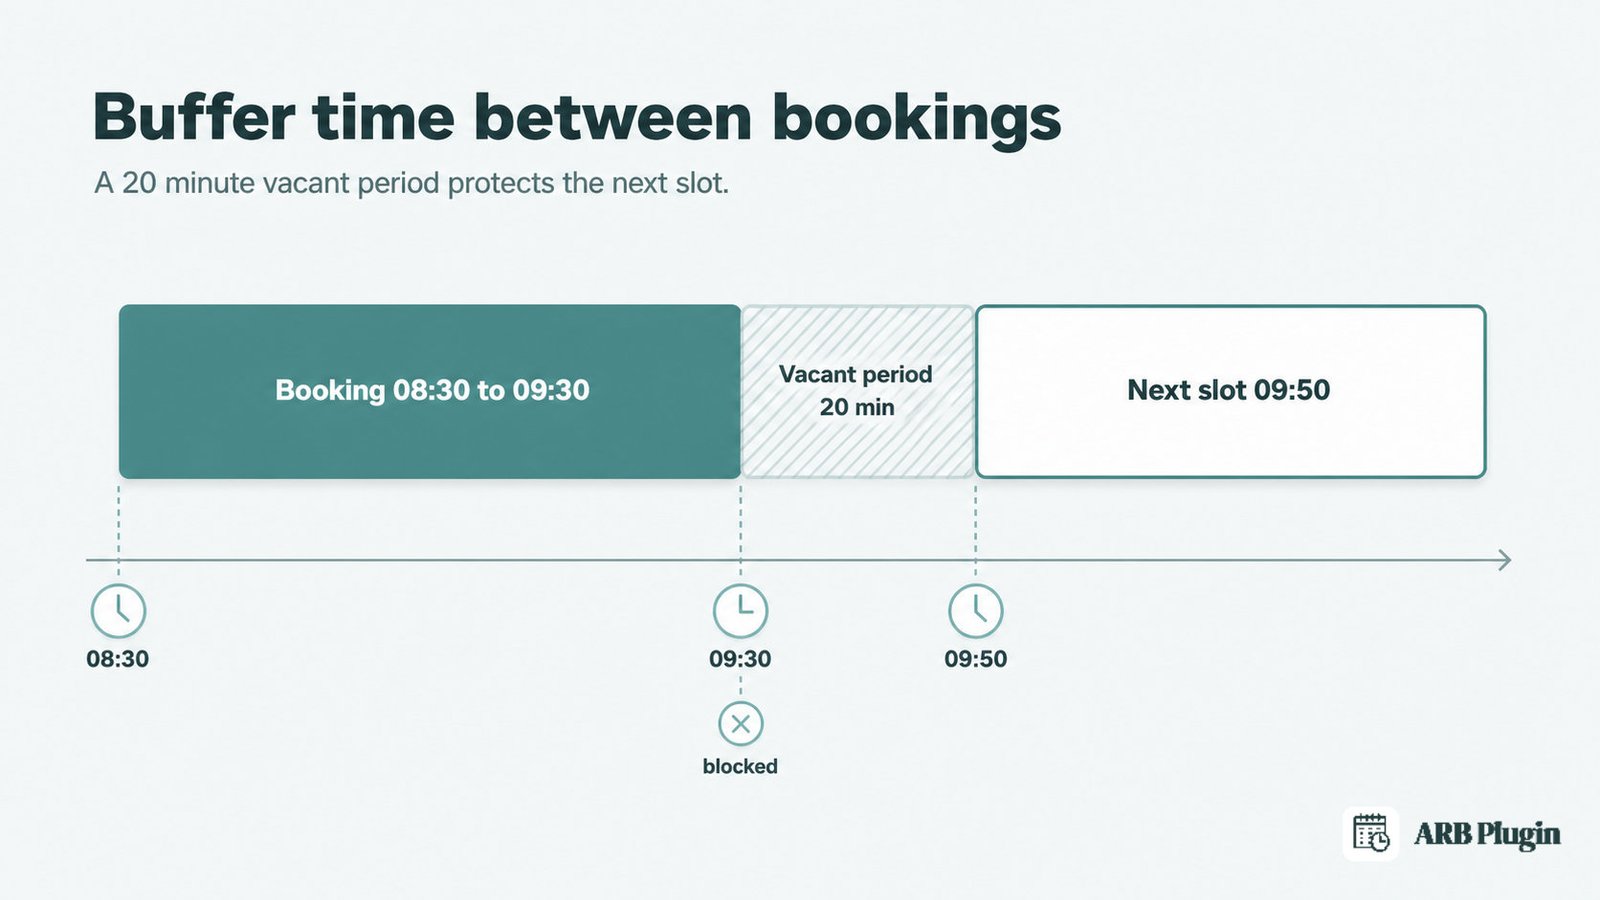
Buffer time stops back-to-back bookings from starting before you have reset the room or caught your breath. ARB's Requires a vacant period of field sets it.
I set an 8:30 to 9:30 appointment with a 20-minute vacant period. ARB pushed the next available slot to 09:50, not 09:30. A treatment room that needs 30 minutes to reset between clients uses the same field, set to 30 minutes instead.
For a deeper walkthrough, see how to set buffer time.
Done: the calendar hides every slot that starts inside your vacant period, so no customer can select it.
Step 6: Block Out Specific Dates and Times
Blocking a date works the same way in most booking systems: open the availability settings, select the date range, and mark it unavailable. ARB's version of that step uses Add Range.
Follow these steps to block out specific dates and times.
- Open the Availability tab and click Add Range.
- Choose Date range with time.
- Enter the exact dates and the time window to close.
I blocked 05:00 PM to 09:00 PM on a single date this way, per ARB documentation. That window disappeared from every customer's calendar. To close for a holiday week instead, add one Date Range with Time covering the full week rather than a single evening.
Done: the blocked dates or times no longer appear as selectable on the front-end calendar.
Step 7: Set Different Availability per Staff or Resource
Different staff members or rooms often keep different hours, and a shared schedule causes the exact double-booking a single-calendar setup cannot catch. ARB assigns availability per resource.
Follow these steps to set different availability for each staff member or resource.
- Enable resources on the product's Resources tab.
- Click Add/link Resource for each staff member, room, or unit.
- Click Edit resource, then set that resource's own Availability and Available Quantity.
I set one lecturer available Tuesday and Thursday. A second lecturer stays available Friday and Saturday, each with separate hours. When a customer picks a resource on the front end, the calendar filters to that resource's own schedule only.
Each resource is configured under booking resources.
Done: choosing one resource on the booking form shows only that resource's available days and times.
Step 8: Show Remaining Slots (Optional)
An optional urgency counter shows customers how many slots remain before a time fills up. ARB's Show quantity of left available time slots toggle adds it.
Turn the toggle on, and the front end displays a live count, such as "25," next to each time slot with capacity remaining. I use it on high-demand slots, where showing scarcity nudges a hesitant customer to book now instead of waiting.
Done: the booking form shows a remaining-slots number next to any time slot this toggle applies to.
Common Booking Availability Mistakes to Avoid
The single most damaging booking-availability mistake is leaving capacity at its default, which lets a store double-book every slot. The remedy is setting Max Reservations per Slot before the product goes live.
Five mistakes to avoid:
- Leaving capacity unset. The store accepts unlimited bookings per slot. Set Max Reservations per Slot to a real number before publishing (Step 2).
- Setting lead time to zero when you need prep. Same-day bookings arrive with no time to prepare. Set A slot is reservable after minimum to your actual prep window (Step 3).
- Skipping buffer time. Bookings stack back-to-back with no turnaround. Reminders alone will not reduce no-shows caused by a rushed, late appointment. Set Requires a vacant period of to your real reset time (Step 5).
- Setting availability on the product but not per resource. Every staff member shares one schedule, so one person's hours apply to all of them. Set availability per resource under Edit resource (Step 7).
- Leaving required confirmation on when you expect instant payment. No payment method shows at checkout, which can look like a broken form to a customer trying to accept payments for appointments. Turn off required confirmation, or keep it on only for a genuine quote-first workflow.
FAQs
Do I need a plugin to set booking availability in WordPress?
Yes. WooCommerce alone ships no booking calendar or availability logic. A booking plugin adds the reservable product type that carries these rules.
How long does it take to set up booking availability?
Setting up booking availability takes about 15 to 20 minutes per product. That estimate assumes you already know your hours, capacity, and closed days.
How do I set different hours for each day of the week?
Add a Range of days for each day or day group under Add Range. Then set that range's own time slots.
How do I block out holidays or specific dates?
Add Range, then choose Date range with time, and enter the dates and hours to close.
Can I set different availability for each staff member or resource?
Yes. Enable resources, add each staff member or room as a resource, then edit that resource's own Availability and Available Quantity.
How far in advance can customers book, and how do I limit last-minute bookings?
A slot is reservable till sets how far ahead customers can book. A slot is reservable after minimum sets how much notice a last-minute booking needs.
How do I add a break between appointments?
Set Requires a vacant period of to the minutes needed between one reservation ending and the next one starting.
Why don't payment methods show at checkout after I set availability?
Required confirmation is turned on, which hides payment methods until you approve the booking. Turn it off for instant payment.
How do I cut down on no-shows once availability is live?
Pair availability with reminders. See how to send appointment reminders for the notification setup.
You now know every availability control a serious booking store needs: capacity, lead time, horizon, bookable ranges, buffer time, blackout dates, and per-resource rules. ARB puts all of them inside one reservable product's own booking tabs, inside the WooCommerce checkout you already run. You get every control for a one-time license instead of a recurring plan. Try the live ARB demo and test these rules yourself before you configure your own product.