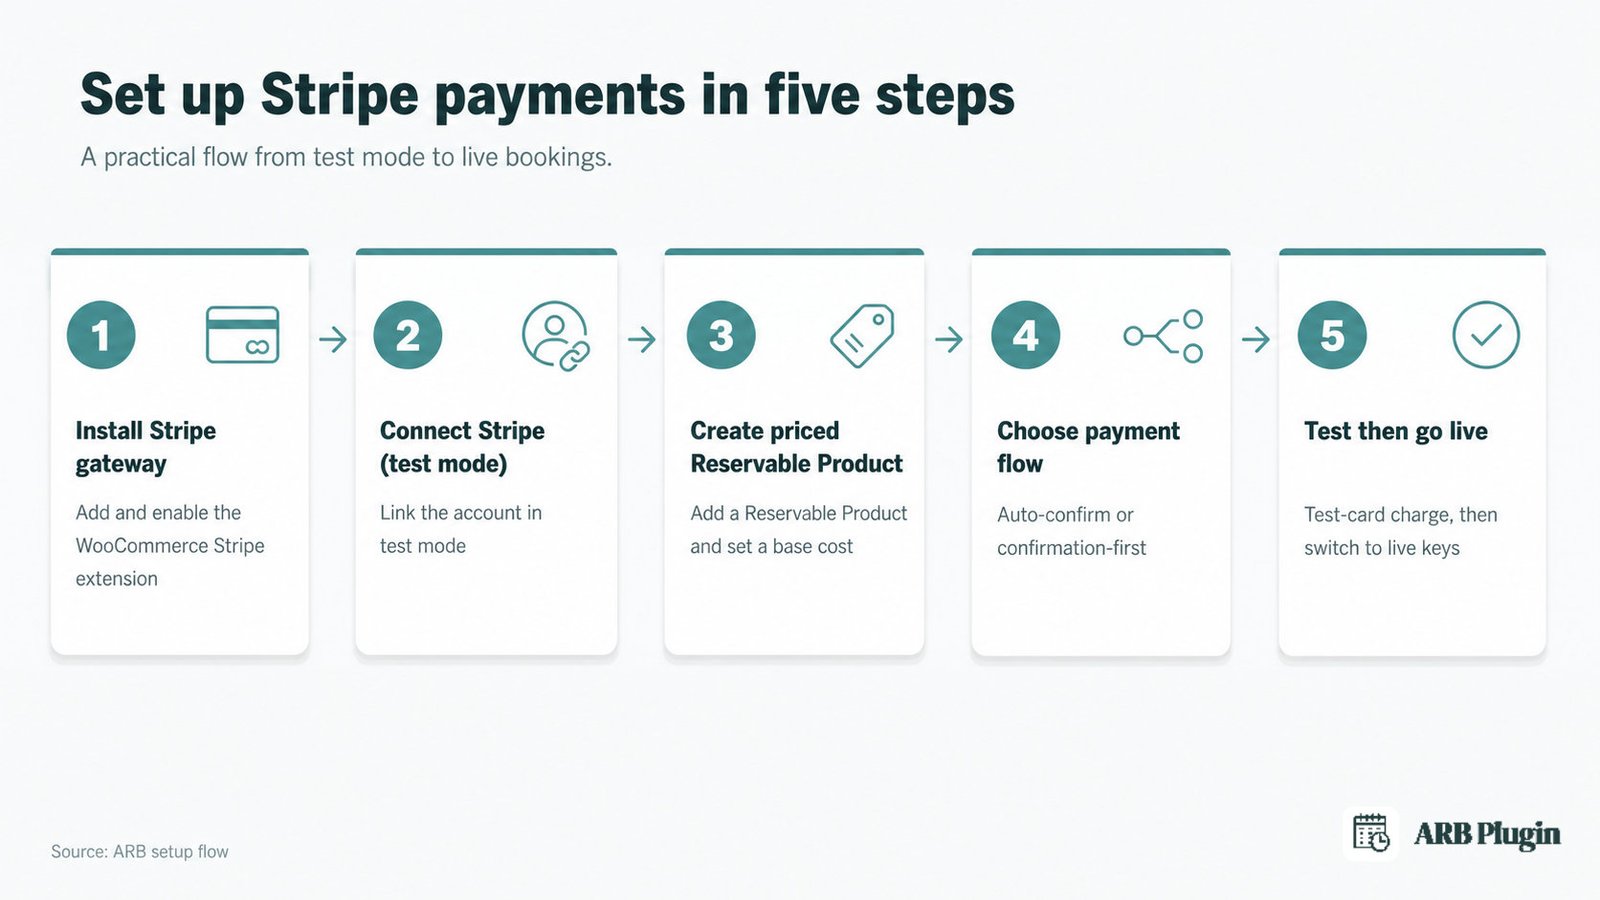
Accepting Stripe payments for bookings in ARB takes five steps. Install the WooCommerce Stripe gateway, connect your Stripe account, and create a priced Reservable Product. Then choose your payment flow and test before going live. ARB adds no separate payment system of its own; it charges through the WooCommerce checkout you already run.
Below: what "Stripe for bookings" means in ARB, what you need before Step 1, and the five setup steps. Also covered: auto-confirm versus confirmation-required, and what Stripe's fee actually costs you.
What It Means to Take Stripe Payments for Bookings
Taking Stripe payments for bookings means a customer's card is charged through your normal WooCommerce checkout the moment they reserve. ARB routes every booking, with its calculated price, into that same checkout. No separate booking-payment system runs alongside WooCommerce.
ARB works with every payment gateway WooCommerce supports: Stripe, PayPal, Square, Amazon Pay, PayFast, eWay, plus Cheque Payments, Bank Transfer, and Cash on Delivery. Once you create a Reservable Product, a customer can book it. That product's price flows straight into the WooCommerce cart and checkout, like any other purchase. Whichever gateway you enabled processes the charge.
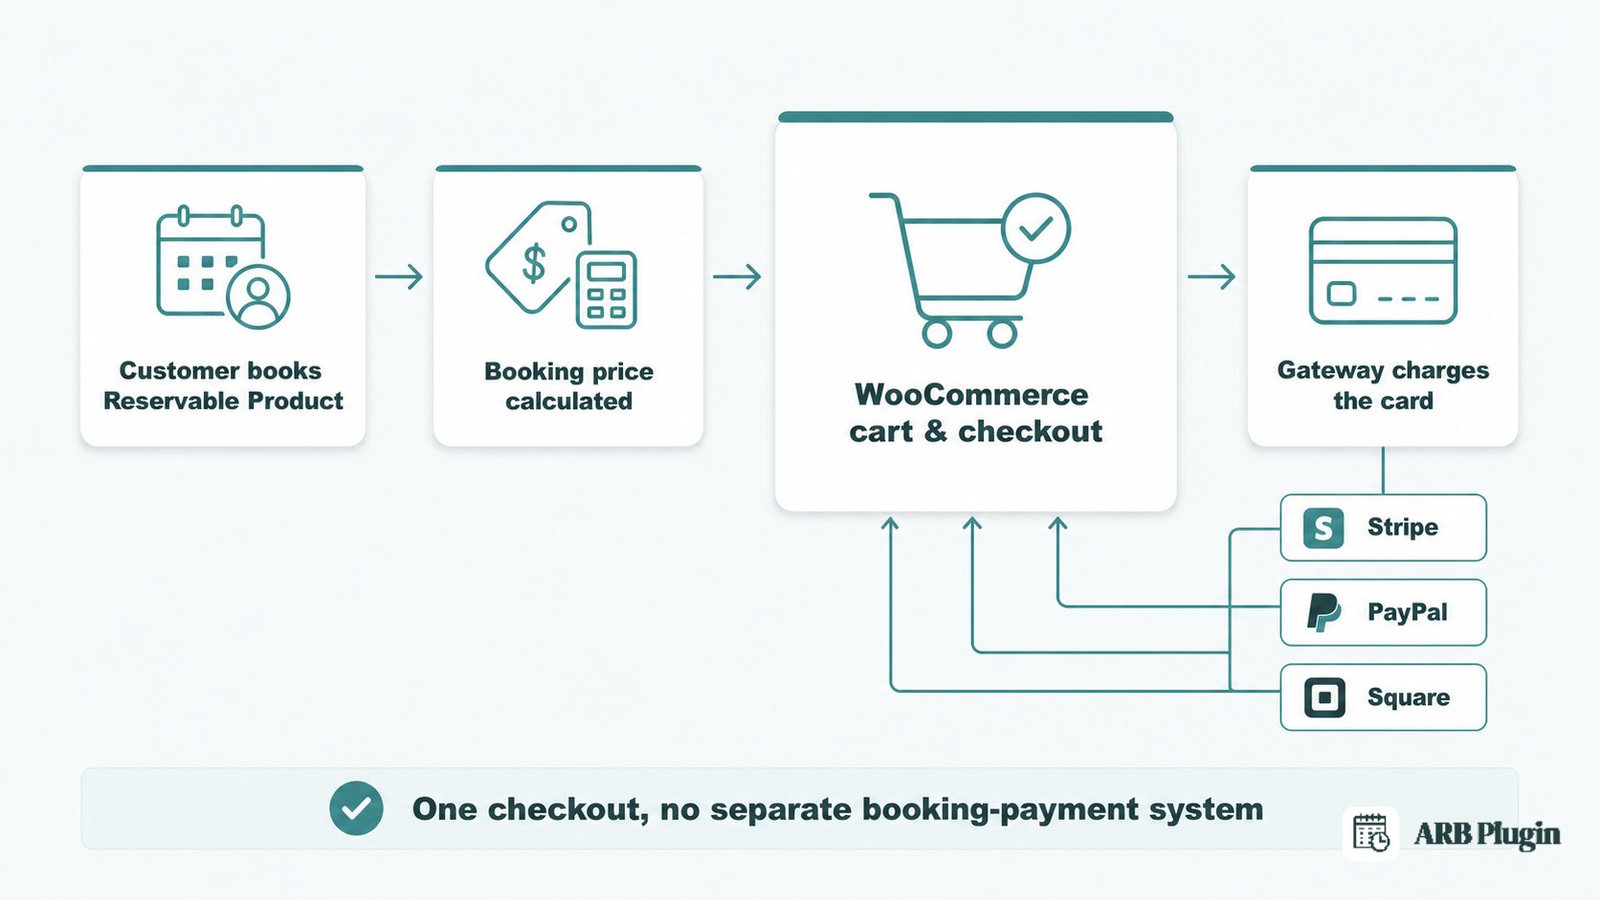
This differs from the general case of accepting payments for appointments, where the payment layer often sits outside the booking tool. ARB has no parallel payment system to configure. Here's how to set it up in ARB.
Before You Begin: What You Need in ARB and Stripe
You need five things ready before Step 1: a live WooCommerce store, ARB installed and licensed, and a free Stripe account. ARB's one-time license already includes every gateway, so there is no tier to check.
- A live WooCommerce store with WooCommerce installed and active. ARB is a WooCommerce extension, so it requires WooCommerce to function.
- ARB installed and activated, with its 9-digit Activation Token Number entered under ARB Settings (from your Envato item purchase code).
- A Stripe account, free to create. Stripe charges its own per-transaction processing fee; ARB adds no fee on top.
- No plan tiers to worry about. ARB ships on a one-time ARB license with every payment gateway included, so Stripe works the same whether you bought it yesterday or three years ago.
- Your starting point: WooCommerce > Settings > Payments, where every gateway, including Stripe, gets enabled.
Not using ARB yet? See a live ARB booking form take a payment before you buy.
How to Accept Stripe Payments for Bookings in ARB: Step by Step
Five steps take a WooCommerce store from no card payments to a live, tested Stripe checkout on a booking. Install the gateway, connect the account, build a priced Reservable Product, pick a payment flow, then test before going live.
Step 1: Install the WooCommerce Stripe payment gateway
Done looks like: Stripe appears as an enabled payment method under WooCommerce > Settings > Payments.
Install the WooCommerce Stripe payment gateway extension, activate it, then enable it from the Payments settings screen. ARB does not add its own Stripe setting. Once Stripe is enabled in WooCommerce, every ARB Reservable Product inherits it automatically, the same way it inherits PayPal, Square, and other gateways.
[Screenshot needed: WooCommerce > Settings > Payments with Stripe toggled on] Alt: WooCommerce Payments settings screen showing the Stripe row with its toggle switched on and enabled.
Step 2: Connect your Stripe account (API keys and Stripe Connect)
Done looks like: Stripe shows as connected in test mode on the Payments settings screen.
From WooCommerce > Settings > Payments > Stripe, click Complete setup to connect through Stripe Connect, or paste your Stripe API keys directly. Use your test keys first and leave test mode on while you finish setup; live keys come in at Step 5. WooCommerce's own "Connecting to a Stripe account" guide walks through both connection paths.
If you manage more than one Stripe account, confirm the connected account matches the one you expect before you go further. Community threads on Stripe-WooCommerce setup describe transactions landing in the wrong connected account after a rushed setup. Avoid that mismatch by checking the account name on the Complete setup screen.
[Screenshot needed: Stripe "Connect / Complete setup" button and test/live toggle] Alt: WooCommerce Stripe settings panel showing the Complete setup button and the test mode toggle switched on.
Step 3: Create a Reservable Product and set a price
Done looks like: a bookable product exists with a price that will flow straight to Stripe at checkout.
Go to Products > Add New, then choose Reservable Product from the Product Data dropdown. Open the Costs tab and set a Base Cost, or use Add Range for weekend surcharges or group discounts. Range types include slot count, person count, date, time, and day. Whatever ARB calculates for a booking is exactly what Stripe charges: there is no separate pricing step for payments. For the full build-out of availability, persons, and resources, see how to add booking to WooCommerce.
[Screenshot needed: Product data dropdown showing "Reservable Product" plus Costs tab with a price] Alt: WooCommerce Product Data dropdown set to Reservable Product, with the Costs tab open and a Base Cost value entered.
Step 4: Choose auto-confirm-on-payment or confirmation-first
Done looks like: you have decided whether Stripe charges the card instantly at checkout or only after you approve the booking.
The General tab's Checkbox Fields control whether a booking requires confirmation. With confirmation OFF, the Stripe field shows at checkout and the customer pays immediately. The order auto-completes if the product is virtual and downloadable; otherwise it moves to Processing. With confirmation ON, no payment method shows at checkout at all. Instead, you set Status = Confirmed from WP-Admin > Reservations > Edit Reservation. The customer then gets an email with a My Account page link where they pay through Stripe.
[Screenshot needed: General tab "requires confirmation" checkbox state] Alt: ARB General tab showing the requires-confirmation checkbox, with a caption noting its effect on checkout.
Step 5: Test a booking before going live
Done looks like: a successful test charge appears in your Stripe dashboard, then Stripe is switched to live mode.
With Stripe still in test mode, place a booking using a Stripe test card. Confirm the order status behaves the way Step 4 described for your chosen flow. Once the test charge and order status look right, open WooCommerce > Settings > Payments > Stripe. Turn off test mode and add your live API keys, or complete the live Stripe Connect flow. Refunds and cancellations after that run through WooCommerce and Stripe as normal.
[Screenshot needed: front-end booking form at checkout showing Stripe card field in test mode] Alt: Front-end ARB booking checkout showing the Stripe card entry field with a test-mode notice visible.
See every gateway and tool ARB connects to on the ARB integrations page.
Auto-Confirm vs Confirmation-Required: Choosing the Right Payment Flow
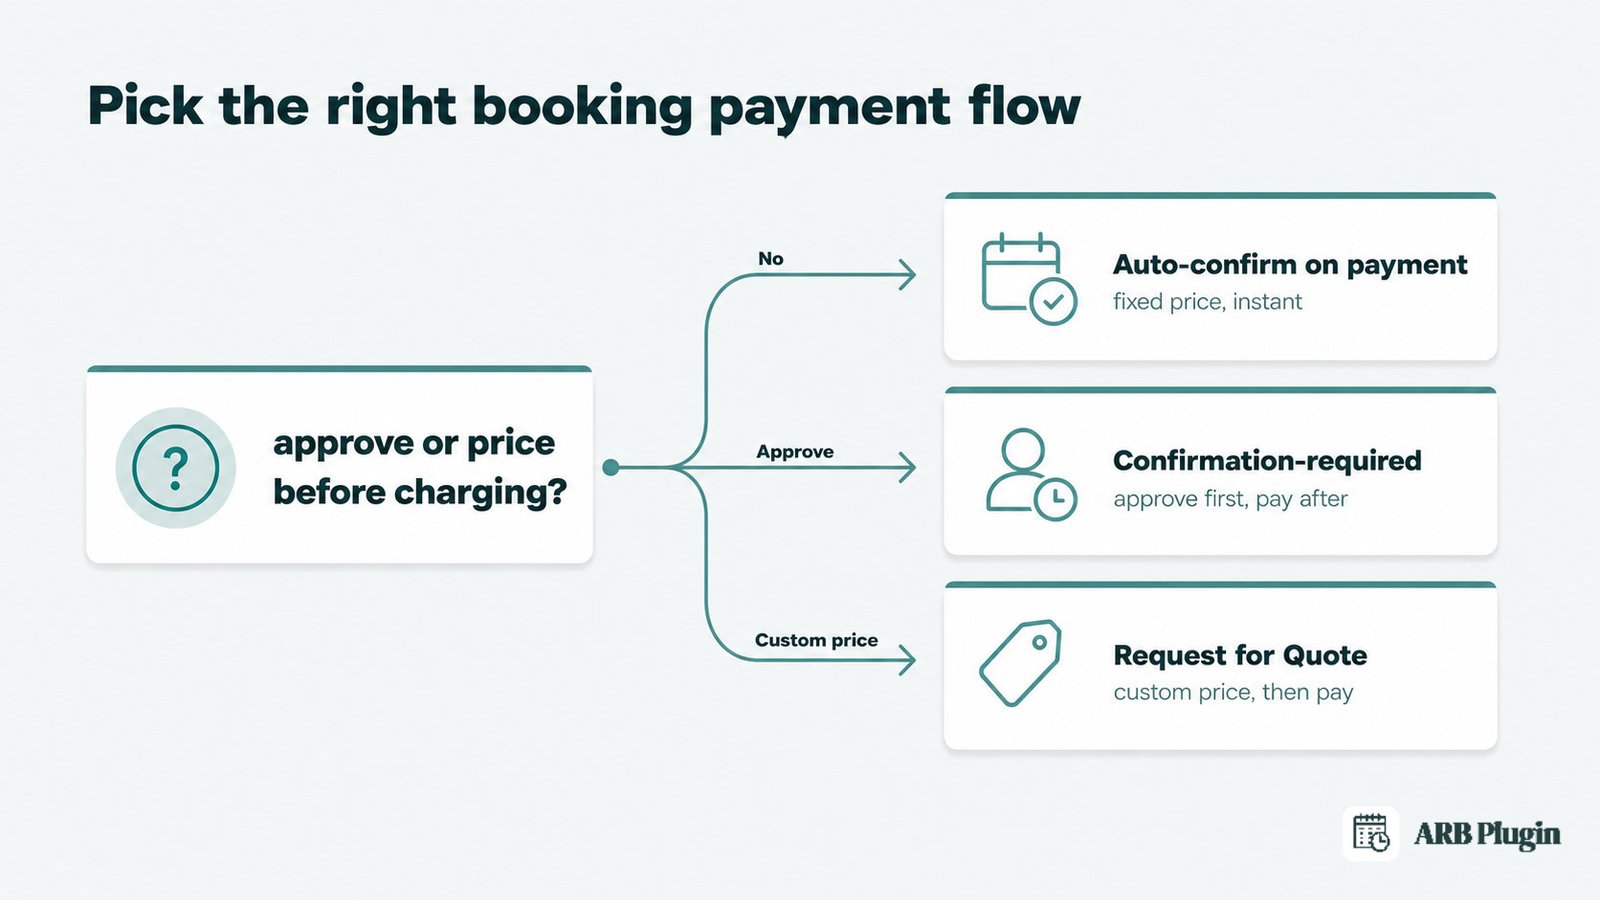
ARB's confirmation setting is the real fork in how Stripe gets charged. The table below compares the three payment flows ARB supports.
| Flow | When Stripe is charged | Shows at checkout? | Resulting order status | Best for |
|---|---|---|---|---|
| Auto-confirm on payment | Instantly, at checkout | Yes, Stripe field is visible | Completed (virtual + downloadable) or Processing (all other products) | Instant-book services with a fixed price |
| Confirmation-required | After you set Status to Confirmed | No, no payment method appears | Unpaid until you confirm, then paid via the My Account link | Approval-first or high-touch bookings |
| Request for Quote (RFQ) | After you set a custom price on the quote | No, the form collects a request, not a card | Awaiting quote, then paid once you send a price | Negotiated or custom-scope jobs |
Auto-confirm suits a spa slot or a rental night with a fixed, known price. Confirmation-required suits a consultation you want to vet first. Request for Quote suits a job you cannot price until you see the details; the admin sets a custom price before any Stripe charge happens.
Pair the payment flow with your booking availability and time slots, then automatically send appointment reminders once the booking is paid.
Stripe Fees, Full Payments, and Deposits for Bookings
Stripe charges its own standard processing fee on every booking payment, published at 2.9 percent plus 30 cents per successful US card transaction. ARB adds no transaction fee of its own. ARB also charges the full booking amount through Stripe at checkout; it has no native partial-deposit option.
That fee is Stripe's published pricing, not an ARB markup. The same rate applies whether you use ARB, WooCommerce Bookings, or any other WooCommerce-based booking tool. To collect a deposit for bookings instead of the full price, you need a separate WooCommerce deposits extension. ARB core does not split a payment into partial amounts.
The nearest native alternatives to a deposit are confirmation-required and Request for Quote: both delay the Stripe charge until after you approve or price the booking, but neither collects a partial amount. The customer still pays in full once payment happens.
Tips for Taking Stripe Booking Payments in ARB
The highest-impact tip: decide your confirmation setting first, since it controls whether Stripe ever shows at checkout at all.
- Keep confirmation OFF for instant Stripe payment. Turn "requires confirmation" ON only when you genuinely need to vet a booking before the customer pays.
- Mark instant, no-shipping bookings as virtual and downloadable. Paid orders then auto-complete instead of sitting in Processing, which keeps your reservation list clean.
- Use the Costs tab's Add Range for surcharges and discounts. A weekend surcharge or a group discount adjusts the total automatically, and Stripe charges the adjusted amount without any extra configuration.
- Offer PayPal alongside Stripe. Both are WooCommerce gateways; enable both under Payments so the customer picks at checkout.
- Use Request for Quote for custom-priced jobs. You set the price before any Stripe charge happens, which suits work you cannot price from a fixed rate card.
Own ARB outright, with every payment gateway already included in the license you bought once.
FAQs
Does ARB charge extra fees on Stripe booking payments?
No. ARB adds no transaction fee on top of a Stripe payment. Only Stripe's standard processing fee, 2.9 percent plus 30 cents per successful US card transaction, applies.
Is Stripe available on ARB's free plan?
ARB has no free plan and no plan tiers at all; it is a one-time license. Stripe, a free WooCommerce gateway, works the same on that single license as every other supported gateway.
Can I take a deposit or partial payment for a booking with Stripe?
Not natively. ARB charges the full booking amount through Stripe at checkout. To collect a deposit instead, add a WooCommerce deposits extension, or use Request for Quote or confirmation-required bookings to charge after you approve the reservation.
Why don't I see Stripe at checkout on my booking?
Because the product requires confirmation. Disable "requires confirmation" on the product's General tab to show Stripe at checkout immediately. Leave it on instead, and the customer pays via the My Account link once you confirm the booking.
Can I use Stripe and PayPal together for bookings?
Yes. Enable both under WooCommerce > Settings > Payments, and the customer chooses either one at checkout.
Does Stripe work with ARB's Request-a-Quote bookings?
Yes. The admin sets a custom price on the quote first, then the customer pays that price through Stripe from their My Account page.
How do I switch Stripe from test mode to live?
Turn off test mode in the WooCommerce Stripe settings and add your live API keys, or complete the live Stripe Connect flow. Place one small real charge afterward to confirm live mode works before announcing your booking flow publicly.
Stripe on ARB bookings runs through the same WooCommerce checkout your store already uses, not a separate system. Pick auto-confirm for instant-pay bookings, or confirmation-required and Request for Quote when you need to approve first. Remember that a true deposit needs a separate extension, since ARB always charges in full. For the full picture of how to add online booking to WordPress, start there before layering Stripe on top. Try the booking flow yourself in the live demo above.