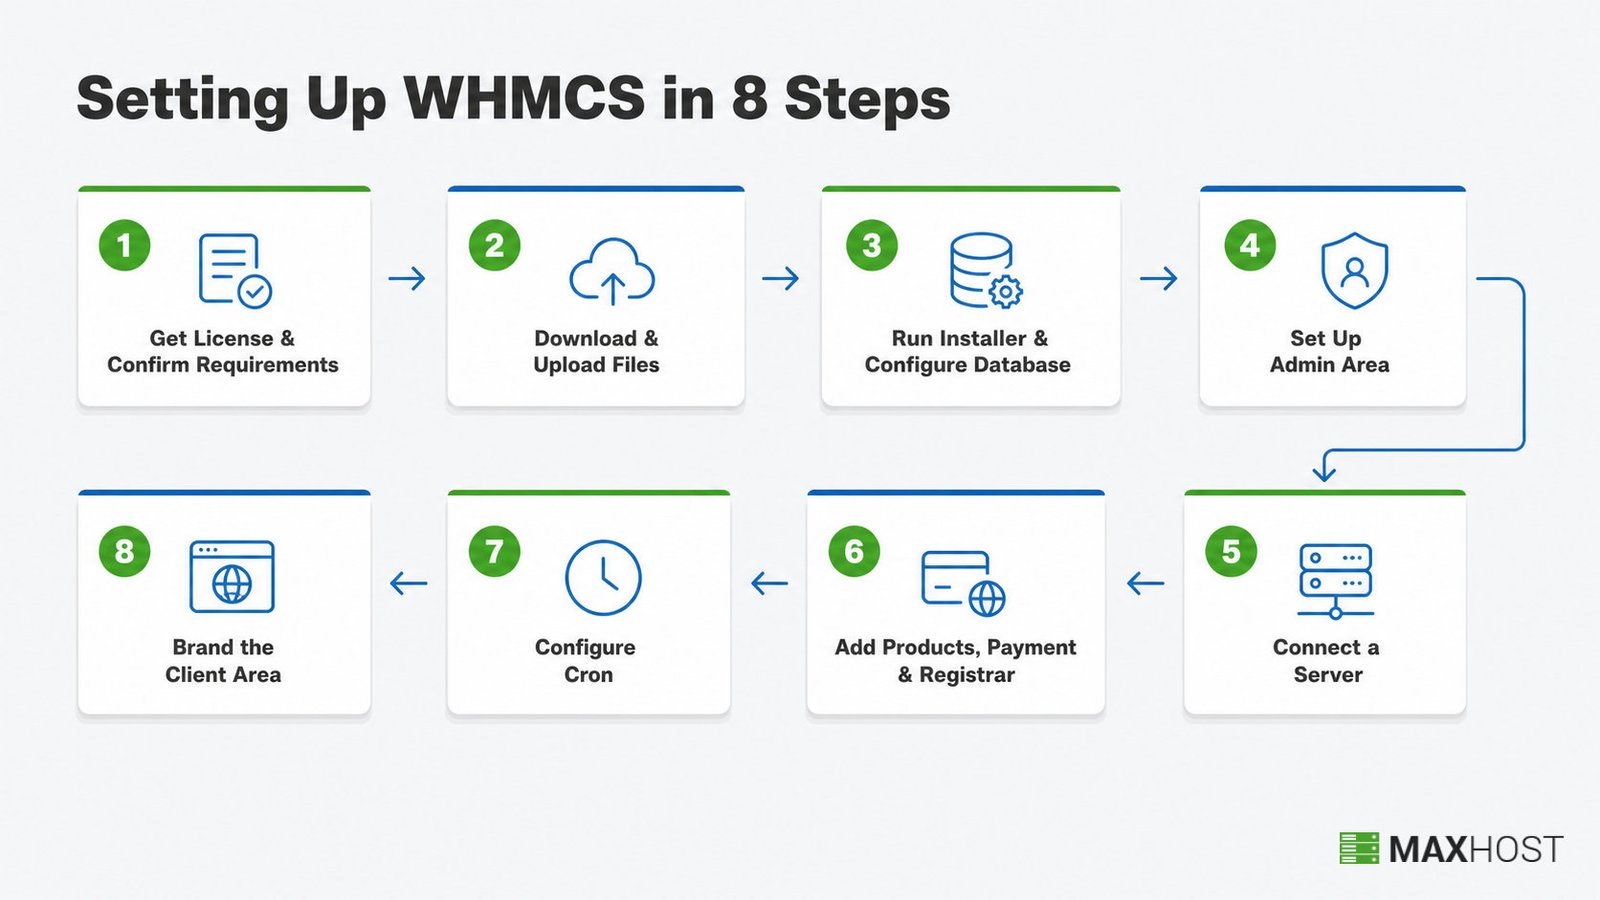
Setting up WHMCS for a hosting business takes eight steps. They run from licensing and requirements through download, installation, admin and server configuration, products and payments, cron automation, and client-area branding. The install script itself usually finishes in under 15 minutes once the server is ready.
This guide shows how to complete each step in order. It also shows how to avoid the mistakes that break billing later. The last step covers making the client area match your WordPress site once WHMCS is live.
What Does Setting Up WHMCS Involve?
Setting up WHMCS means installing the billing and provisioning platform and connecting it to a hosting control panel. It also means configuring products, payments, and automation until the system can take orders and provision accounts without manual work. A finished setup covers all eight areas below, not just the install script.
WHMCS runs as a self-hosted PHP application on a Linux, Apache, MySQL, PHP (LAMP) server. The admin area handles configuration, billing, and support, while the client area is where customers sign up, pay, and manage their accounts. For the full definition of the platform itself, see what is whmcs.
A hosting business typically completes this setup once, before it accepts its first paying customer. Reconfiguring it from scratch rarely happens outside a full server migration, so getting the sequence right the first time matters.
What You Need Before You Start
The most overlooked prerequisite is server compliance. Many failed WHMCS installs trace to a server that does not yet meet the PHP, MySQL, and extension requirements. The installer itself is rarely the actual cause.
Before you start:
- Role: whoever holds server or hosting-panel access, since the install needs file-upload and database-creation rights.
- Time: the install script typically finishes in under 15 minutes once the server is ready. Full configuration, including the setup wizard, security hardening, and cron, takes longer.
- Inputs: a WHMCS license key, FTP or file-manager access, and MySQL database credentials with the privileges listed in Step 3.
- Tools: a LAMP-style server or hosting account that meets the requirements in Step 1, plus DNS access if you plan to run WHMCS on its own subdomain.
Put WHMCS on a dedicated subdomain, such as billing.example.com, rather than a subfolder of your main site. A subdomain reads as more professional and keeps billing traffic separate from your marketing pages.
Step 1: Get a WHMCS License and Confirm Your Server Meets the Requirements
Getting WHMCS running starts with buying a license and confirming your server can run it. Skipping the requirements check is the fastest way to stall an install partway through.
Purchase a WHMCS license from the WHMCS Members Area or an authorized reseller before you touch the server. Then confirm your server meets WHMCS's own system requirements, summarized below.
| Requirement | Minimum | Recommended |
|---|---|---|
| Operating system | Linux (no Windows support) | Linux |
| Web server | Apache 2.x | Apache 2.x |
| PHP | 8.2 | 8.3 |
| ionCube Loader | 13.0.2 | 14.4.0 |
| PHP memory limit | 64 MB | 128 MB |
| Database | MySQL 5.2 | MySQL 8.x |
| MySQL Strict Mode | Disabled | Disabled |
WHMCS also requires the cURL, GD2, IMAP, JSON, PDO, PDO_MySQL, Reflection, and XML PHP extensions, with cURL compiled against SSL. Ask your host to disable MySQL Strict Mode before you install. WHMCS does not support it, and an enabled Strict Mode produces database errors partway through setup.
Step 2: Download and Upload WHMCS to Your Server
Downloading and uploading WHMCS moves the platform's files from your license account onto the server you confirmed in Step 1. This step produces no visible result yet; it just stages the files the installer needs next.
Follow these steps to get the files onto your server.
- Download the WHMCS package as a ZIP file from your Members Area account.
- In cPanel, open File Manager, navigate to
public_html(or a subdomain's document root), and click Upload. - Select the ZIP file, then extract it once the upload finishes.
- If you do not have cPanel, upload the extracted files via FTP or SFTP instead.
Done. The WHMCS files sit in the target directory, and visiting that directory's URL in a browser redirects you to the installer.
Step 3: Run the Installer and Configure the Database
Running the installer creates WHMCS's core tables and the primary admin account. This is the step that turns uploaded files into a working application.
Create a MySQL database first, with a dedicated user. Grant that user these install-time privileges.
- ALTER
- CREATE
- DROP
- INDEX
- LOCK TABLES
- SELECT
- DELETE
- INSERT
- UPDATE
You can remove ALTER, CREATE, DROP, and INDEX after installation for daily operations, and re-add them only when you run an update.
With the database ready, complete the installer.
- Navigate to
yourdomain.com/install/install.phpin a browser. - Read and accept the WHMCS End User License Agreement.
- Let the installer check your PHP, extension, and permission requirements, and fix anything it flags.
- Enter your license key and the database name, user, and password.
- Create your primary admin account with a strong, unique password.
Once the installer finishes, delete the /install/ folder from your server. Leaving it in place is a known security gap, since anyone who finds the URL can attempt to reinstall over your live data.
Step 4: Set Up the Admin Area
Setting up the admin area means completing WHMCS's Getting Started Wizard, which appears the first time you log in. It walks through company details, payments, domains, and your first server.
The wizard's Company section collects your business name, address, and logo, all of which appear on invoices and client-facing pages. Its later sections cover payment gateways, a domain registrar, your first server, and an optional MarketConnect catalog. Steps 5 and 6 detail the server and payment parts.
Configure mail delivery separately, under Configuration > System Settings > General Settings, on the Mail tab. Connect an SMTP provider, Google Workspace, or Microsoft 365 account so WHMCS can send invoices, tickets, and automated notices.
The wizard reappears on every login at Configuration > Getting Started Wizard until you complete every section. You can also revisit it later to adjust any setting without starting over.
Step 5: Connect a Server for Provisioning
Connecting a server lets WHMCS automatically create, suspend, and terminate hosting accounts when orders and cancellations come in. Without this step, every account still has to be provisioned by hand.
Follow these steps to add your first server.
- Go to Configuration > System Settings > Servers, then click Add New Server.
- Select your control panel as the Module: cPanel, Plesk, or DirectAdmin are the three the wizard supports natively.
- For a cPanel server, enter the hostname or IP address, your WHM username, and an API token generated in WHM (current WHMCS versions use a token here, not a WHM password).
- For Plesk or DirectAdmin, enter the hostname or IP address plus the reseller credentials or login key your panel provides.
- Click Test Connection and confirm WHMCS reports success before saving.
- Click Save Changes.
Done. The server appears in your Servers list, and any product you assign to it can provision automatically once an order pays.
Step 6: Add Products, a Payment Gateway, and a Domain Registrar
Adding products and a payment gateway is what makes your WHMCS installation able to sell anything. Skip this step and your order form has nothing to check out.
You need at least one payment gateway active before you can sell. Activate one under Configuration > Apps & Integrations, or pick from the Getting Started Wizard's bundled options.
- PayPal Payments
- Stripe
- Bank Transfer
- Mail-In Payment
Add your hosting packages under Configuration > System Settings > Products/Services, and assign each one to the server you connected in Step 5. If you plan to sell domains, connect a registrar, such as Enom, under Configuration > System Settings > Domain Registrars. Set your TLD pricing before you publish the order form.
Step 7: Configure Cron for Automation
Configuring cron is what turns WHMCS from a manual admin panel into a system that runs itself. Without it, invoices, renewals, and suspensions never fire on schedule.
Set your server's system cron to the line below. It matches WHMCS's own cron documentation.
*/5 * * * * php -q /home/username/crons/cron.php WHMCS processes cron tasks at 5-minute granularity, so running it more often than every 5 minutes adds nothing. The hard floor is once per day, since some daily automation tasks, such as renewal reminders and suspensions, only complete when cron runs.
Step 8: Brand the Client Area
Branding the client area makes WHMCS's customer-facing pages, order forms, and invoices match the rest of your hosting business, instead of shipping WHMCS's default look.
Go to Configuration > System Settings > General Settings, then open the General tab. This is where you set your company name, your System URL, and your System Theme for the client area. WHMCS ships two default themes, including a current default called Twenty-One.
A WordPress hosting theme with bundled WHMCS templates installs through this same General tab setting. MaxHost's WHMCS integration is one example: it installs directly into WHMCS with no bridge plugin connecting the two systems. The client area then matches your WordPress marketing site, with no recurring sync fee.
Before you announce your site publicly, place at least one test order through the client area. Confirm the invoice generates, the payment processes, and, if you connected a server in Step 5, the account provisions correctly.
Common WHMCS Setup Mistakes to Avoid
The single most damaging mistake is skipping security hardening after installation, since an unhardened admin area is exposed the moment your site goes live. Four other mistakes recur often enough to name.
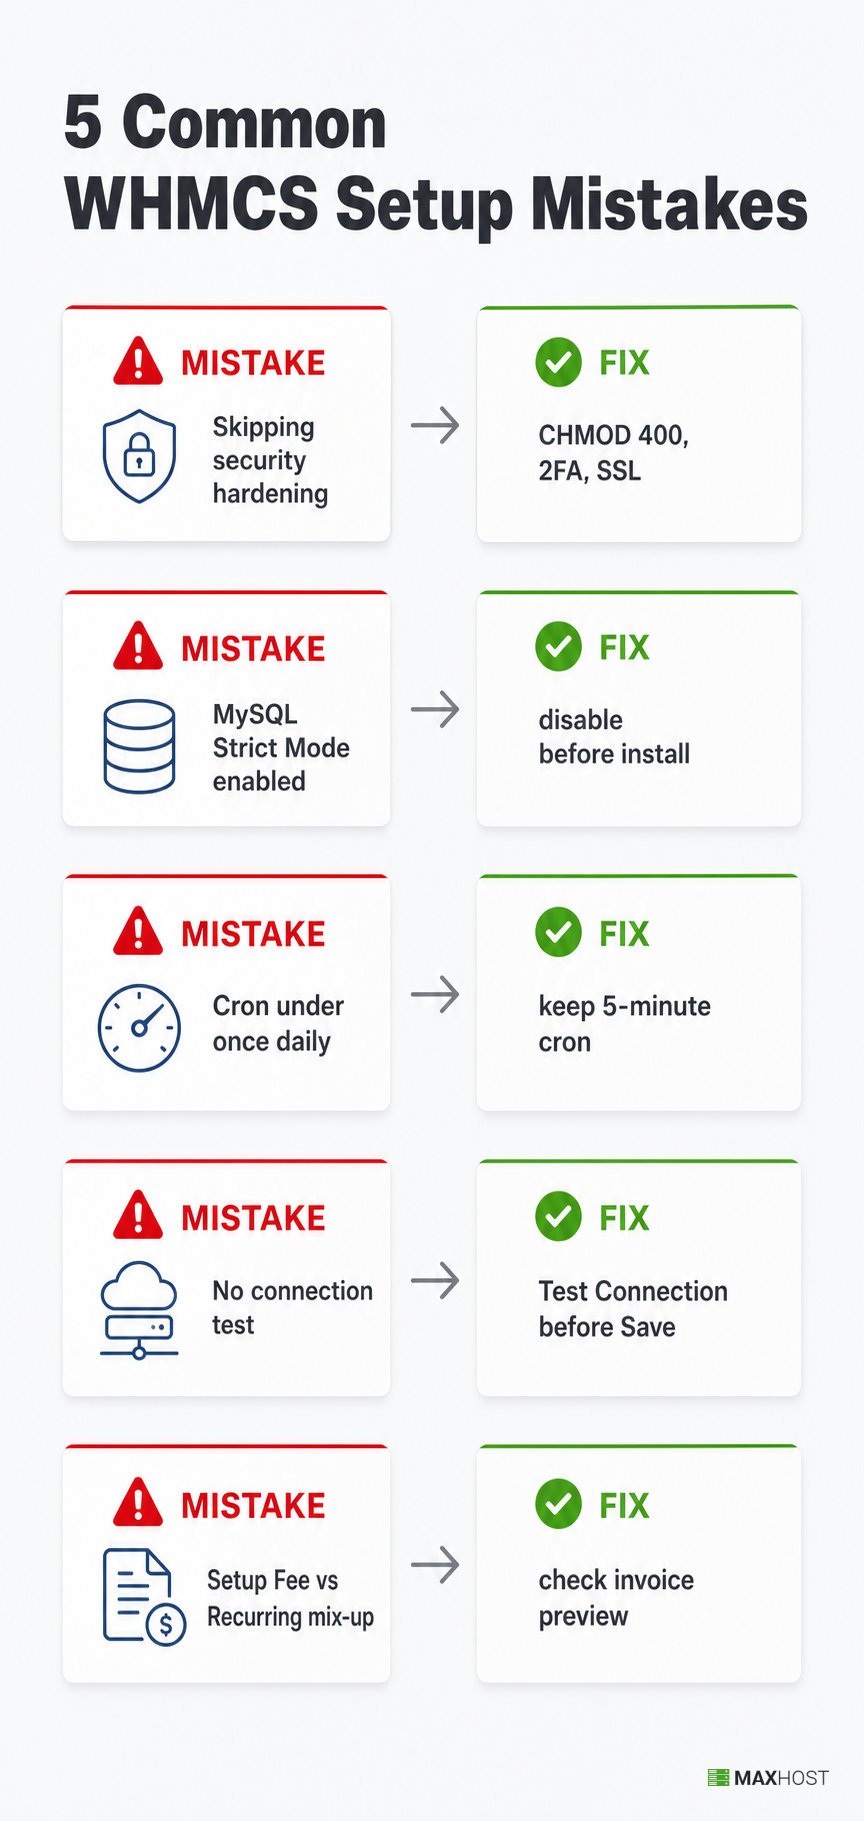
- Skipping security hardening. Consequence: an exposed admin login and world-writable directories. It happens because hardening feels optional once the site works. The remedy, per WHMCS's own security guidance: CHMOD
configuration.phpto 400, move the crons directory above the web root, rename the admin directory, restrict Admin Area access by IP where feasible, enable two-factor authentication for every admin user, and enforce SSL site-wide. - Leaving MySQL Strict Mode enabled. Consequence: database errors mid-install or mid-operation that look unrelated to the actual cause. It happens because Strict Mode is often the server's default. The remedy: disable it before you install, and confirm it stays disabled after any server-level update.
- Running cron less than once a day. Consequence: invoices, renewals, and suspensions stop firing on schedule. It happens because the cron entry gets added once and never checked again. The remedy: confirm the 5-minute cron line is active, and check your host's cron logs monthly.
- Not testing a server connection before saving it. Consequence: orders that appear to succeed but never provision an account. It happens because Test Connection feels like an extra click. The remedy: always click Test Connection and confirm success before Save Changes, every time you add or edit a server.
- Confusing the Setup Fee and Recurring columns when adding a product. Consequence: a one-time setup charge billed every renewal cycle, or a recurring fee that never bills at all. It happens because both fields sit next to each other in the product form. The remedy: check the invoice preview after saving any new product, before it goes live on the order form.
FAQs
How long does it take to set up WHMCS?
The install script alone typically finishes in under 15 minutes once the server meets the requirements. Full configuration, including the setup wizard, server connection, security hardening, and cron, usually takes longer than the install itself.
Do I need cPanel or WHM to use WHMCS?
No. cPanel, Plesk, and DirectAdmin are the three server modules the Getting Started Wizard supports natively, but WHMCS also connects to other panels through additional modules.
How often should the WHMCS cron job run?
Every 5 minutes is the recommended interval, and WHMCS processes tasks at that granularity regardless of how often you schedule it. Once per day is the hard floor for daily automation tasks to complete.
Can I install WHMCS without a server module like cPanel?
Yes. A server module is only required to automate provisioning. You can run WHMCS purely for billing and manually provision accounts until you connect a server.
What is the difference between a WHMCS Bridge and installing WHMCS templates directly?
A Bridge is a plugin that embeds WHMCS pages inside WordPress and depends on both systems staying compatible after every update. Installing templates directly into WHMCS, the approach this guide covers, skips that dependency. See what is whmcs bridge for the full mechanism and its update-breakage risk.
Do I need a WordPress hosting theme to use WHMCS?
No. WHMCS runs independently of WordPress. A WordPress hosting theme becomes relevant only if you want your WordPress marketing site and your WHMCS client area to look like one product. See how to integrate whmcs with wordpress for the available approaches.
Which WordPress hosting theme works with WHMCS?
Several WordPress hosting themes bundle WHMCS client-area templates or a Bridge plugin. The right one depends on whether you want to avoid a recurring Bridge fee. Compare the leading options in best whmcs wordpress themes.
Once WHMCS is installed, configured, and live, your client area still needs to look like it belongs to your hosting business. MaxHost's bundled WHMCS templates install directly into the General Settings theme picker from Step 8. They need no bridge plugin and no recurring sync fee to maintain. View the MaxHost demo to see the matched WordPress and WHMCS client-area layouts before you buy.