There are total 20 WHMCS templates available for you. The 20 templates are:
- maxhostaltv813
- maxhostaltv813-tw [*Recommended]
- maxhostaltv812
- maxhostaltv812-tw
- maxhostaltv811
- maxhostaltv811-tw
- maxhostaltv810
- maxhostaltv810-tw
- maxhostaltv89
- maxhostaltv89-tw
- maxhostaltv88
- maxhostaltv88-tw
- maxhostaltv87
- maxhostaltv86
- maxhostaltv85
- maxhostaltv84
- maxhostaltv83
- maxhostaltv82
- maxhostaltv81
- maxhostaltv80
You need to use just 1 of them in your WHMCS installation. Which one? It depends on which version of WHMCS you are using. Here we are going to explain more so that you can choose the correct one for you:
- Use maxhostaltv813-tw template OR maxhostaltv813 template [ If your WHMCS version is 8.13.0 or later ]
- Use maxhostaltv812-tw template OR maxhostaltv812 template [ If your WHMCS version is 8.12.0 or 8.12.1 ]
- Use maxhostaltv811-tw template OR maxhostaltv811 [ If your WHMCS version is 8.11.0 to 8.11.2 ]
- Use maxhostaltv810-tw template OR maxhostaltv810 [ If your WHMCS version is 8.10.0 to 8.10.1 ]
- Use maxhostaltv89-tw template OR maxhostaltv89 [ If your WHMCS version is 8.9.0 ]
- Use maxhostaltv88-tw template OR maxhostaltv88 [ If your WHMCS version is 8.8.0 ]
- Use maxhostaltv87 [ If your WHMCS version is 8.7.0 to 8.7.3 ]
- Use maxhostaltv86 [ If your WHMCS version is 8.6.0 to 8.6.1 ]
- Use maxhostaltv85 [ If your WHMCS version is 8.5.0 to 8.5.1 ]
- Use maxhostaltv84 [ If your WHMCS version is 8.4.0 to 8.4.1 ]
- Use maxhostaltv83 template [ If your WHMCS version is 8.3.0 to 8.3.2 ]
- Use maxhostaltv82 template [ If your WHMCS version is 8.2.0 to 8.2.1 ]
- Use maxhostaltv81 template [ If your WHMCS version is 8.1.0 to 8.1.3 ]
- Use maxhostaltv80 template [ If your WHMCS version is 8.0.0 to 8.0.4 ]
How to Setup Maxhost Template on WHMCS
- Access your WHMCS site
Navigate your WHMCS site through FTP or cPanel. Now, navigate to the /templates directory of your WHMCS. The following screenshot is the ‘templates’ directory of your WHMCS installation.

- Upload the Maxhost template inside the ‘templates’ directory of WHMCS
Upload the Maxhost whmcs template folder (e.g. maxhostaltv811-tw folder) inside the ‘templates’ directory of your WHMCS. The following screenshot is showing you all the template folders, which are present in the WHMCS/templates folder of your purchased zip file (Maxhost – Web Hosting and Corporate WP Theme.zip).

Please note that if you find any of the above-mentioned template folders missing, open the ‘Read-me.txt‘ file present there and follow the instructions provided.

- Activate Maxhost template from your WHMCS admin
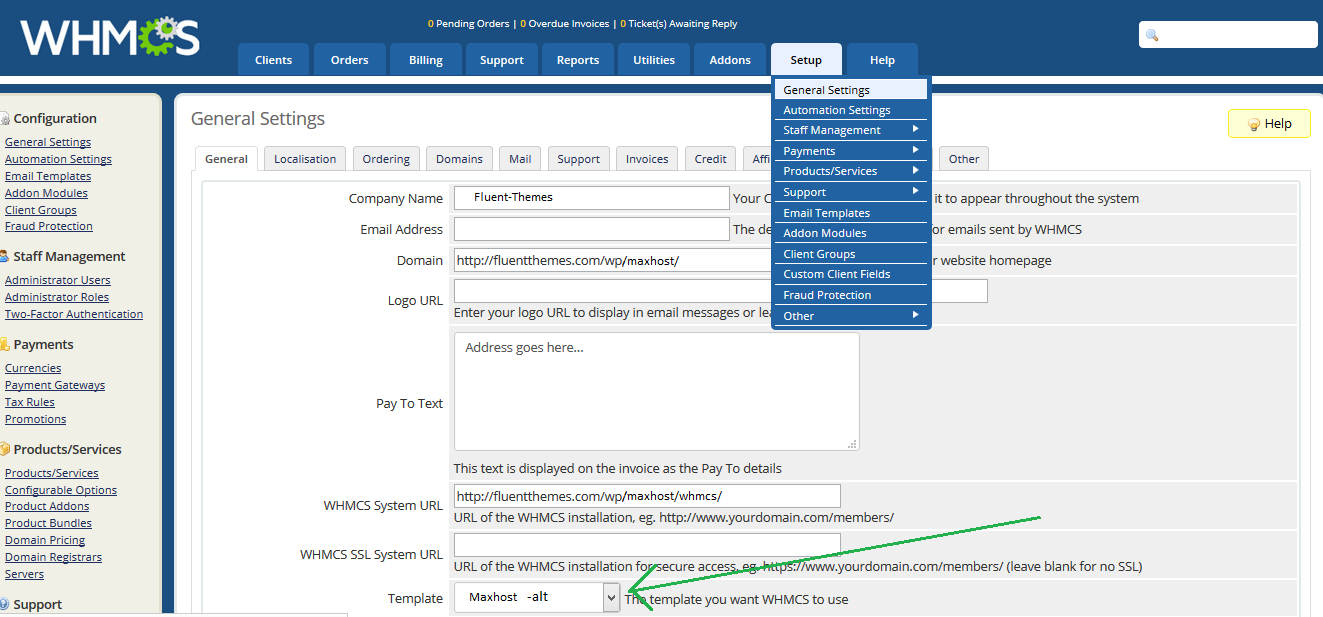
After successfully uploading your chosen template folder on your WHMCS, you can activate the template from your WHMCS admin. Login to your WHMCS admin panel and navigate to Admin > System Settings > General Settings > General tab. In this page you will find ‘Template’ option, where you will choose ‘Maxhost-Alt-Style-2’ as your template and click on ‘Save Changes’ button.
Maxhost-Alt-Style-2 template is Activated. Now you can visit the front-end of your WHMCS and you will find the template is ready with demo header and footer content.
How to Edit Header Content of the template
Step 1: First of all make sure your WordPress website‘s header customization including menu creations are done.
Step 2: Once you are satisfied then open your WordPress website in a browser and press ctrl+u. You will see a new tab is opened with the html of your site.
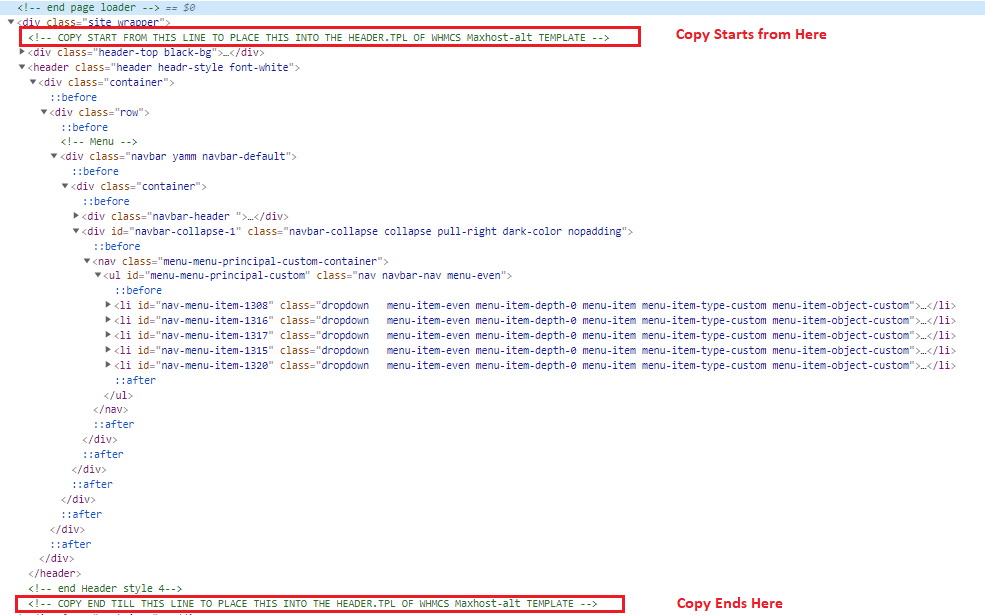
Step 3: Start copying html lines from where it says ‘COPY START FROM THIS LINE TO PLACE THIS INTO THE HEADER.TPL OF WHMCS Maxhost-alt TEMPLATE’ and Stop copying when it says COPY END TILL THIS LINE TO PLACE THIS INTO THE HEADER.TPL OF WHMCS Maxhost-alt TEMPLATE.
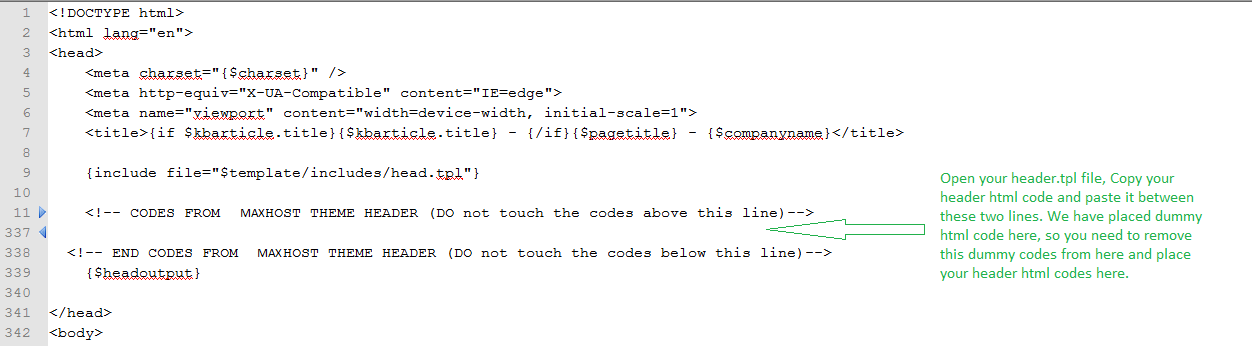
Step 4: Now navigate to the template folder (e.g. ‘maxhostaltv11-tw‘) and ‘edit’ the ‘header.tpl‘ file and paste the copied html into the header.tpl file. In the header.tpl file you will see a line says ‘CODES FROM MAXHOST THEME HEADER GOES BELOW (DO not touch the codes above this line)’ and another line says ‘END CODES FROM MAXHOST THEME HEADER (DO not touch the codes below this line)’. You should remove all the codes between these two lines and paste your copied html here.

How to Edit Footer Content of the template
Step 1: At first make sure your WordPress website‘s footer customization are done.
Step 2: Once you are satisfied then open your WordPress website in a browser and press ctrl+u. You will see a new tab is opened with the html of your site.
Step 3: Start copying html lines from where it says ‘COPY START FROM THIS LINE TO PLACE THIS INTO THE FOOTER.TPL OF WHMCS Maxhost-alt TEMPLATE’ and Stop when it says ‘COPY END TILL THIS LINE TO PLACE THIS INTO THE FOOTER.TPL OF WHMCS Maxhost-alt TEMPLATE’.
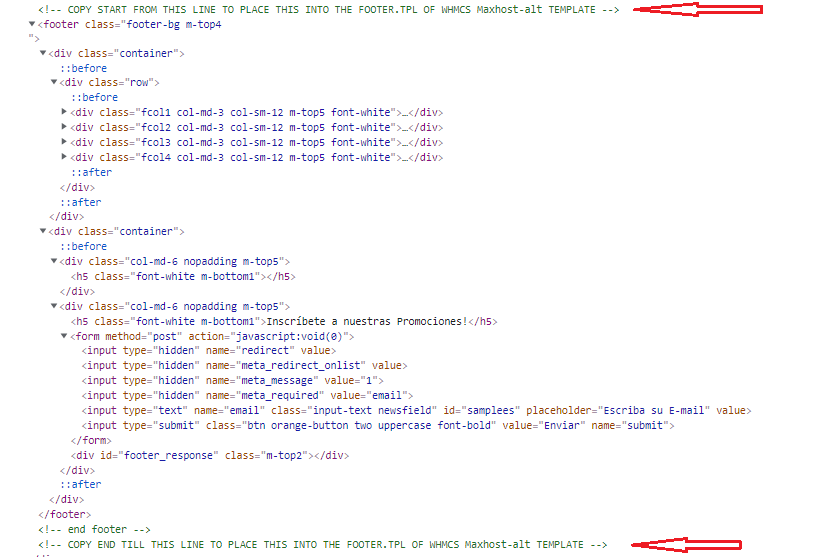
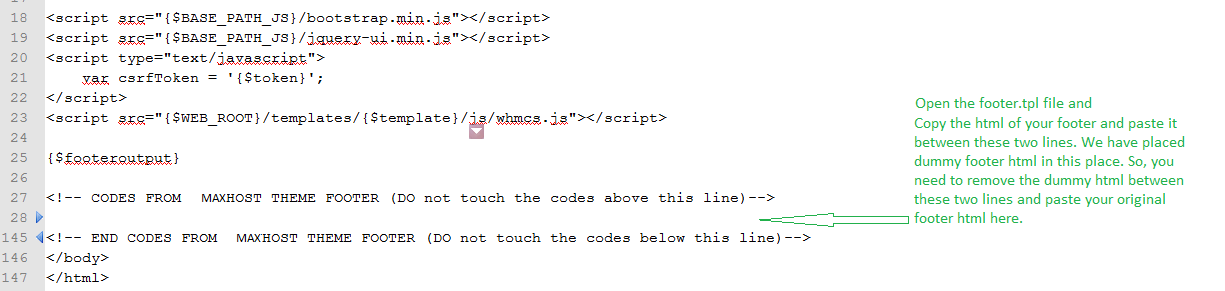
Step 4: Now navigate to the folder (e.g. ‘maxhostaltv11-tw‘) and ‘edit’ the ‘footer.tpl‘ file and paste the copied html into the footer.tpl file. In the footer.tpl file you will see a line says ‘CODES FROM MAXHOST THEME FOOTER GOES BELOW (DO not touch the codes above this line)’ and another line says ‘CODES FROM MAXHOST THEME FOOTER GOES ABOVE (DO not touch the codes below this line)’. You should remove all the codes between these two lines and paste your copied html here.

How to choose correct Order Form
Maxhost template for WHMCS is built for using the ‘Standard Cart’ Order Form template. So, you need to make sure that you have login to your whmcs admin panel and then go to System Settings > General Settings > Ordering tab and choose ‘Standard Cart‘ as your default order form template.

How to Add WHMCS page(s) to WordPress Website Menu
You can add your WHMCS page as a Custom link of your WordPress Menu. Visit WP-Admin > Appearance > Menus and then follow the below screenshot.

How to Change the Color of the Template
To change the color of your template, please open header.tpl file and find the following section of codes between around 20 to 40 no. lines:

From the above code uncomment any of the color css line which you want to use. For example if you want to use the red color, the above section of code should be like this:

However, if you want a custom color to use instead of any of the pre-defined colors, then the procedure is as follows:
From the header.tpl file uncomment any one color css line. For example, you can uncomment the green color css line which is like this:

Find that green.css file from your whmcs template folder, which is present in this directory (css/maxhostcss/colors). In that green.css file, Replace all the green color code (#49a32b) to your custom color code.
For example, your chosen custom color code is this (#FA8072). Then, the css lines of green.css will be like this:
.kbcategories a{
     color: #FA8072; /**#FA8072 is your color code here**/
 }
Instead of this :
.kbcategories a{
     color: #49a32b; /**#49a32b is the green color code**/
 }
How to Change the Logo
To replace the default logo with your logo, please open the custom.css file, which is located in the css folder of the template. Put the following css code at the bottom of the custom.css file:
.navbar-brand.logo {
     background: url(YOUR-LOGO-URL-HERE) no-repeat left 21px !important;
 }
Note: Replace 'YOUR-LOGO-URL-HERE' with your original logo url.
For example, if your logo url is: https://www.yourdomain.com/wp-content/uploads/2017/01/Logo.png, then the css code will be:
.navbar-brand.logo {
     background: url(https://www.yourdomain.com/wp-content/uploads/2017/01/Logo.png) no-repeat left 21px !important;
 }
How to Change the Favicon
To replace default favicon with your own favicon, please go to your whmcs template’s css/image folder and find this file: favicon-16×16.png. Delete this png file and upload your favicon png image in the folder and rename it exactly as ‘favicon-16×16.png‘.
I have adjusted my WordPress site’s logo width and height using the option fields given in the ‘Theme-Options’ panel. How can I adjust that for WHMCS template?
Open your WordPress website in a browser and press ctrl+u. You will see a new tab is opened with the html of your site.
Find this line from there:
/* START Logo CSS ———————————————————————— */
You will find your custom logo css starts from there, and ended just before this line:
/* END Logo CSS ———————————————————————— */
Copy the above CSS to your clipboard. Now, open the custom.css file, which is located in the css folder of the template. Put the copied CSS code at the bottom of the custom.css file.