
Toggle Mobile Menu
Find what you need to get your online booking form up and running with ARB. This handbook will help you understand how to set up your reservation form and manage the appointments and bookings as admin. This WooCommerce extension plugin allows your customers reserve hotel rooms or resorts, appointments for courses, doctors, salons and any other businesses which require appointment booking.
The installation process of ARB Plugin is quite simple and straightforward, and shouldn't cause you any troubles at all. Independent of you previous experience with WordPress plugins, you aren't likely to have any problems, just follow these simple steps:

Download & install Envato Market plugin
This plugin can install WordPress themes and plugins purchased from ThemeForest & CodeCanyon by connecting with the Envato Market API using a secure OAuth personal token. Once your themes & plugins are installed WordPress will periodically check for updates, so keeping your items up to date is as simple as a few clicks.
If you download new plugin version from CodeCanyon please follow these steps to upgrade from the existing version:
1. Go to your FTP and open WordPress plugins folder
2. Delete the old ARB | Appointment Reservation and Booking Solution for WooCommerce folder
3. Upload the new version of ARB | Appointment Reservation and Booking Solution for WooCommerce
4. Go to WP-admin panel, open Plugins section and Activate it.
To accept appointments/reservations, you need to create a reservable product (i.e., Booking Form).
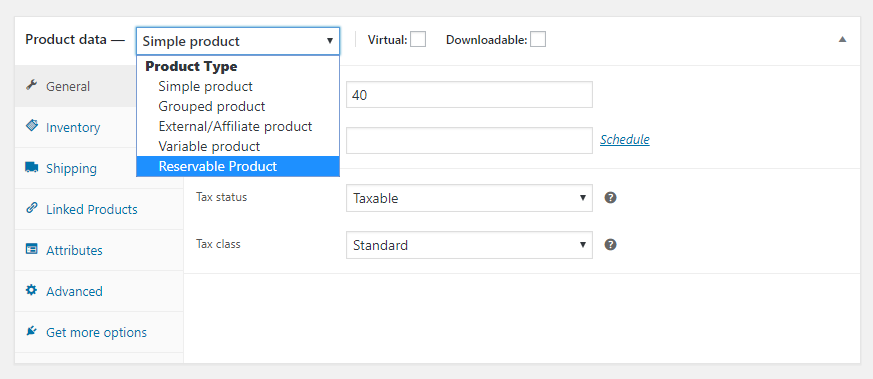
Booking fields will be available as soon as you choose Reservable Product. The booking fields will be under the following 5 tabs:
Properties of General Tab - Click to view a screenshot of the General Tab
Properties of Availability Tab - Click to view a screenshot of the Availability Tab
>> Get more details on Availability settings.
Properties of Costs Tab
>> Get more details on Costs settings.
Properties of Persons Tab Details is here.
A resource can be a Hotel room OR a Theatre OR a Doctor OR a Teacher OR Course Type etc etc. Details on Resource Settings is here.
Duration determines how long a reservation lasts. The duration can be customer defined (input on the front-end) or admin defined (fixed slot). Duration units can be as flexible as Months, Days, Hours or Minutes.
Customer-defined slots have a set period of time, but customers can decide how many slots they want. For example, a hotel room is reservable in day basis, and customers can choose how many days they would like to reserve.
Fixed slots have a set period of time that you define. The customer or client can only choose 1 slot at a time. For example, law consultant appointment lasts 2 hours (fixed slot) and clients can only reserve one slot of '2 hours' at a time.

Following fields can be used if you choose customer defined slot:
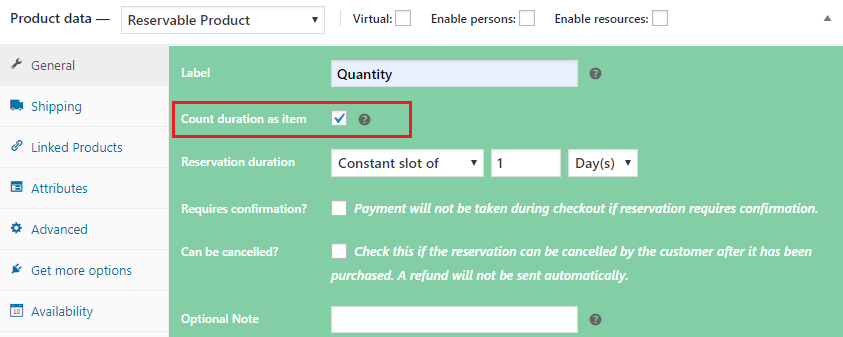
The default label is Duration. You can put there Ticket, Course etc as well. This is important to choose a correct label because this will be shown in Cart page, Checkout page and also in Email notifications. For example, if you put Duration and customer book for 2 days, the Cart page will show "Duration: 2 Days". If you put "Ticket", the Cart page will show "Ticket: 2" and so on..

Enable this if users are not going to book your product per hour/day/month etc. For example, you are offering food delivery service and you want the users to input the number of items they want you to deliver. If you put Quantity in the Label field and then enable this settings, users will see the duration field as Quantity. So, by the duration field the form will count how many food item is being ordered.
Please note: When you use this option, each booking will be counted as 1 booking regardless whatever number is inputted by the user in the duration field.
It is up to you that you offer cancellation facility to ther customers or not. If you choose Can be cancelled, customers will be able to cancel their reservations before the appointment beings.

From the Availability settings tab you can set how many resources (a resource can be hotel rooms, tickets, seats of a course, rentable products etc) you have for booking, what is the minimum amount of slots the customer can book, what is the maximum amount of slots they can book etc. You can set certain period of date/time as Non-Reservable also.
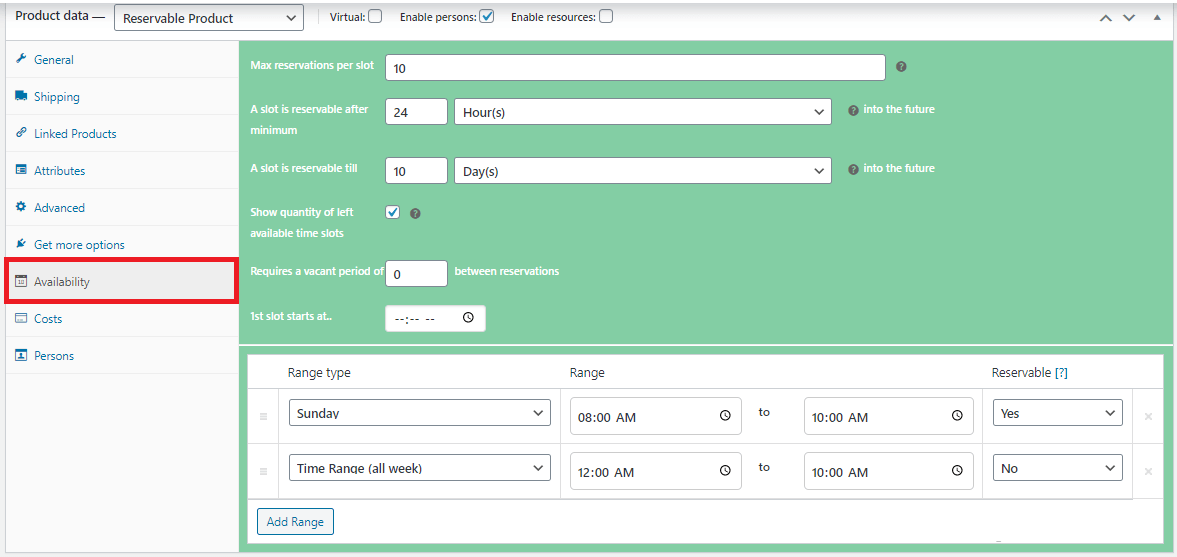
You can add as many Availability Ranges as you need by clicking on the Add Range button. The Add Range button will give you options to choose from the following ranges:
Date range
Range of months
Range of weeks
Range of days (Sunday to Monday)
Time Ranges (all week) (whole week with 00:00 to 23:59 Time Slots)
Date Range with time (range of dates with 00:00 to 23:59 Time Slots)
Monday to Sunday (with 00:00 to 23:59 Time Slots)
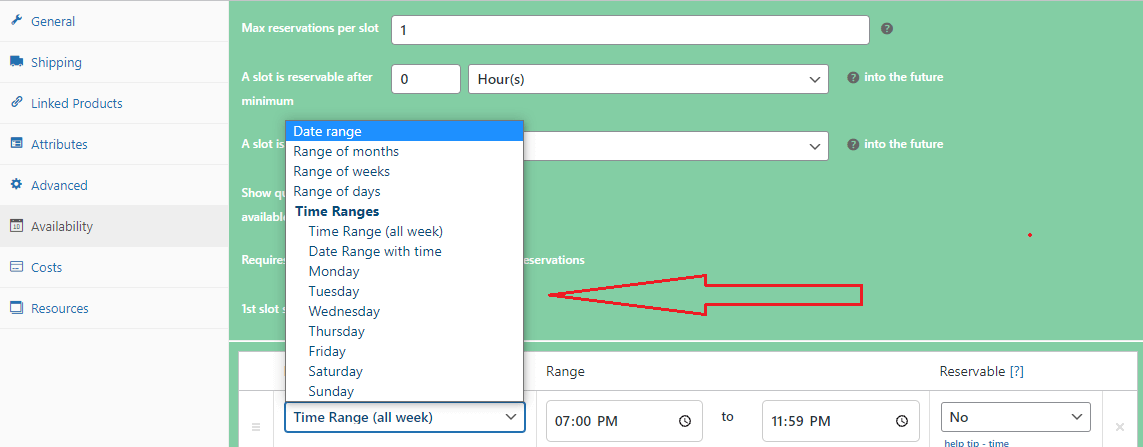
Using the above options you can let your customers book by not only days, but also hours and minutes.
If you want to have a vacant period which cannot be reserved by the customers, you can do so by using the Requires a vacant period settings. For example, your doctor takes rest for 30 minutes after every hour, so he/she cannot take patients at that time. You can set a 30 minute vacant period and patients will not be able to choose those vacant time blocks for appointment.

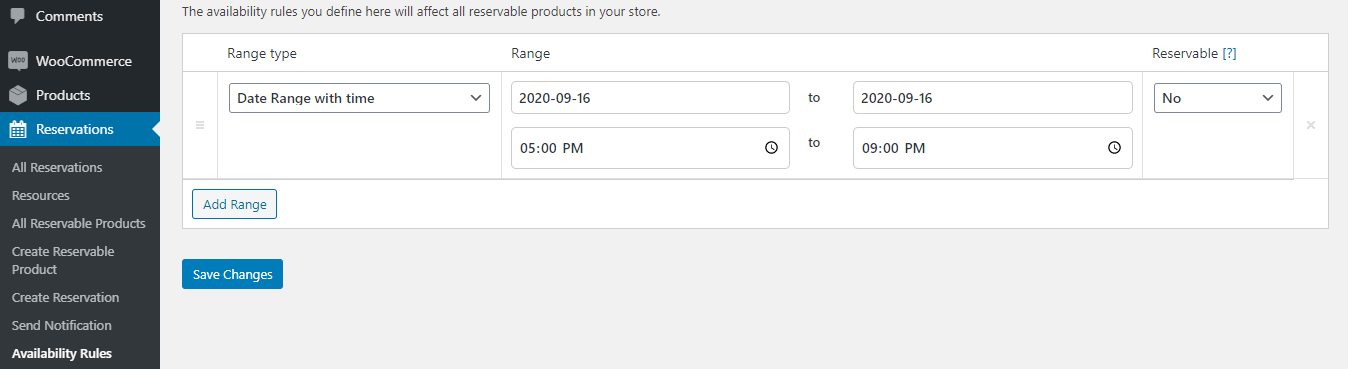
Yes it is possible to block out specific date with time. For example, you want to block out 05:00PM to 09:00PM of 2020-09-16. You can do so by choosing 'Date range with time' and input your desired date and time in the given fields. Please see the following screenshot:
Resources in ARB plugin are those things which will be available in the booking for customers to choose from. A resource can be a Hotel room OR a Theatre OR a Color OR a Department OR Course Type OR a Car Type etc etc. You can add as many resources as you need. All the resources you add in a product will be available in the drop-down in the booking form in the front-end. Just give a Tick mark on Enable resources and you will have the Resource tab with all those settings.
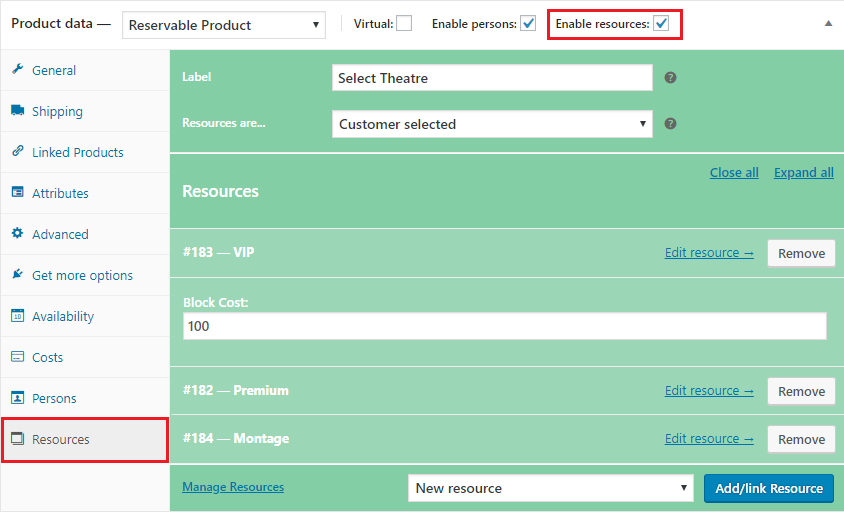
You can add as many Resources as you want by clicking on the Add/link Resource button. To edit the "Availability" and "Available Quantity" of the resource click on the "Edit resource" link.
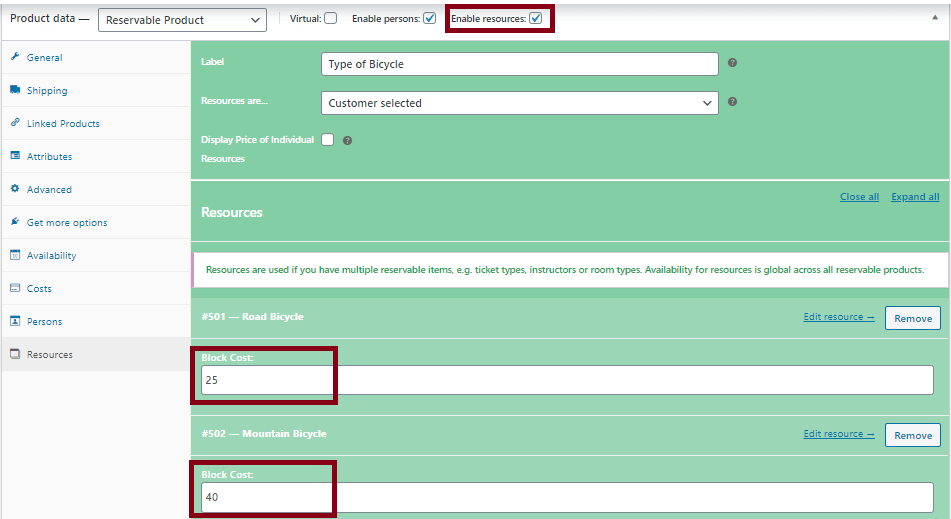
You can set different prices for different resources. For example, you are selling movie tickets online. You want your customers to choose Theatre from 3 different types of theatre you have (for example: Premium, VIP, and Economy). You can do so by adding 3 resources (Premium, VIP and Economy) in the Resources tab and set your desired prices for each resource. The customers will get a drop-down with the 3 resources and choose any one from there to make a booking.
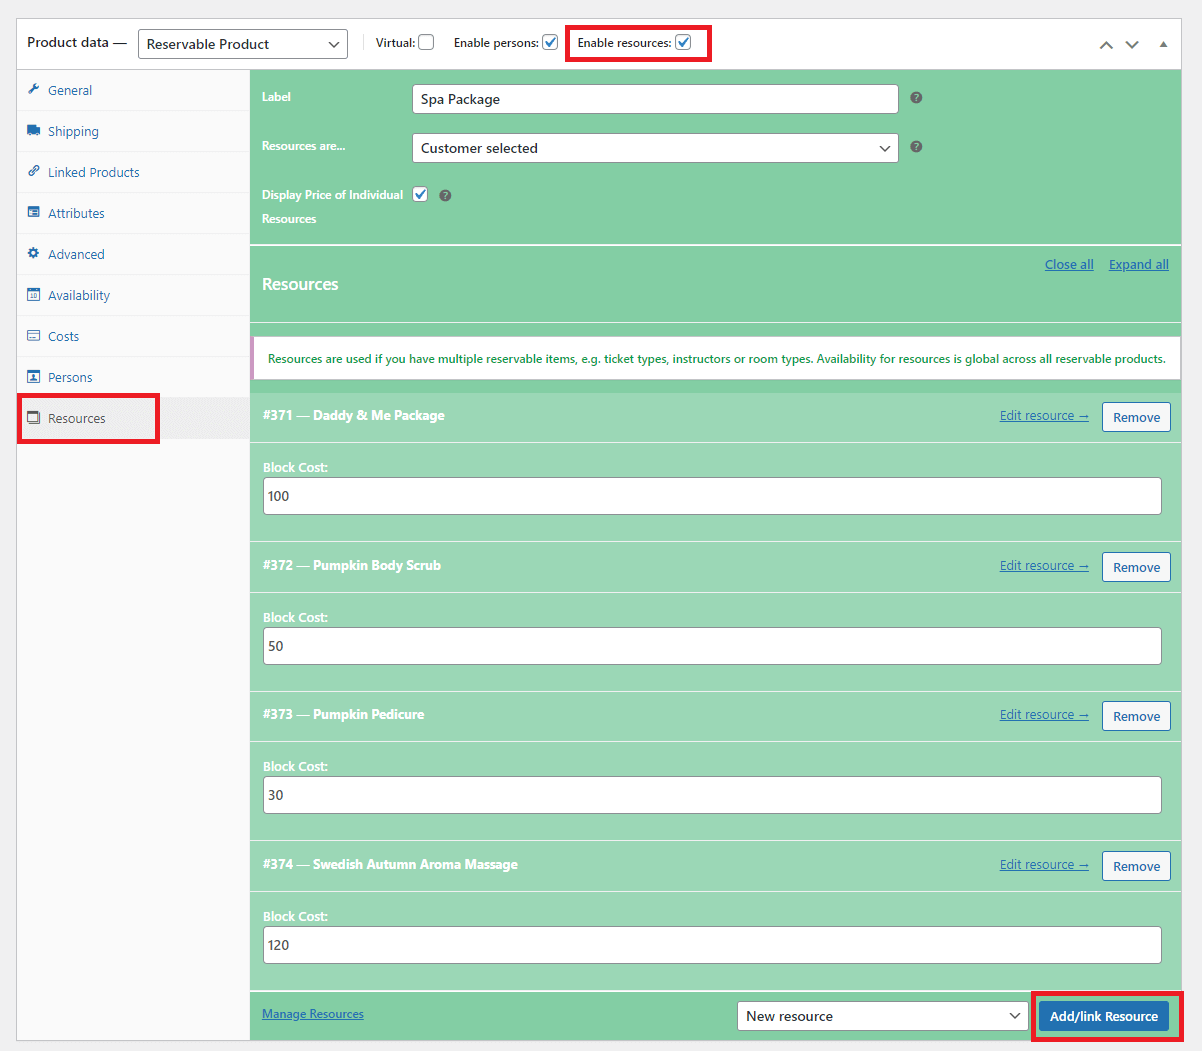
The following screenshot of Resource Settings fields will give you a drop-down of 4 resources in the booking form: "Daddy & Me Package", "Pumpkin Body Scrub", "Pumpkin Pedicure" and "Swedish Autumn Aroma Massage" as you see in this Live example booking form.
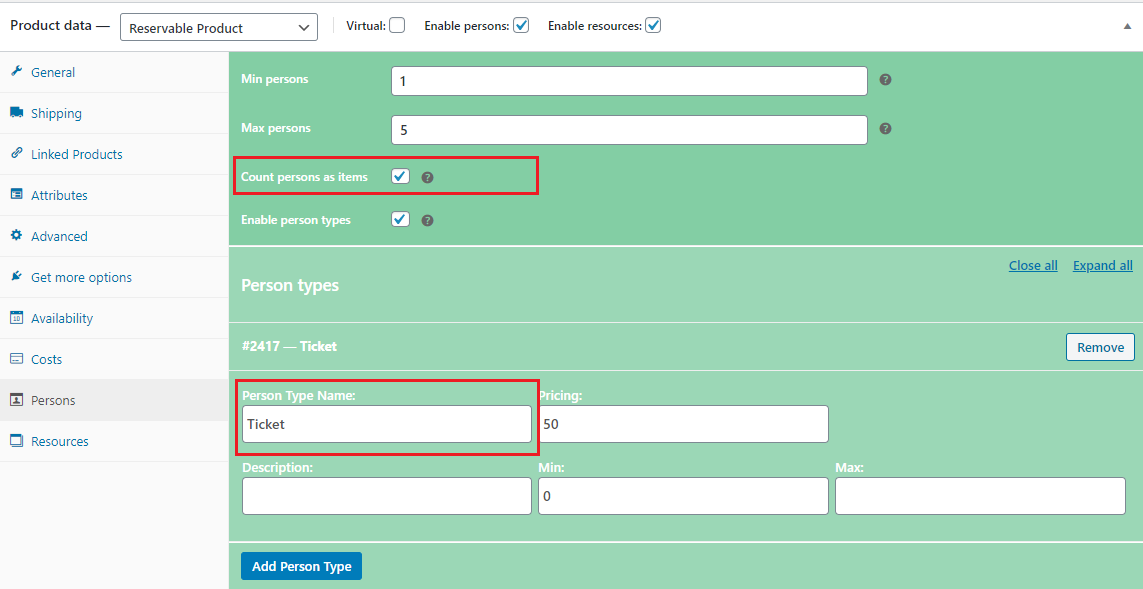
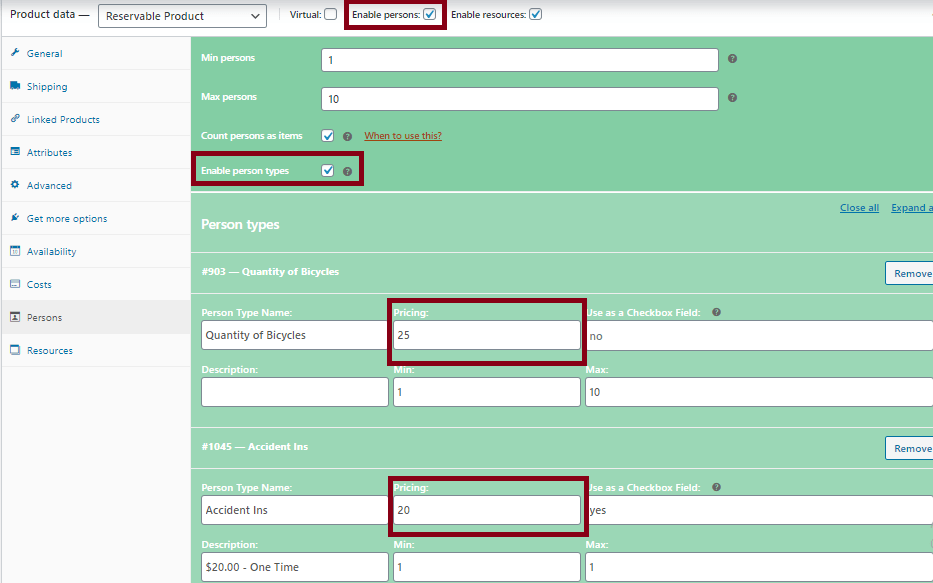
Put a Tick mark on Enable Persons and you will have a new tab as "Persons". In the person settings tab you can put minimum and maximum value and also you can input different person types. You can set different prices, different minimum and maximum value for different person types as well. The Person Types is a very useful option for your booking form. View the details of the Person Types Settings from here.
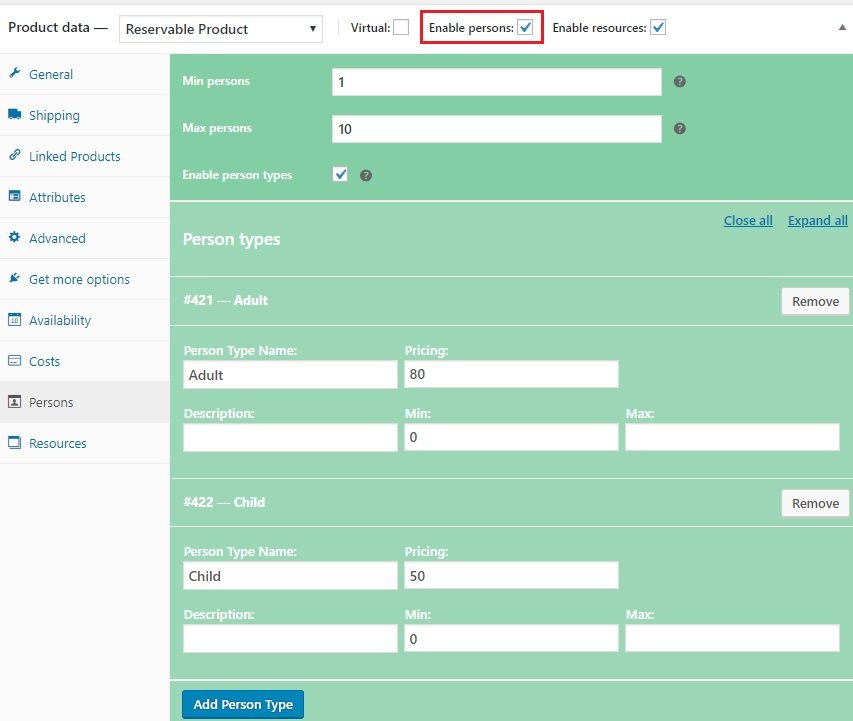
It is important to note here that "Person Types" does not necessarily mean actual "Person" here. It can be "Tickets", "Rental cars", "Courses" etc as well. Whatever value you put in the "Person Type Name" field will display in the booking form. If you put Tickets in the Person Type field, the booking form will display Tickets field for your customers.
For example, if you sale movie tickets you will use the Person Type settings to set the price of the ticket, and to set minimum and maximum tickets a customer can purchase at once. If you need to add more fields in the booking form (like checkbox fields to choose Soft Drinks and Popcorn), you can do so by clicking on the Add Person Type button. You can add as many Person Types as you want by clicking on the Add Person Type button.
The following screenshot of Person Types fields will give you "Tickets", "Soft Drinks", "Popcorn" and "Snacks" fields as you see in this Live demo booking form.

When you use this option, number of persons (or person types) will be counted as number of reservations. That means if a customer makes a reservation for an event for '5' persons, then 5 slots (not just 1 slot) of your event will be booked (if "count persons as items" is enabled).
There are 2 fields in Costs settings tab: i) Base Cost ii) Display Cost. The display cost is not the actual cost. It is just to show in the front-end. If you keep it empty the booking form would calculate the actual cost and show that in the front-end.
The Base Cost is the cost which would be added to other Individual Costs you set for the product.
Example : Lets say you are selling Pizza and Burger from your website and you need to put a $5 delivery charge for each booking. To do that you have created 2 resources (Pizza and Burger). And in the Block cost field of the resource you have put the price for the Pizza and Burger. So, the costs are set for your resources already. Now you just need to add the delivery charge ($5); and the 'Base Cost' field comes into play now. You put $5 in the 'Base Cost' field and you are done. When a customer orders 5 Burgers the cost will be $20x5=$100 + $5 (Base cost) = $105 for 5 Burgers. The Base cost has been added to the individual resource costs here.
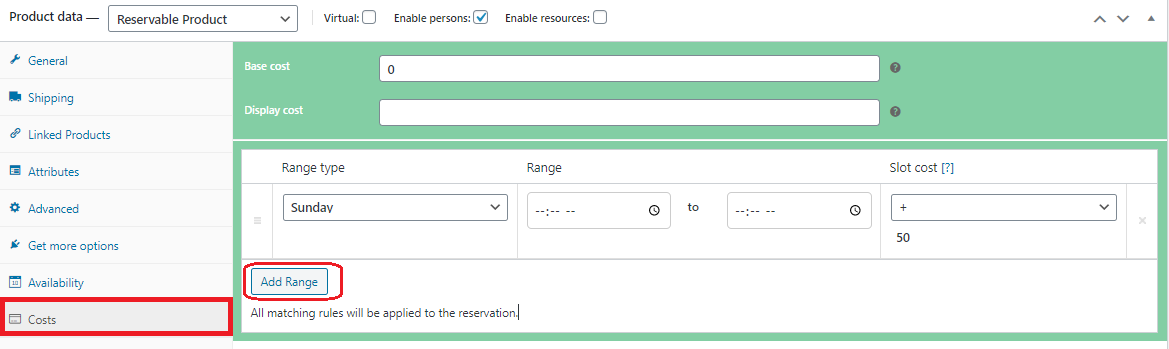
The Add Range button is an useful functionality of the Costs Tab. By this button, you can increase or decrease the price/cost for certain period of time OR for certain number of persons OR for certain number of slots.
Example: Lets say,
you want $20 extra charge for booking your spa service on Saturday to Sunday.
you want to give $10 discount price for a time range like 7:00PM to 10:00PM.
you want to offer $10 discount if a booking is made for more than 1 person.
you want to offer $5 discount if more than 4 slots are booked.
You can do so by adding as many ranges as you need as we have done here in the following image:

You can add as many ranges as you need.
To view all the reservation orders, go to WP-Admin > Reservations > All Reservations page.

A list will appear in the reservations page where you can filter the orders by dates or by reservable products. Also you can search for a certain order using the search form present in the page.
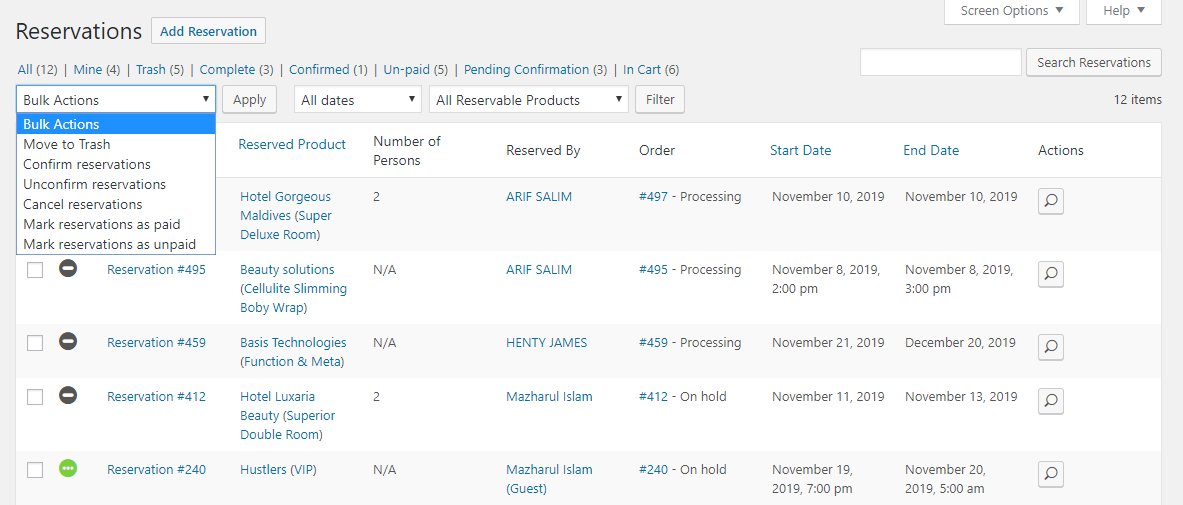
To view the details of a reservation order just click on the Search icon. You will have a new page where all the details of the order will be displayed. You can add private note with the order, email invoice to the customer, change the status of the order from there.

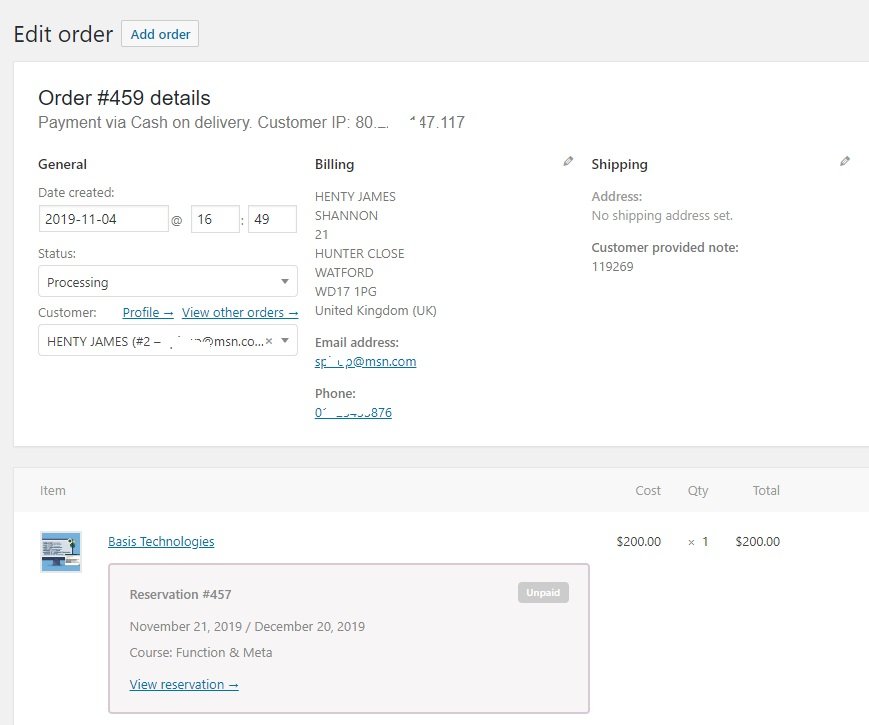
You may need to edit the order details if the customer requests you to change their orders. For example, customer forgot to add a package in his/her order and may request you to add that package to his/her order manually. You can do so from your admin area's Edit Order page. Take a look at this video to know how to edit an order details. You can edit resource of the order, start and end data/time of the order, number of persons and number of person-types of the order, other field values of the order and cost of the order. And, you can also send the updated invoice email to the customer by a Click only.
In the Edit Reservation page you will see a Status dropdown. Choose Confirmed from the dropdown and then click on the Save Reservation button

If the reservation order is "Unpaid", the confirmed reservation still needs payment in order to complete the order. The customer will get an email notification with his/her order details / invoice and his/her My Account page url to make the payment. From the My Account page the customer can make the payment. Once payment is made by the customer, the order status will show as complete.
With only 1 click, you can send email notification to all customers who have a future reservation for a particular product. This will use the default template specified under WooCommerce > Settings > Emails.
Visit WP-Admin > Reservations > Send Notification page and choose a product whose customers will get the email. Then put subject and message in the given fields and click on Send Notification button. There are some dynamic tags available which you can use in your email. For example: if you use {customer_name} in your email message, it will be dynamically converted to the real customer's name in the email.
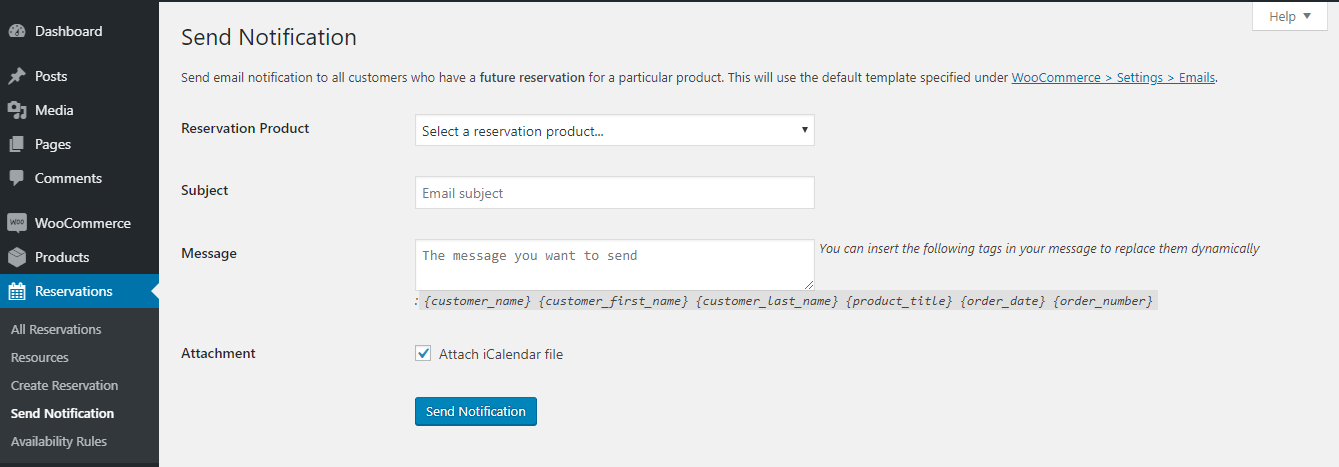
If you enable Attach iCalendar file, the customers will get an iCalendar file (.ics) as attachment. In the iCalendar file the customer's reservation time will be displayed. This iCalendar file can be imported in Google Calendar as well to view the reservation time in Google Calendar.
In the individual order page click on the Order Actions Dropdown and choose Email invoice / order details to customer and click on the Update button.

ARB works with all supported WooCommerce extensions, thus you can use any payment gateways supported by WooCommerce. Some popular payment gateways you can use with ARB are:
PayPal, Stripe, Square, Google Ads, Amazon Pay, PayFast, eWay etc. As addition you can also use Cheque Payments, Bank Transfer or Cash on Delivery payment methods.
Yes, you can. At first, visit the WooCommerce > Settings > ARB Settings page and enable ARB Quote Request.

Then visit the products editor page for which you want the Quote Request button. At the right sidebar you will find the Quote Request Settings section. Choose On from the dropdown and then click on Update button of the product.

WooCommerce Tax tab (WooCommerce > Settings > Tax) displays several options that can be set to suit your needs — settings you choose are based on the tax jurisdiction under which your store is located.
Also, you can set different tax rates for different countries or even different states or cities.
Yes, you can. ARB reservation plugin is WPBakery compatible. You can display your bookable product with booking form in any page of your website using your WPBakery page builder. It is as easy as you add any other WooCommerce product page in the WPBakery page builder.

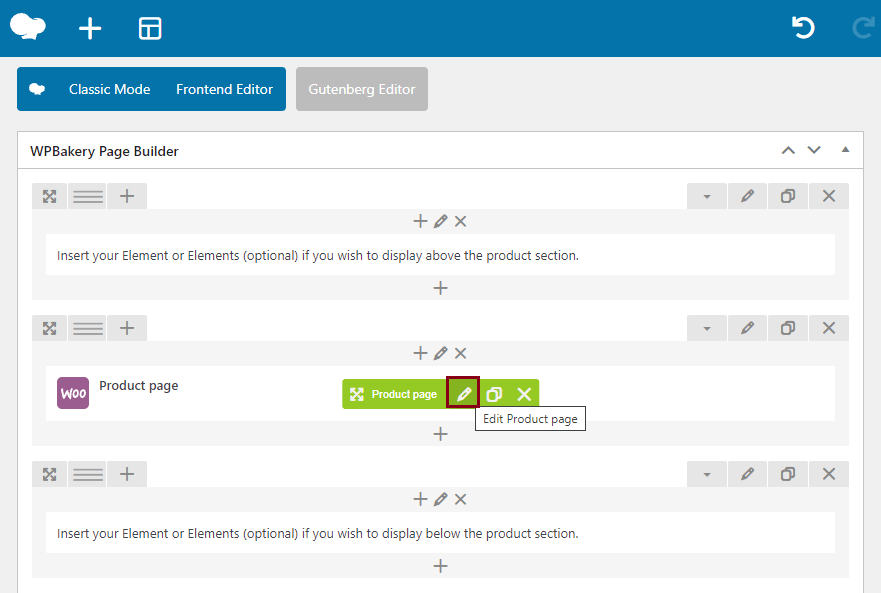
Yes, you can. After creating a Reservable product you can use this shortcode [product_page id="your_product_id"] to display the product with reservation form. Please note, you must display the Reservable product to display the reservation form.
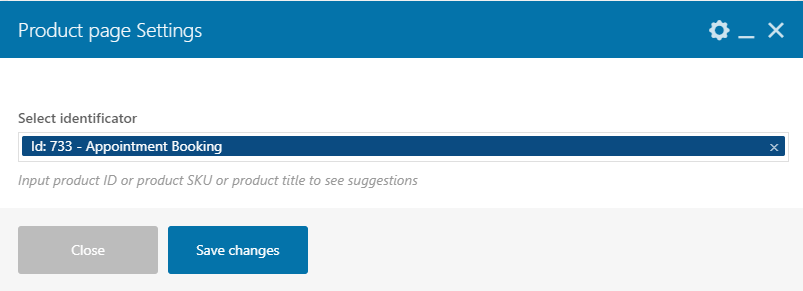
Replace your_product_id with your product's ID. If your Reservable Product's ID is 733, the shortcode would be [product_page id="733"]. Check the following image to know where to get the ID of your Reservable product.

Yes, you can. ARB reservation plugin is Elementor compatible. You can display your bookable product with booking form in any page of your website using Elementor page builder in 2 steps :
1. Create your shortcode by following the instructions given here.
2. Paste the shortcode into Elementor's dedicated Shortcode widget.


Yes, you can. For example, you have 2 lecturers ( Mr A and Mr B ) in your school. Mr A is available to take classes on Tuesday and Thursday. And Mr B is available on Firday and Saturday, like below:
Availability for Mr. A:
Tuesday 11:00am - 4:00pm
Thursday 11:00am - 7:00pm
Availability for Mr. B:
Friday 11:00am - 4:00pm
Saturday 11:00am - 4:00pm
You can set this up easily using ARB.

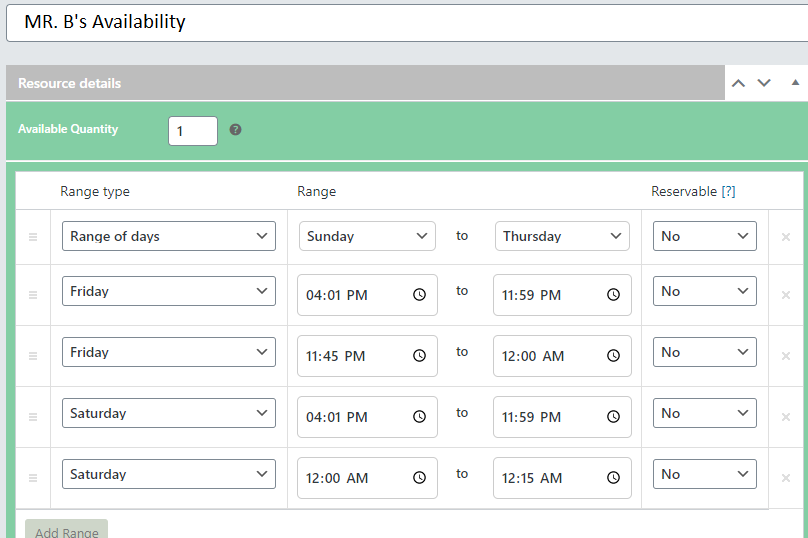
In the front-end booking form if an user choose Mr A, the calendar will show Mr A's available date/time only. Similarly if user choose Mr B, the calendar will display Mr B's available date/time only.
Yes, you can. The duration settings have these options for you. Please take a look at the following image.

Yes, you can. The duration settings have these options for you. Please take a look at the following image.

Yes, you can. The instructions are given in the following image. Note: to trigger the ajax cost calculation you need to have at least 1 drop-down (resource or persons) instead of the calendar.

Yes, you can. Visit WooCommerce > Settings > ARB Settings page and there you will find the color option and other css options to adjust your booking form's design.
Yes, you can. Please visit Person Settings section for details.
Every Resource and every Person Types can have its own 'Pricing'. We call them individual pricing. The following 2 screenshots will show you how to set pricing for individual resource and person types respectively.
ARB Google Calendar (Add-On) is required to integrate Google Calendar with ARB. This will sync all your booking orders from your website to your Google Calendar. The syncing is automated.
Yes, you can. Please visit Cost Settings section for details.
Once an order has been paid, ARB only sets the status of the order to Completed if the reservable product purchased in the order is virtual and downloadable. If the reservable product in an order is physical and/or virtual without being downloadable, the order is marked as Processing. This helps you manage the shipping of physical items.
When an order only contains a reservable product that is virtual, the order will be marked as Completed automatically if the payment has gone through.
Yes, you can. The demo data is included with the plugin purchase files.
In the 'wp-admin > settings > general' page you will find the options to change the date/time formats as required.
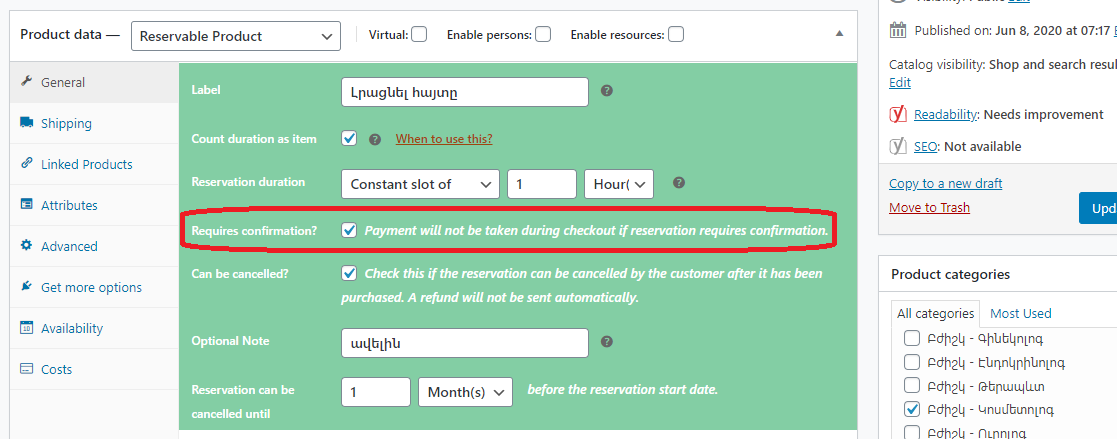
To get payment while checkout, you must disable 'required confirmation' settings (please see the following screenshot). If 'confirmation' is required, then no payment method will show in the 'checkout'.
You will need a free software to translate the plugin’s all English text in your language. The software name is Poedit. The Poedit is a common program which you can use to translate the plugin. It’s available for free on poedit.net.
After you have installed Poedit, you can open it and select File > Open. Then select the arb.pot file from the plugin you wish to translate which you can find in the /languages/ folder of ARB plugin.
Then go through every line of text and translate it to your native language. Afterwards go to "File > Save as" to save the catalog with your language code (for example "arb-es_ES.po" for Spanish language). Poedit automatically creates a new file "arb-es_ES.mo" and saves it, too.
After that upload those language files (.po and .mo files you just created) to wp-content/languages/plugins folder using FTP or Cpanel. That’s it.
Yes, ARB is translatable with WPML plugin.
How to create a reservable product with ARB