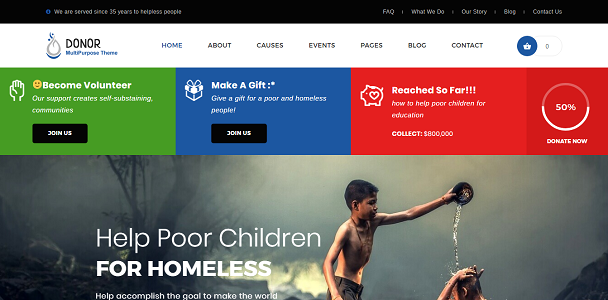
Denorious - Nonprofit WordPress Theme
- Updated: 11/01/2025
- By: Fluent-Themes
- Demo URL: https://fluentTheme.com/wp/donor/
- Email Support: support@denorious
Thank you for purchasing our Theme!
We hope that you find all your questions regarding this Theme answered in our Documentation and in the Video Tutorial as much in details as possible. However, if you still need support, do not hesitate to contact us at our support center for this Theme. Please do not forget to provide us your theme purchase code when you contact us for support.
Getting Started
Themes Installation & Activation
Installing denorious Theme is quite easy. Basically install this Theme is almost the same as installing other Theme. This part will guide you to how install denorious Theme.
After downloading denorious package from Themeforest you need to extract those file, and then you will find zip file with name like denorious.zip . This is main file of denorious Theme.
- Go to Appearance -> Themes on your WordPress Admin Dashboard
- Then click the Add New button at the top of the page and then choose Upload Theme option
- After that upload file denorious.zip and click Install Now
- After finishing upload, click the Activate and right after installing themes you will be prompted to install required plugins. Below we will instruct you how to install the required plugins
Common Error during Installation
The error: "Are you sure you want to do this?"
If you are installing your theme from the WordPress theme installer, but get a message that says “Are you sure you want to do this?”, most likely your web server is configured with PHP settings that are too low to allow the theme ZIP file to upload. Specifically, PHP is configured to a maximum file upload size limit at 8 megabytes or less. The theme ZIP is about 25 megabytes in size. Thus, the web server is rejecting the upload. WordPress is giving you a rather ambiguous message in response. This is not a theme fault or bug. There two ways to solve this problem:
1. You can either get your web host to increase your PHP limits. Some hosting allows you change PHP values from htacess or PHP.ini Please check your help documents from provider.
Recommended PHP configuration limits are as follows:
max_execution_time = 18000

                memory_limit = 128M

                post_max_size = 32M

                upload_max_filesize = 32M
2. You can upload your theme via an FTP client.
Required Plugins
Right after you finish activating denorious Theme. You will be notified to install required plugins for this theme.
If the required plugins are activated, now you’re ready to create Awesome Stuff with denorious.
Please remember, you will need to verify your item purchase code to get the main plugin 'The_Denorious_Extensions'.
Verify Theme Purchase Code Now
Themes & Plugins Update
Updating Themes
Installing the new version of theme, almost the same as installing new themes. You can update denorious theme by downloading a fresh copy from ThemeForest, deleting the current version you have on your server and uploading the new version.
Updating Required Plugins
When you need to update the plugins to the latest version, you just need to Deactivate and Delete the existing plugin and then in your wp-admin panel you will see a notification to install the plugin which you recently removed/deleted. Install and activate that, you are done.
Automatic Update
Envato provide plugin (unfortunately it does not work on some servers) that enable automatic update for themes. You can download those plugin from here. You will just need to input your API key. For more detail about how to use envato toolkit, please follow this url.
Included Plugins
Plugin that we include are :
- The Denorious Extensions
- WPBakery
- The FT Contact Form
Create Pages Like Live Preview Demo
You need to follow the Following 2 Steps to make your site like Live Preview
- 1. Import Demo Data
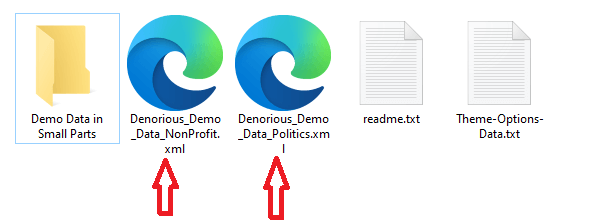
In your purchased theme file (Denorious - Nonprofit WP Theme.zip) you should find a folder named 'Demo Data'. Open the folder and you will get
2 demo data files. You can import any one of them in your WordPress.
To make your site like this, you should import 'Denorious_Demo_Data_NonProfit.xml' file.
To make your site like this, you should import 'Denorious_Demo_Data_Politics.xml' file.
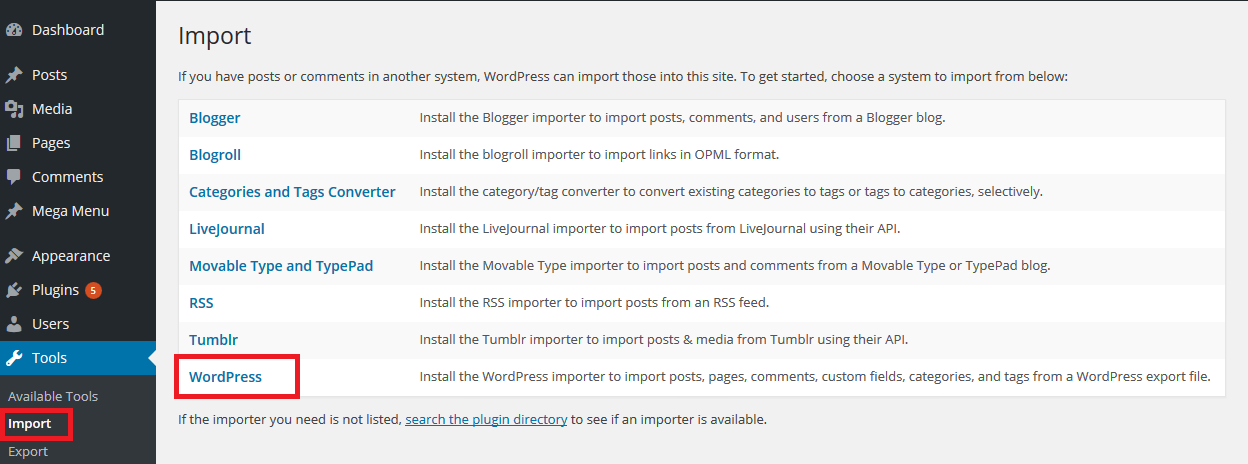
In order to import the demo data file you just need to go to Tools -> Import on your WordPress Admin Dashboard. There you will see a list of import systems (blogger, blogroll etc). Choose WordPress from there and you will be asked to install the WordPress Importer plugin. After installing and activating the plugin you will need to upload our demo data xml file :Denorious_Demo_Data_NonProfit.xml or Denorious_Demo_Data_Politics.xml and click Import. That's it - All done - Have fun!
Please remember, you may see some notices/warnings after importing the demo data, this is because of different admin panel settings than the Demo site. You do not need to worry about those notices. The required data has been imported correctly.
- 2. Set the Home/Front Page
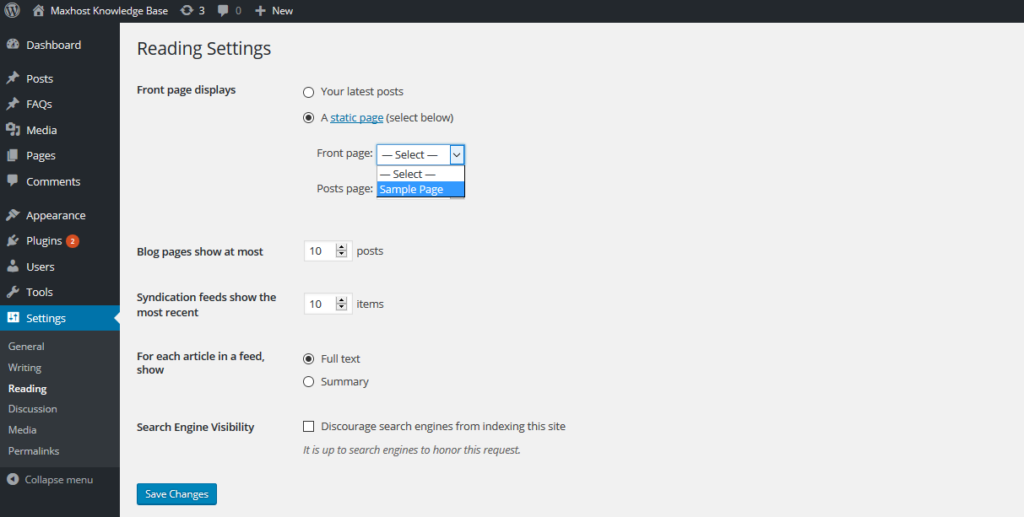
To set your chosen page as the homepage of your site, go to Settings > Readings. Select "A static page" and choose one of the existing pages (Homepage - 02) to be served as the Front Page of your site.
Now you can visit your site's homepage and you should see your homepage is similar to our Live Preview page.
Theme Options
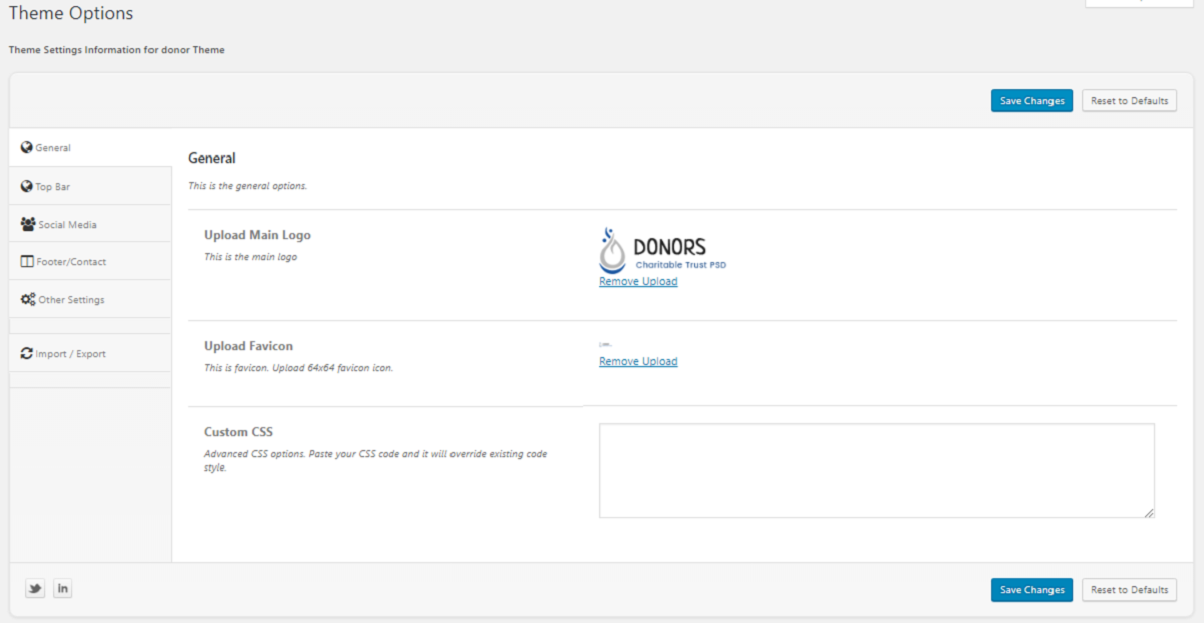
We have created Powerful Theme-Options for you so that you can customize your website with just a few clicks. Go to Theme-Options on your WordPress Admin Dashboard
General Settings
-
From here you can upload Logo and Favicon icon. Also there is one textarea field - Custom CSS. Custom CSS field is for using your own custom styles which will override the theme default styles.
Top Bar Settings
-
From here you can set your slogan or website intro. Also there is one portion to put some custom links - e.g FAQ, What We Do, Our Story etc.
Other Settings
From here you can customize the following things of the default pages and posts of your site:
- Upload Default Header Background Image
- On/Off Author Info
- On/Off Shop Page Sidebar
Import/Export Settings
If you wish to Import/Export the saved settings of Theme-Options from one WordPress to another, then this Import/Export tab is highly useful for you. With a few clicks you can Import/Export the data of the Theme-options.
General Guidelines
Navigation Menu
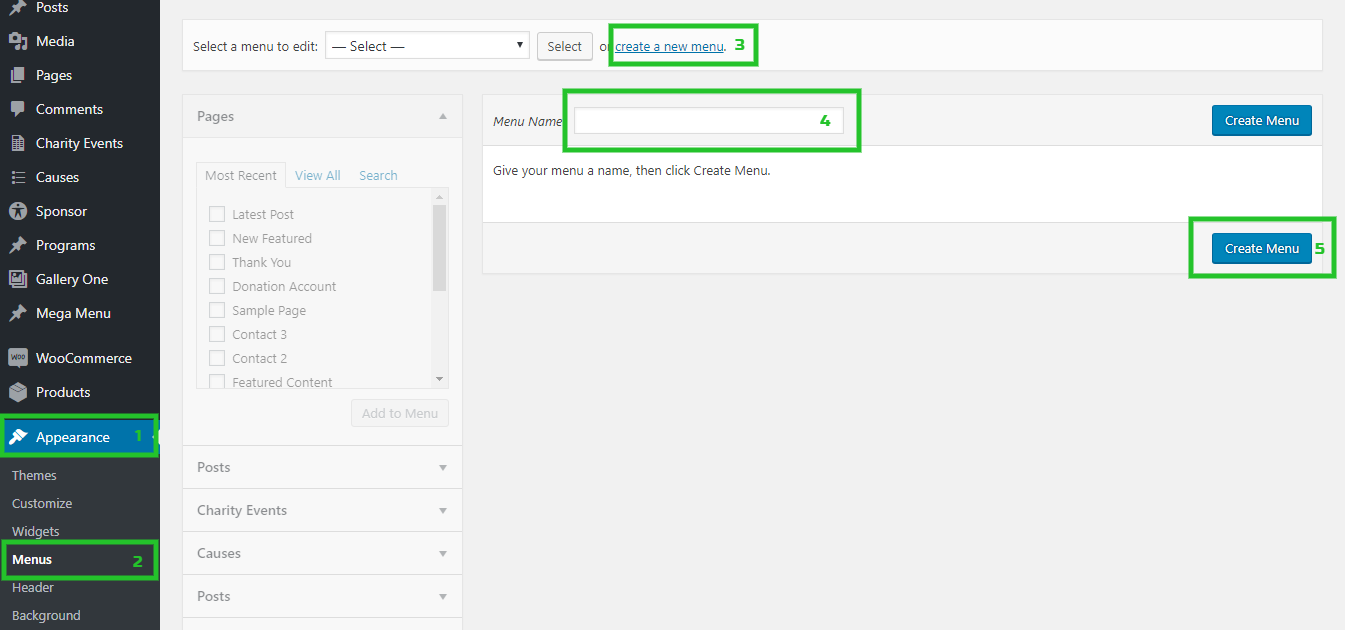
You need to create Menu from Appereance -> Menus and choose create a new menu option.
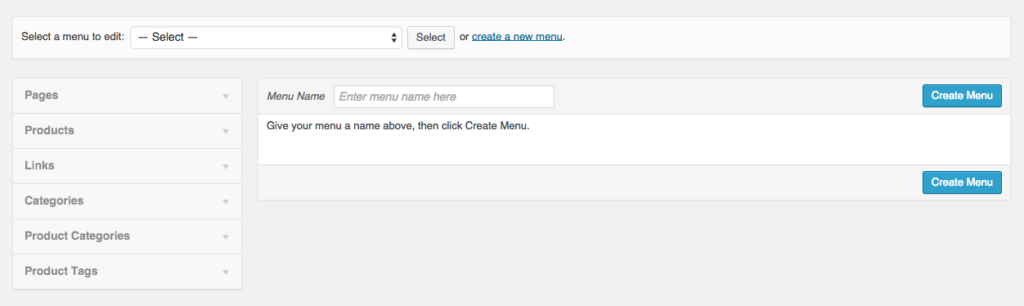
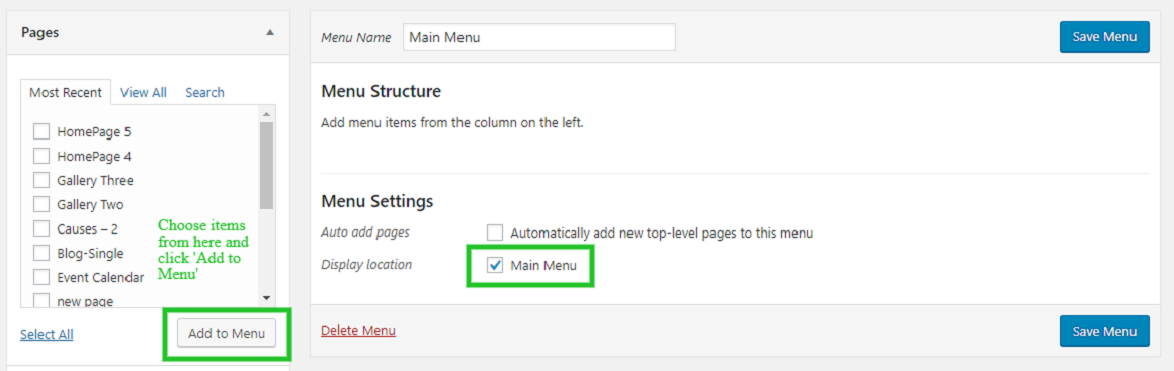
After that you can choose Pages, Posts, Custom Links(useful for One-Page layout's menu), Categories from the left column and click Add to Menu button. The selected menus will be added under the Menu Structure. Then you will need to choose Theme Locations under the Menu Settings:
- Choose Main Menu if you want to use the menu at the top of your website.
Page Building with WPBakery
Add New Page
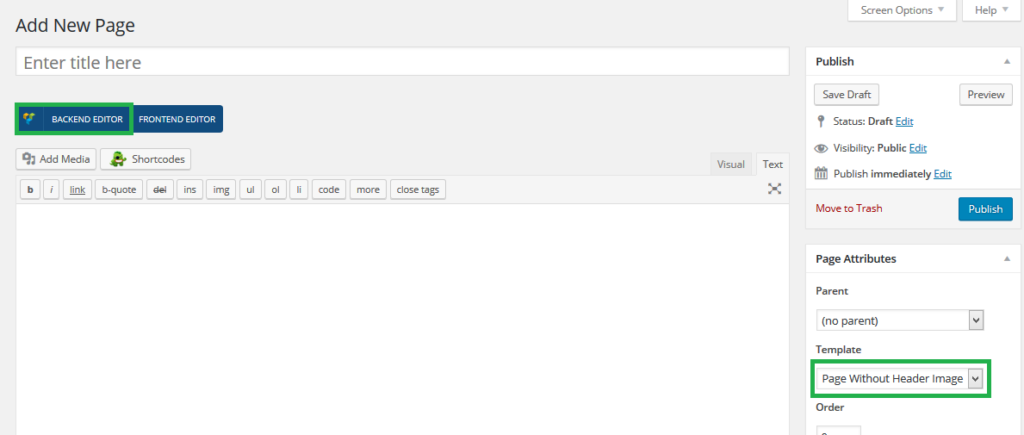
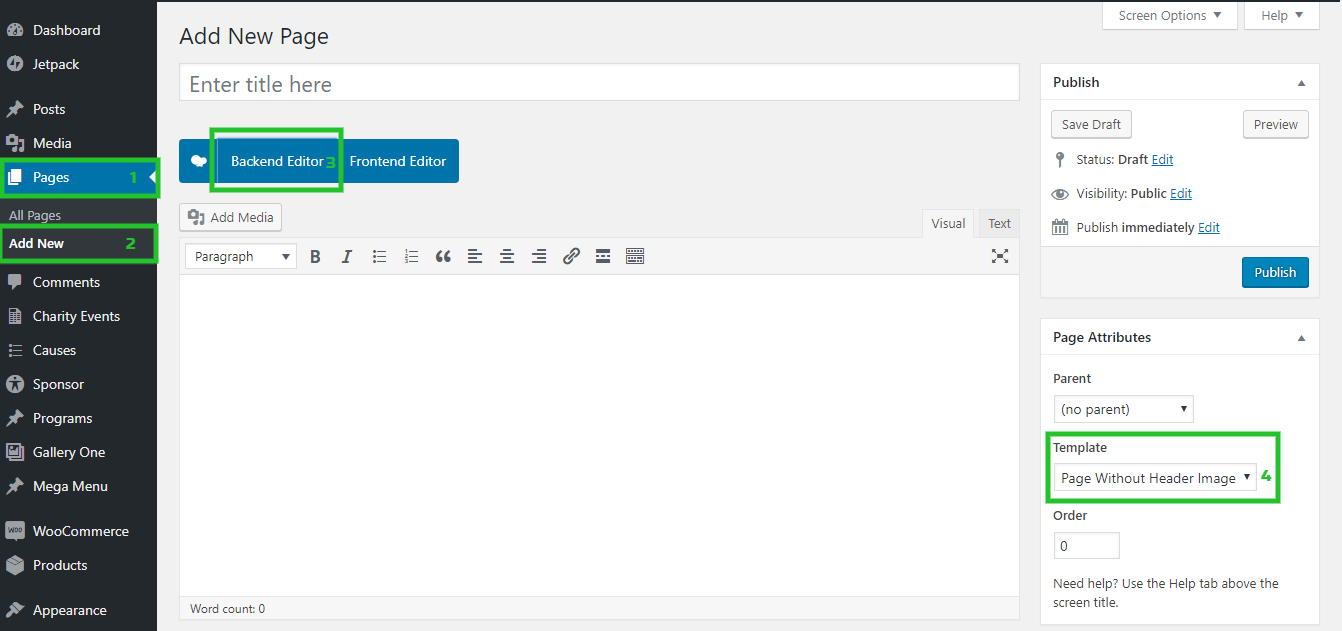
Go to Pages -> Add New on your WordPress Admin Dashboard. And click on the BACKEND EDITOR. Also choose Page without Header Image Template to get the best view of WPBakery elements.
Use Custom Elements
There are around 32 custom elements which you can use to build your pages. Click on any element created by Fluent-Themes Shortcodes and you will have all the options you need to insert the element to your page nicely.
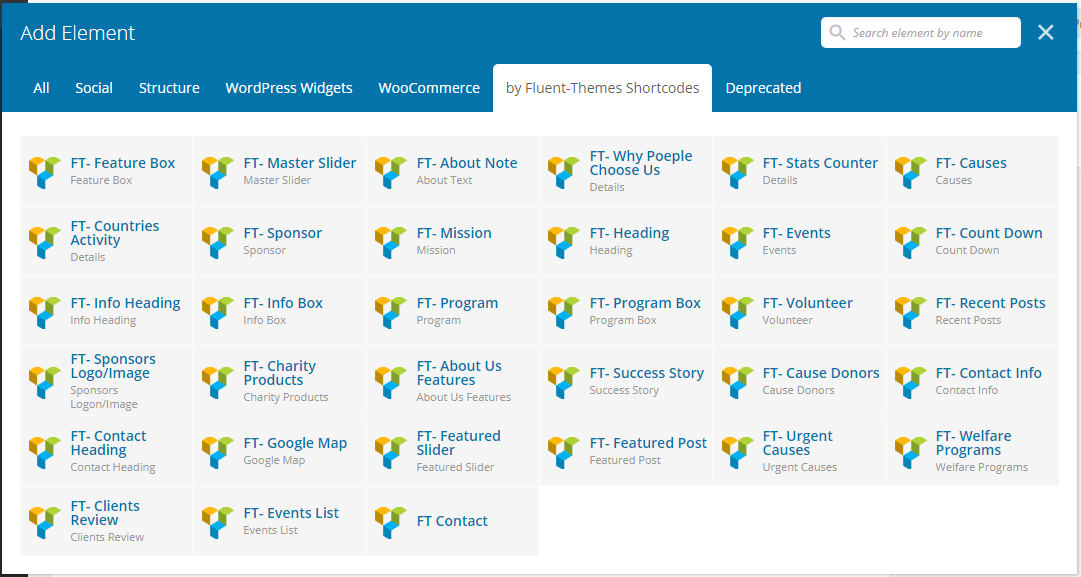
Creating Master Slider with Fluent-Themes Shortocode
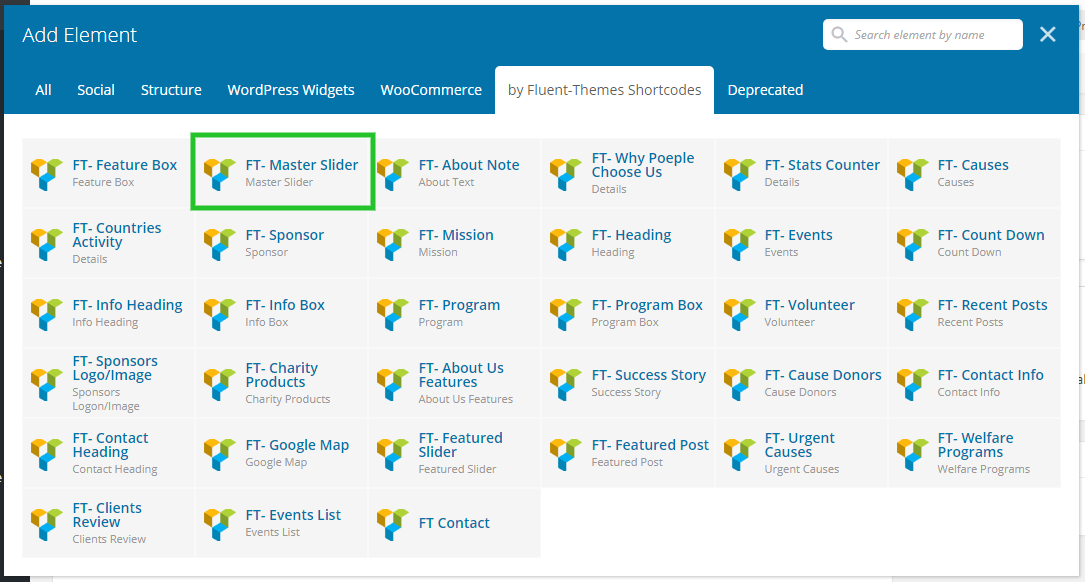
Find FT-Master Slider in the Fluent-Themes Shortocodes. Click on that and you will have options to attache slider images, styles and other stuff.
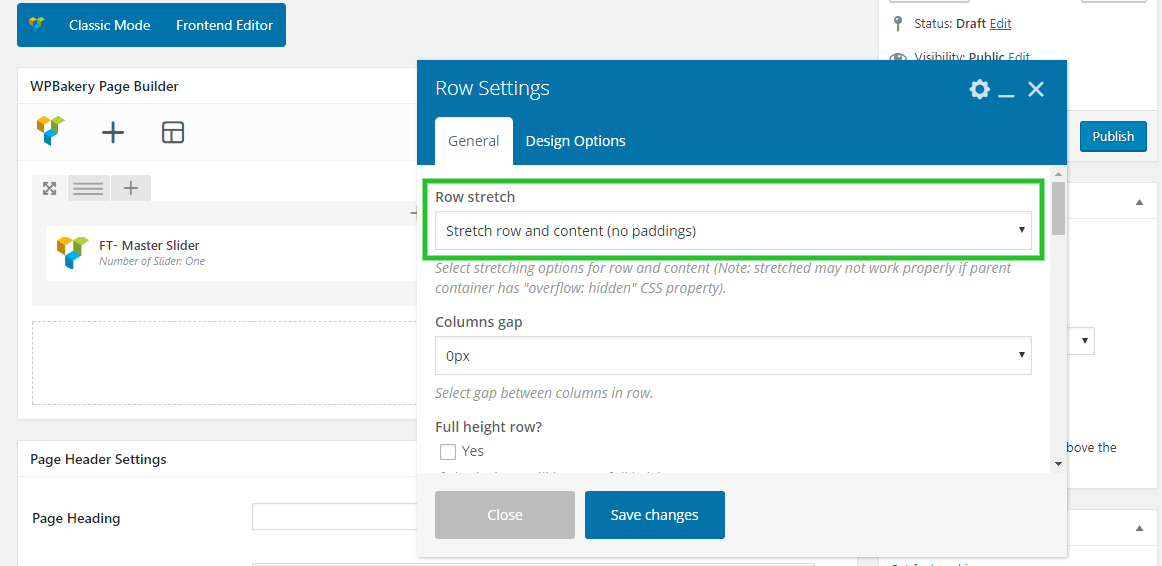
After creating master slider you just need to select Stretch row and content (no paddings) from row stretch dropdown to display as full width.
Page Templates
Making events is easy. You just need to create New Post from Charity Event and create new page than select Events page template. Publish the page.
Making events calendar. You just need to create New Page and select Events Calendar page template and than publish the page. All events date and title will be highlighted in the calendar.
Making causes post with an easy way. You just need to create New Post from Causes custom post types and add new a page and select causes page template and than publish the page. There is two page templates (Causes One, Causes Two) for cuases.
To add childs information for sponsor, there is a simple way. You need to just add childs information under Sponsor custom post type and than create a page and select Sponsor from page templates dropdown; Publish the page.
To create program and display programs list in the website. You just need to create program under Programs custom post types and than create a page and select Programs page template; Publish the page.
Create an image gallery. You just need to create Post and upload image from Gallery One custom post type and create a new page and than select Gallery One or Gallery Two or Gallery Three page template. Publish the page.
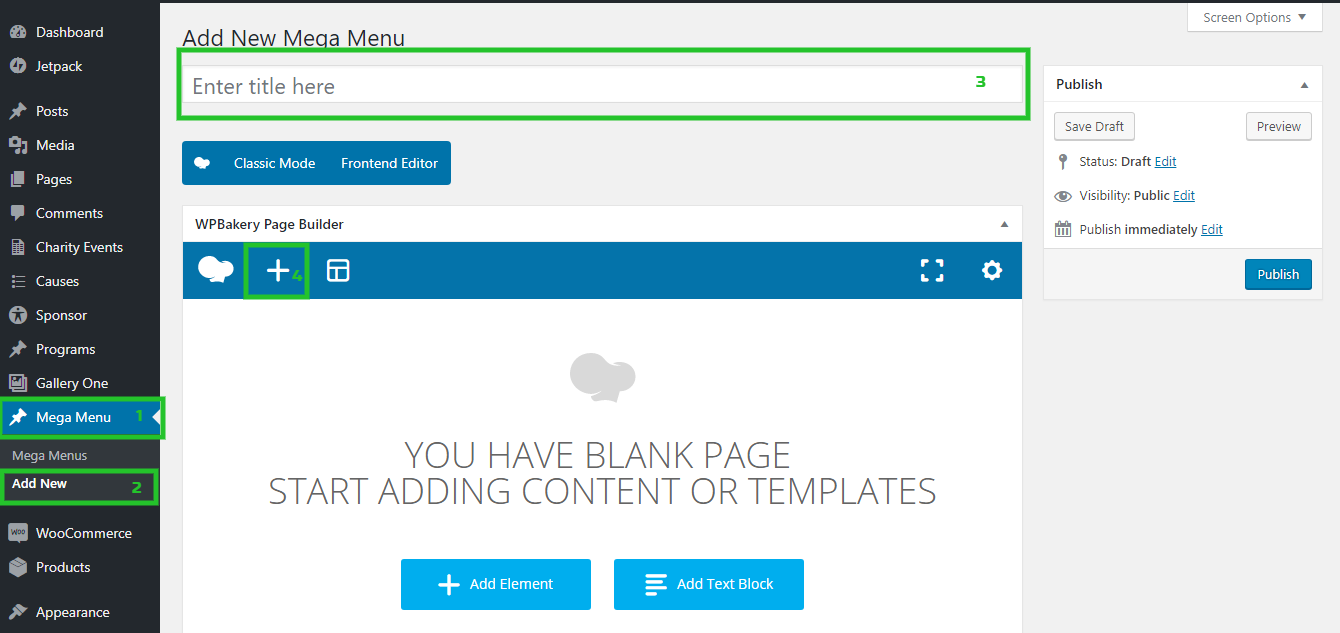
Mega Menu is an exclusive feature of this theme. You can use the feature in the main menu. Creating Mega Menu is easy. You just need to create menus under Mega Menu custom post types.
Demo Data Import
In your purchased theme file (Denorious - Nonprofit WP Theme.zip) you should find a folder named 'Demo Data'. Open the folder and you will get
2 demo data files. You can import any one of them in your WordPress.
To make your site like this, you should import 'Denorious_Demo_Data_NonProfit.xml' file.
To make your site like this, you should import 'Denorious_Demo_Data_Politics.xml' file.
In order to import the demo data file you just need to go to Tools -> Import on your WordPress Admin Dashboard. There you will see a list of import systems (blogger, blogroll etc). Choose WordPress from there and you will be asked to install the WordPress Importer plugin. After installing and activating the plugin you will need to upload our demo data xml file :Denorious_Demo_Data_NonProfit.xml or Denorious_Demo_Data_Politics.xml and click Import. That's it - All done - Have fun!
Please remember, you may see some notices/warnings after importing the demo data, this is because of different admin panel settings than the Demo site. You do not need to worry about those notices. The required data has been imported correctly.
Translate Themes using the Poedit Program
Poedit is a common program which you can use to translate the theme. It’s available for free on poedit.net.
After you have installed Poedit in your PC, you can open it and select File > Open. Then select the denorious.pot file from the theme you wish to translate which you can find in the /languages/ folder of Denorious theme.
Then go through every line of text and translate it to your native language. Afterwards you can save as the catalog with your language code name (for example Denorious-es_ES.po for Spanish language) File > Save as . Normally Poedit automatically creates the .mo file and saves it, too.
The last step you have to do is to upload your created language files in the /languages folder of Denorious theme and also upload those language files to wp-content/languages/themes folder using FTP/cPanel.
Here is a video tutorial about translating your theme using Poedit Program
Questions and Answers
How to create events?
Go to Charity Events → Add Event from left sidebar Admin Panel Menu.
Give event title, write event description in texteditor, add featured image and select categories from left sidebar. If you need to create a new category; click on +Add New Category, write desired category and press Enter↵
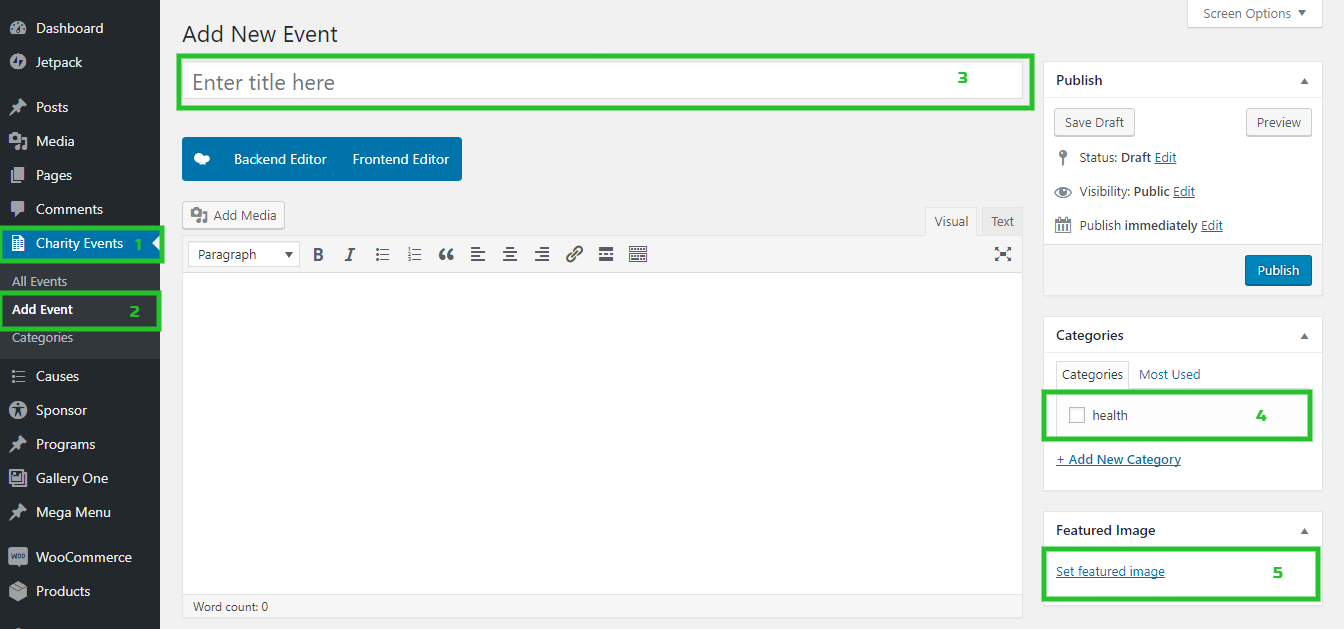
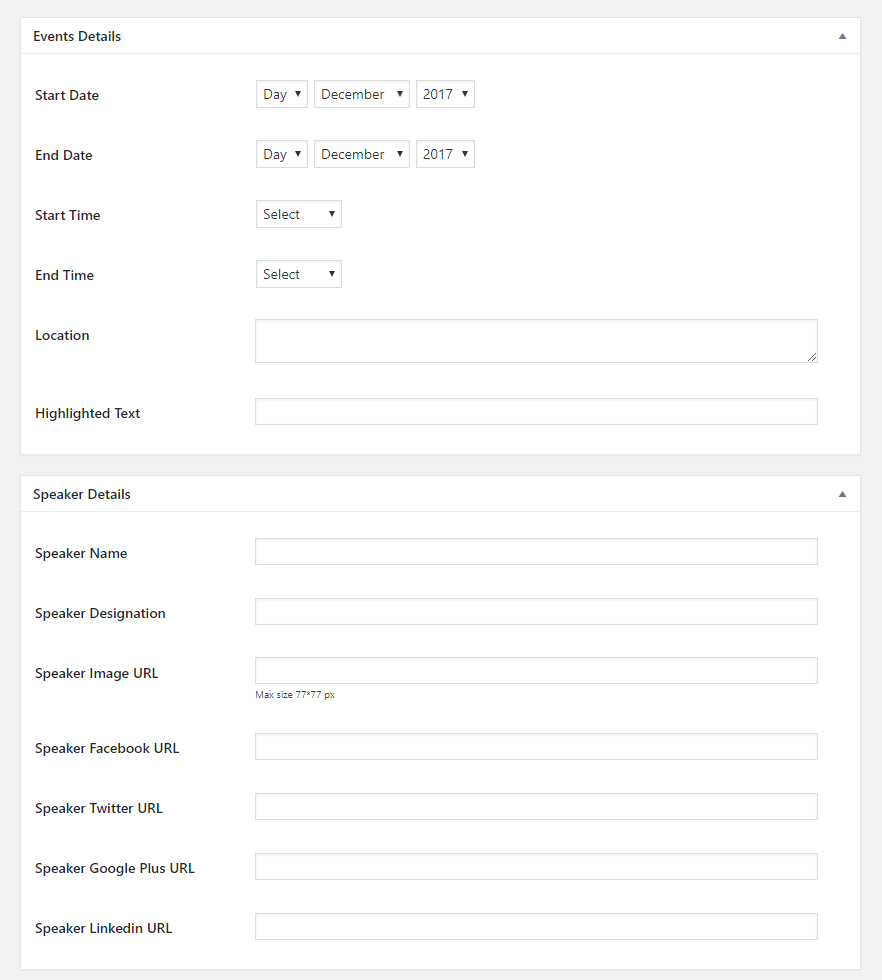
Set event date, time, venue and speaker details from bottom sidebar
How to create causes?
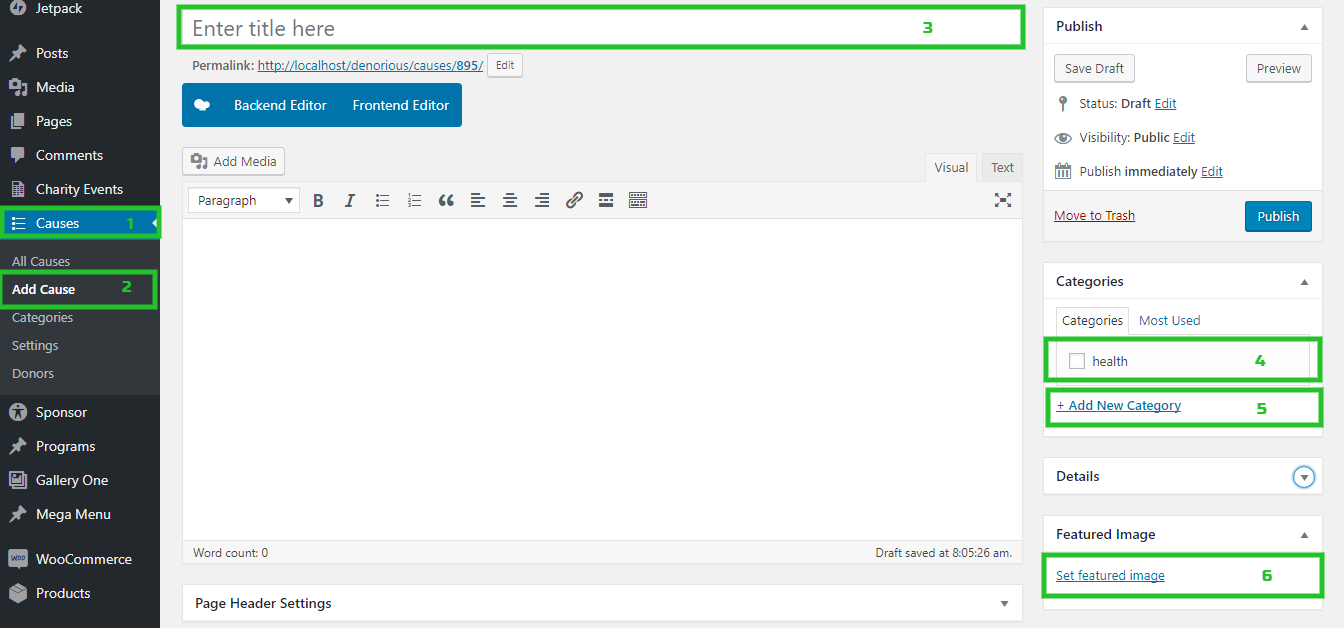
Go to Causes → Add Cause from left sidebar Admin Panel Menu.
Give cause title, write cause description in texteditor, add featured image and select categories from left sidebar. If you need to create a new category; click on +Add New Category, write desired category and press Enter↵
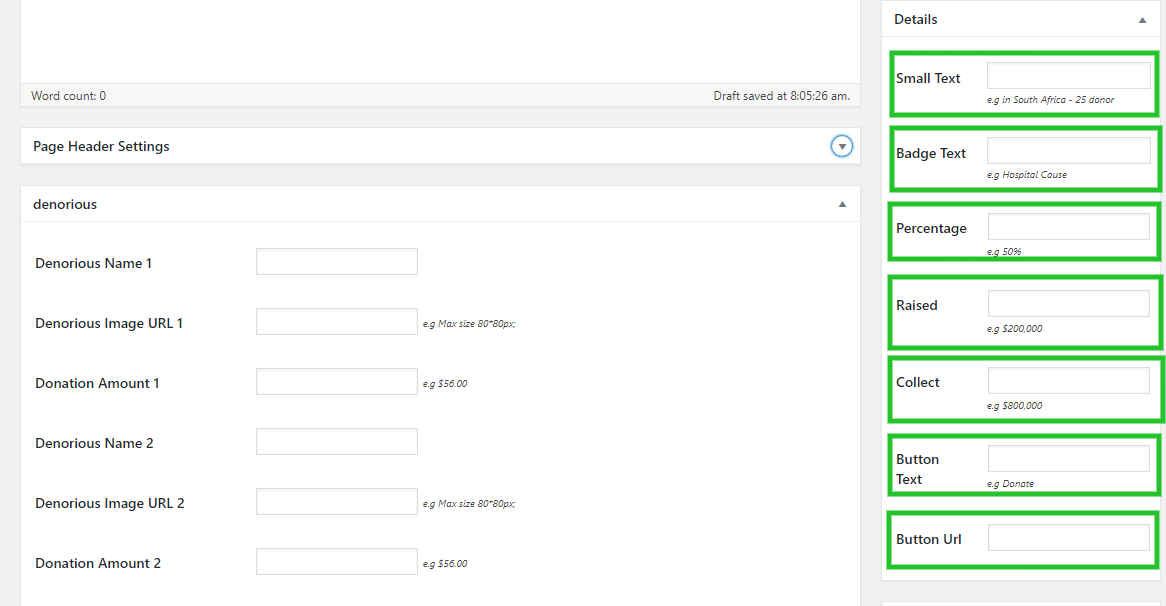
Set cause small text, badge text, raised value and perecentage, collection value and perecentage, and donate button from bottom sidebar
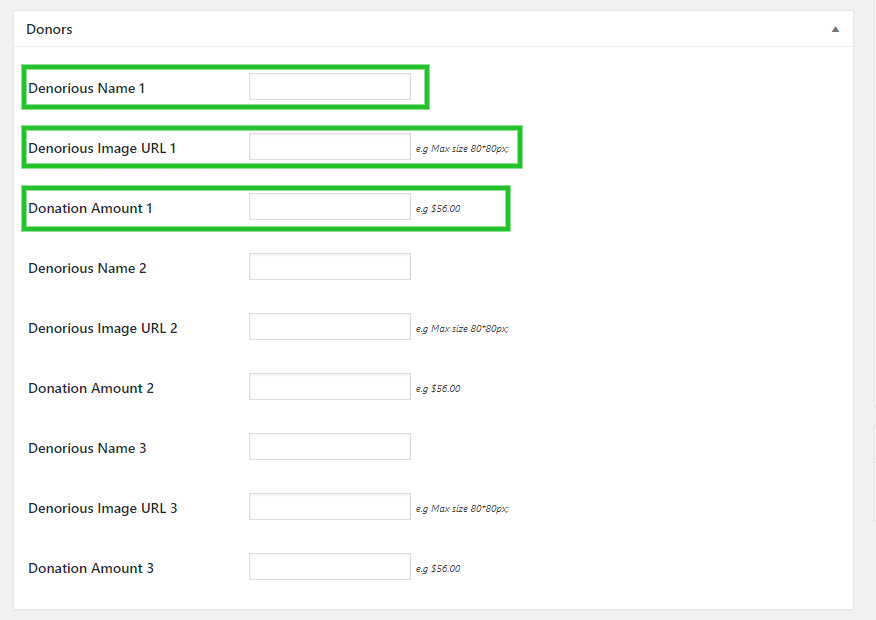
If you show existing donors info. Fill up donors name, image and donation amount from bottom Donors sidebar
How to create Mega Menus?
Megamenu is a awesome feature of Denorious theme. To enable mega menu in this theme just follow two steps. User can set 2-4 columns in the mega menu.
Create single menu from Appearance->Menu. If you we want to display four columns menu than have to create four menu individually from Menu section. Example: We want to display four columns megamenu. We have to create four menu like Pages, Blog, Shop and Others by following below step.
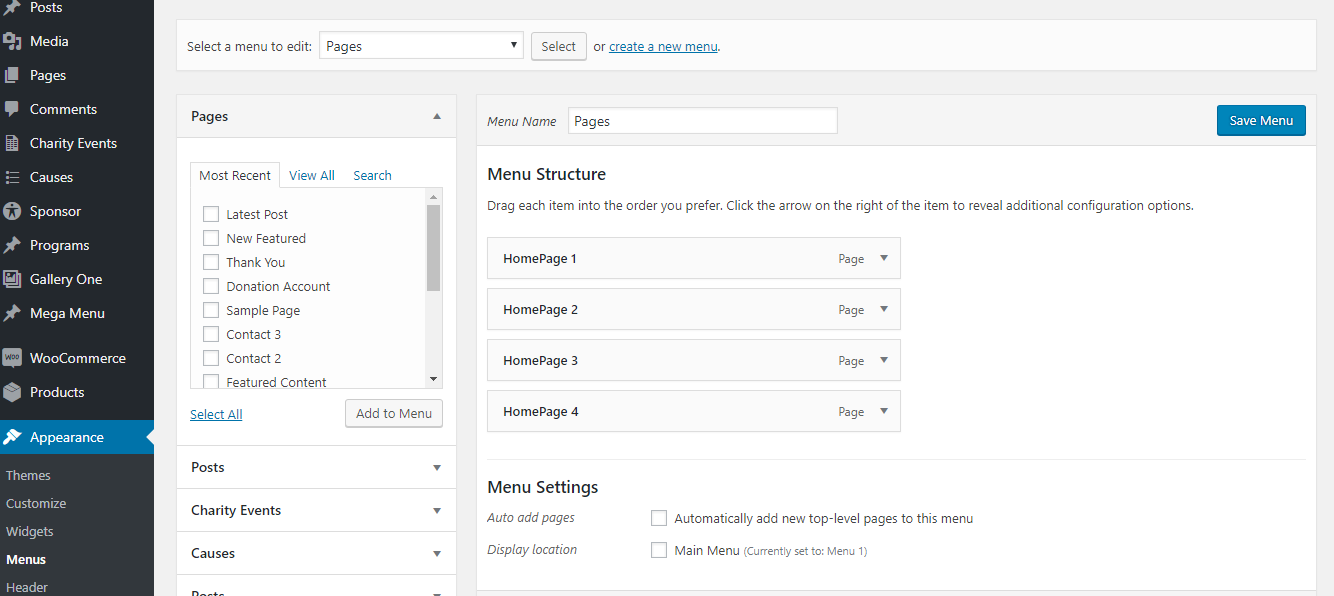
Integrate desired menus in the Megamenu. Just follow the following steps
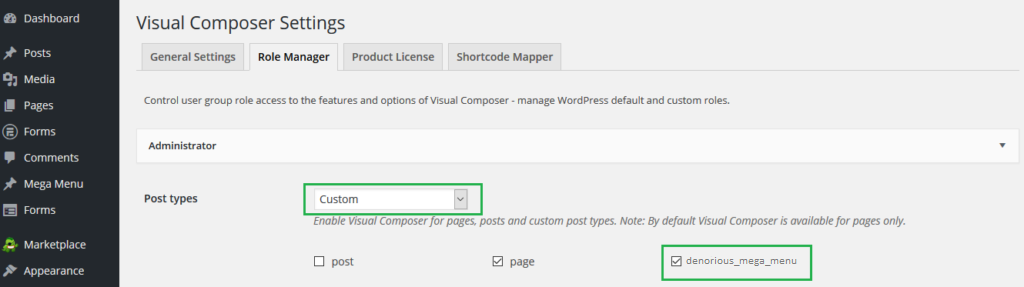
Enable WPBakery Page Builder for Mega Menu
1. Navigate to WPBakery > Role Manager
2. In Post Types choose ‘Custom’ and then make sure denorious_mega_menu is checked.
Now, Create your Mega Menu using the WPBakery Page Builder
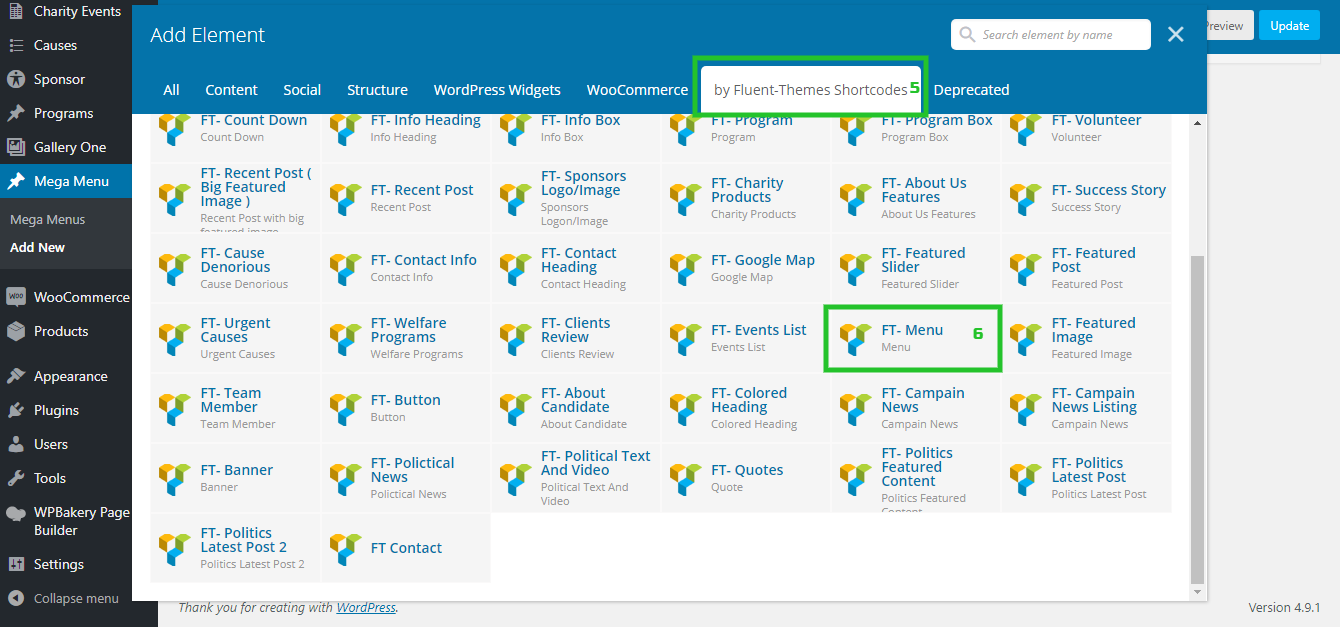
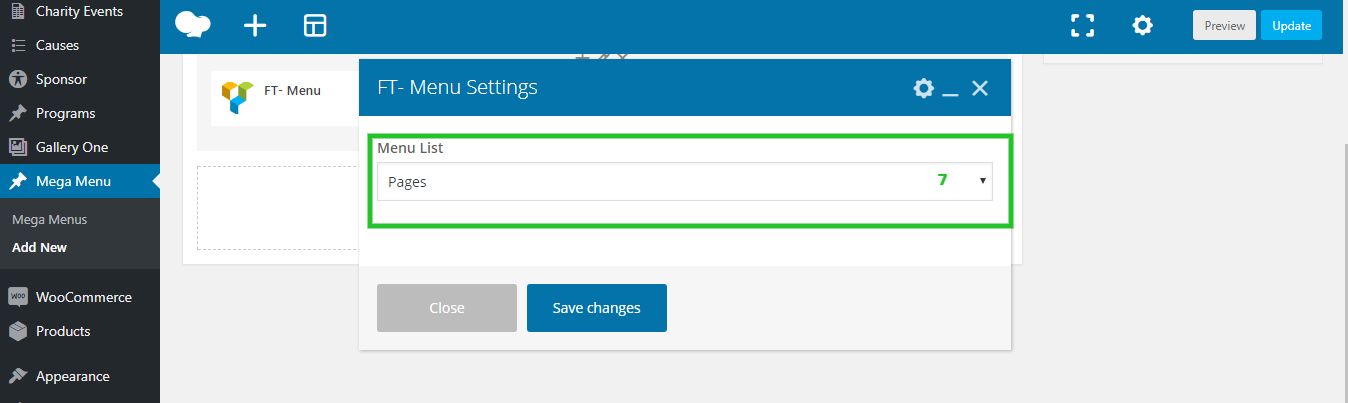
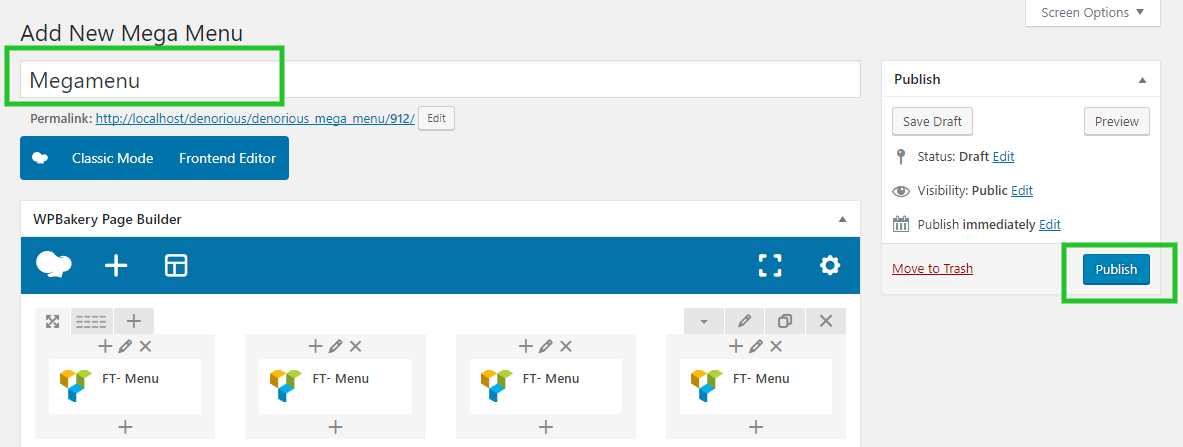
Go to menu by clicking Apprearance -> Menu and select main menu/primary menu.
We almost done. Now we just need to call megamenu in the primary menu by following these steps.
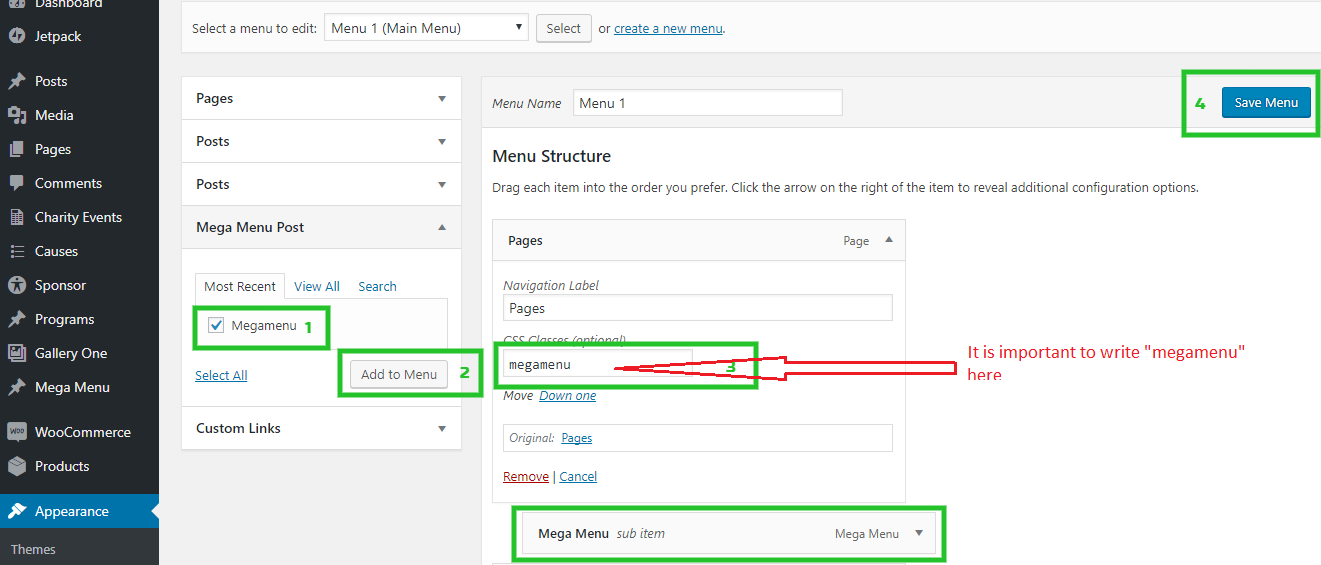
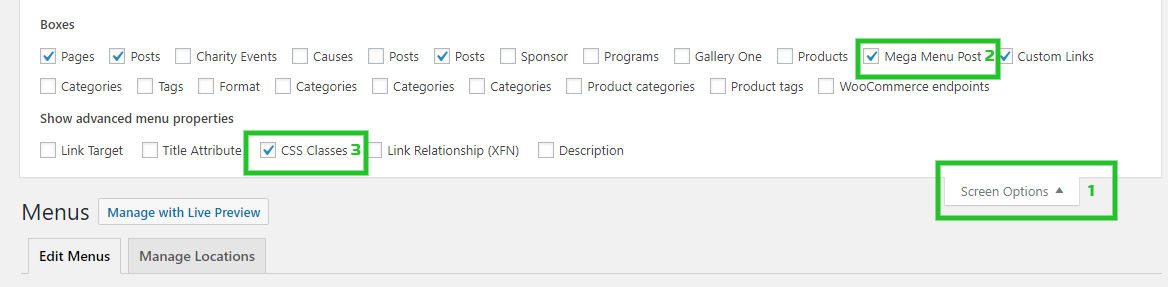
Note: If you do not see Mega Menu Post in the left sidebar. Click on Screen Options and check Mega Menu Post and also CSS Classes checkbox
How to make a working Donation Form?
Donation Form is a built in feature of Denorious Theme. Donation Form integrated with Cuases and Sponsor Custom Post Types. So that if user add new causes or sponor post; Donation Form will display below in every single post of cuases and sponsor custom post types.
But, of course you can Switch On/Off the Donation form from the settings given in the wp editor. Check the screenshot below:
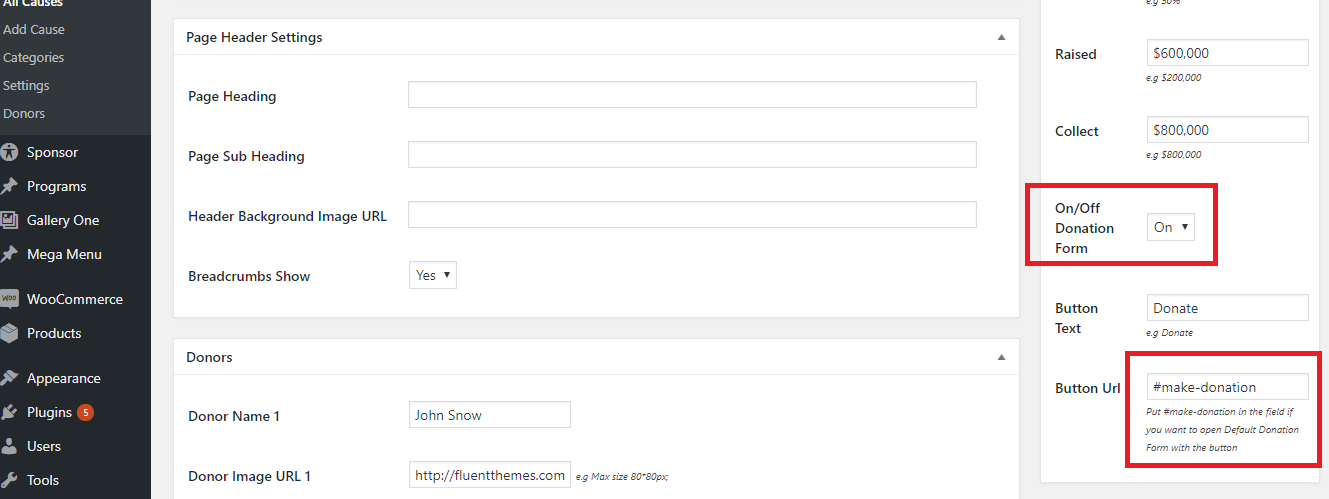
To link up a Button with the donate form, you can input the button link as below:
http://Your_Single_Cause_Page_OR_Sponsor_Page_URL/#make-donation
The '#make-donation' at the end of the url is the trigger for opening the Donation Form.
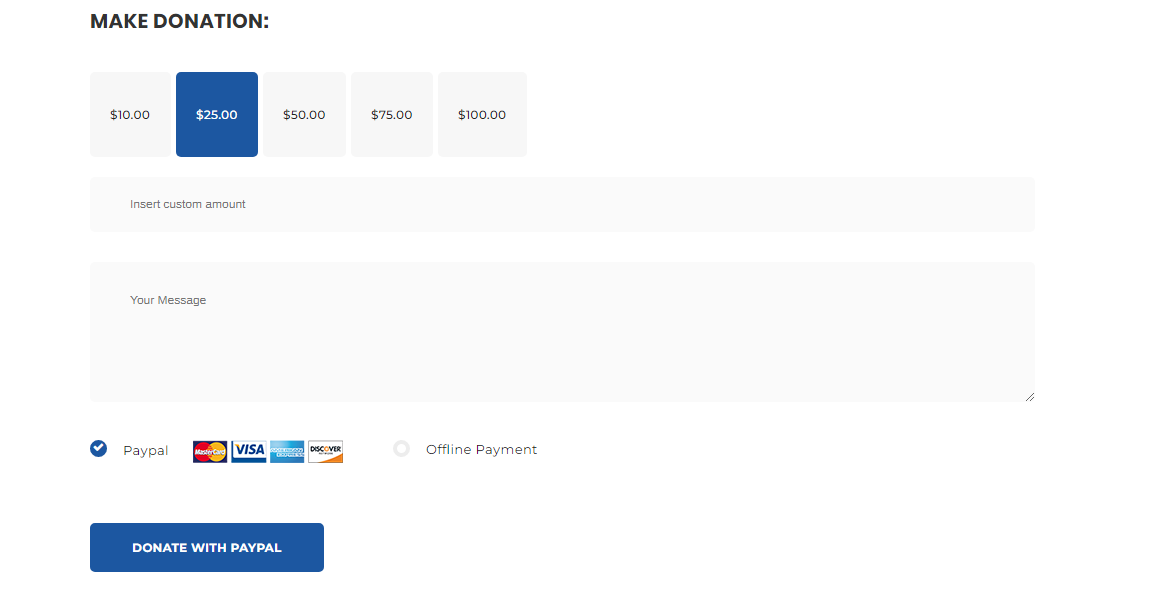
Donation form of Causes:
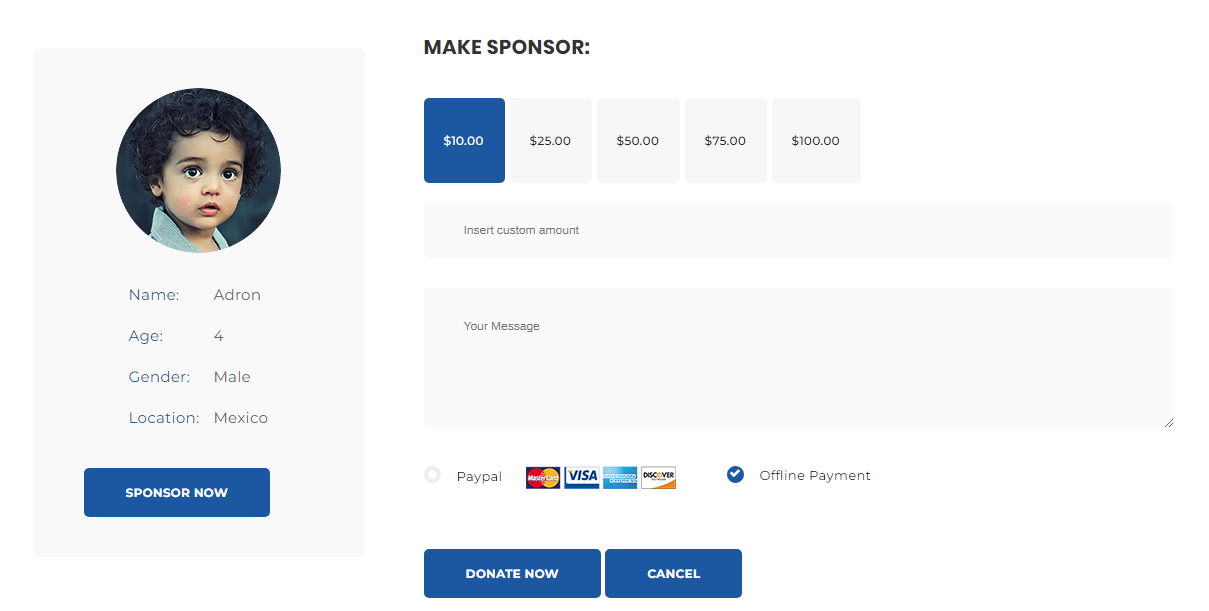
Donation form of Sponsor:
Where to put my PayPal account info to accept Donation to my PayPal?
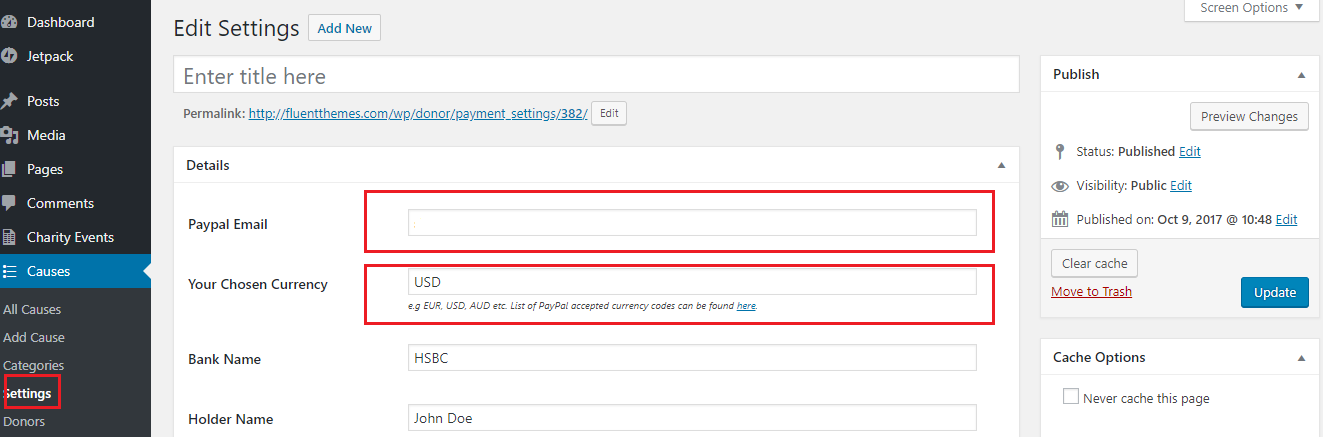
The only info needed to make the Donation Form work is your PayPal email. Just visit the payment settings page (WP Dashboard > Causes > Settings) and input your PayPal email in the 'Paypal Email' field.
How to change Currency?
Just visit the payment settings page (WP Dashboard > Causes > Settings) and input your currency in the 'Your Chosen Currency' field. The list of accepted Currency by PayPal can be found here.
How to make a working Contact Form with/without Map?
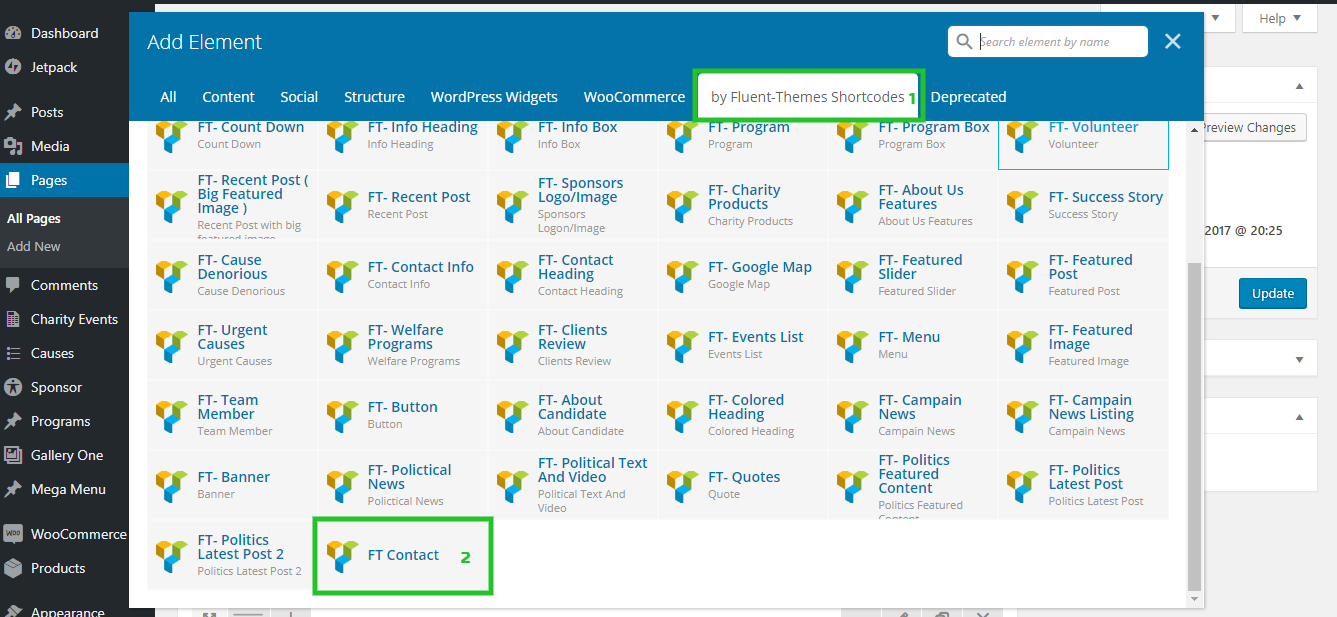
Create a Contact Form with/without Map is quite easy. Create a page from left sidebar Admin panel menu and select contact page template. Click on + sign above the texteditor. WPBakery elements will appear in the popup box. Click on by Fluent Themes Shortcodes and click on Contact VC Custom Elements. Fill form heading, receiver email address and other stuff and click Save Changes button.
Google Map integration
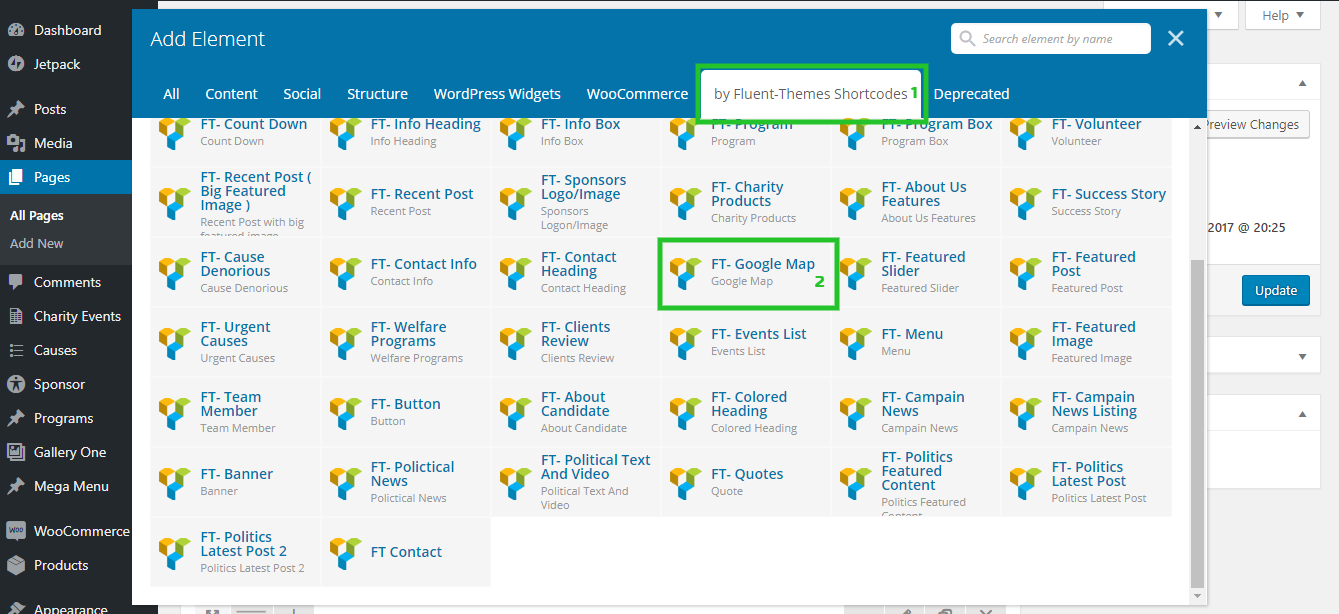
You just follow above step and click on Google map WPBakery Custom Elements under the by Fluent-Themes-Shortcodes Tab. Write Lattitude and Langtitude Code.
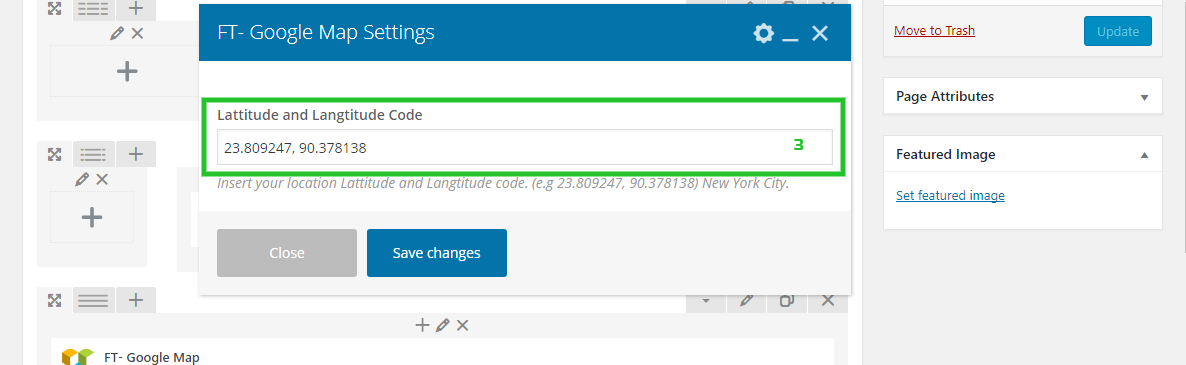
Finally, input your Google Map API key in the 'API KEY' field and click Save Changes button. Because, now Google wants an API key to authenticate users to access their APIs.
To get your Google MAP API key, please visit this url and click on the 'Google Maps Embed API' box. You will get a new page where you need to click on the 'Enable' button to enable your Google Map API. After clicking on the Enable button you will get a new page where you see 3 tabs: 'Matrics', 'Quotas' and 'Credentials'. Click on the 'Credentials' tab and you will see the API key. Copay that API key and paste that in the 'API Key' field and click Save Changes button.
How to use Custom VC (WPBakery) elements to create pages?
WPBakery is a page builder WordPress plugin. Can create page with lots of custom features by drag and drop functionality. So user can build a website very easily without coding knowledge.
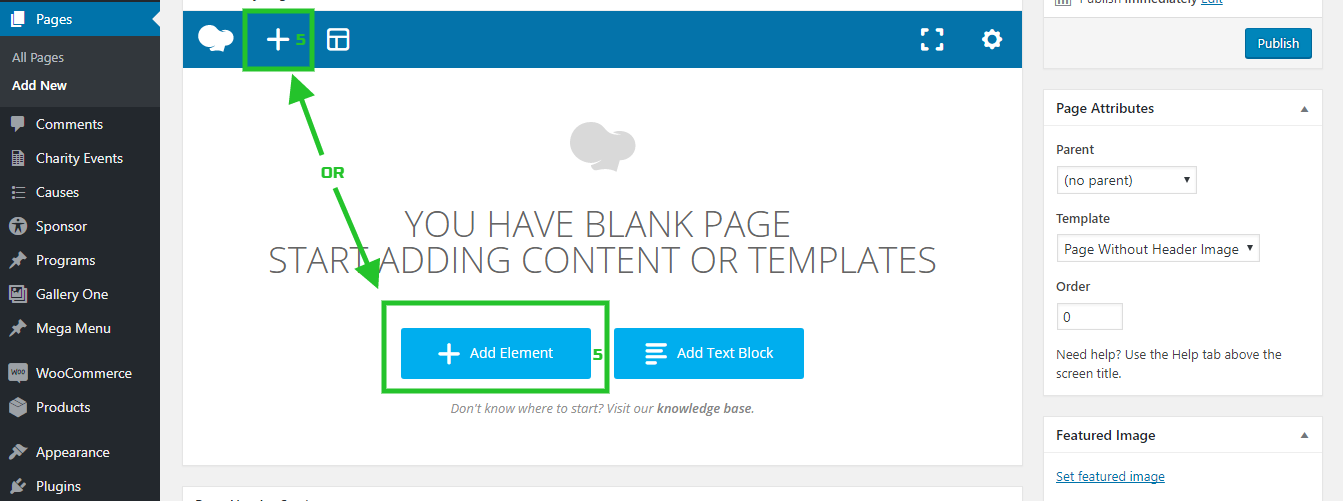
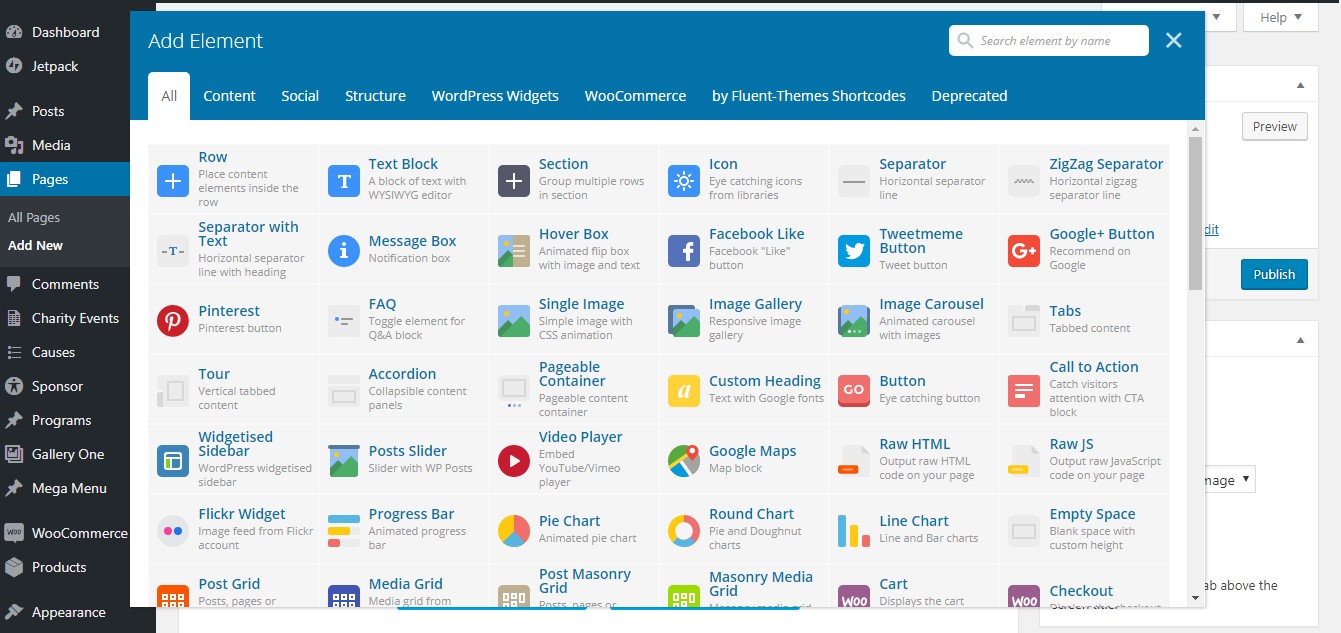
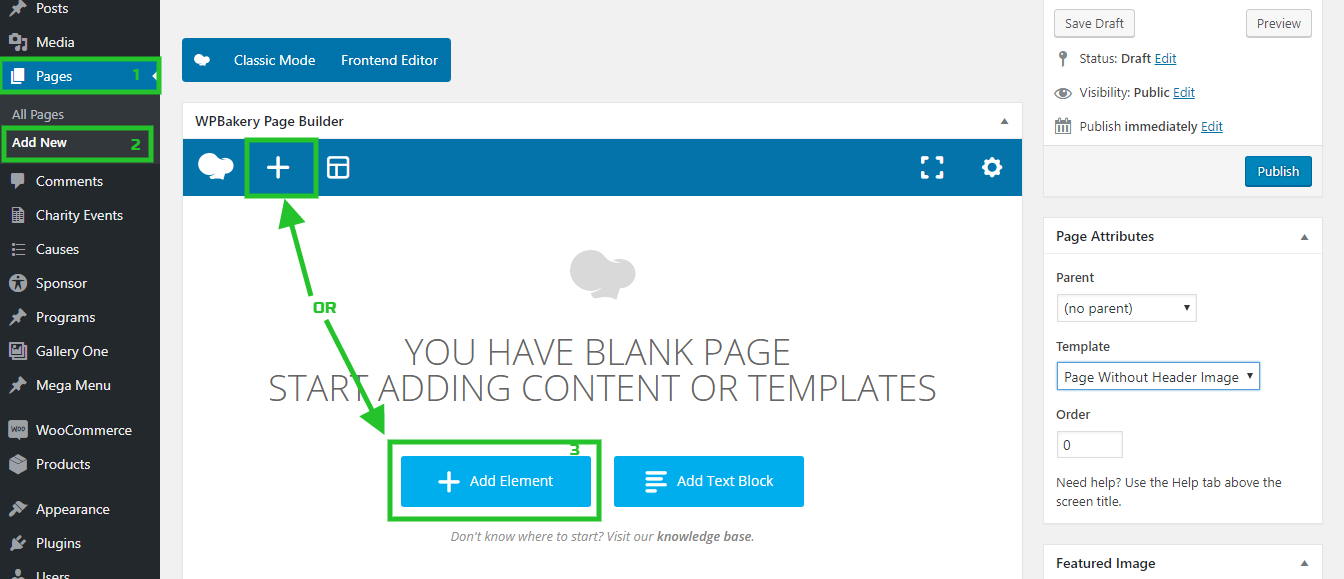
Go to Page and click on Add New from left sidebar Admin panel menu. Select "Page Without Header Image" template from right sidebar. Now Click on Backend Editor and +sign button or Add Element Button above of the text editor. After that click, WPBakery popup box will appear with many tabs and lots of features.
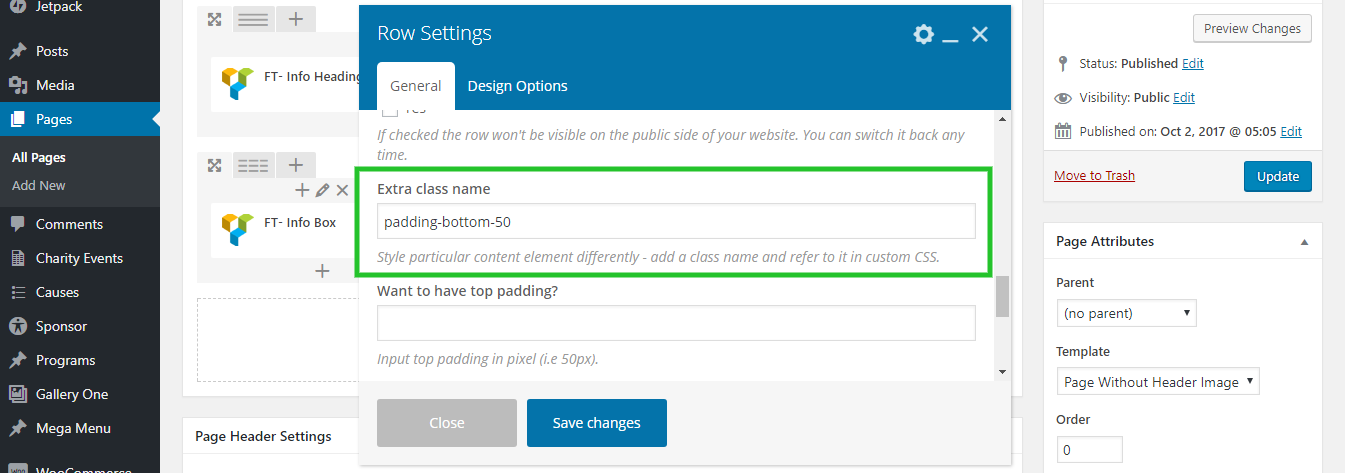
How to use ‘padding-bottom-50’ class in the Extra Class field of VC Row Editor?
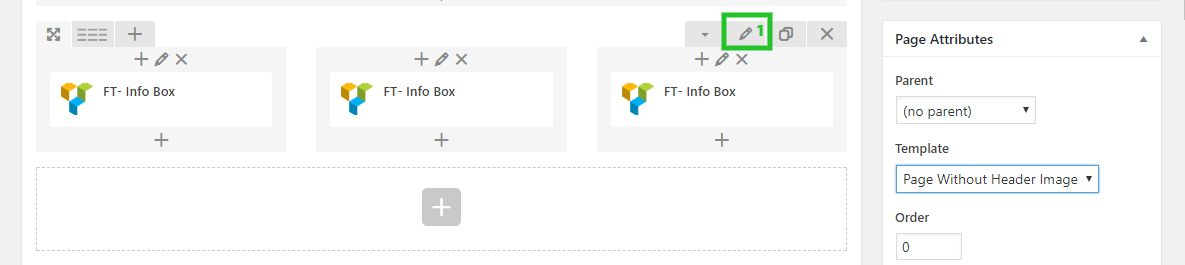
padding-bottom-50 is a special css class. Works only small devices like mobile, tab etc to reduce top or bottom, top and bottom both padding. There are another more classes which user can use.
- padding-0
- padding-50
- padding-top-0
- padding-top-50
- padding-bottom-0
- padding-bottom-0
- padding-bottom-50
How to use:
How to insert video in the Footer OR in the Sidebar?
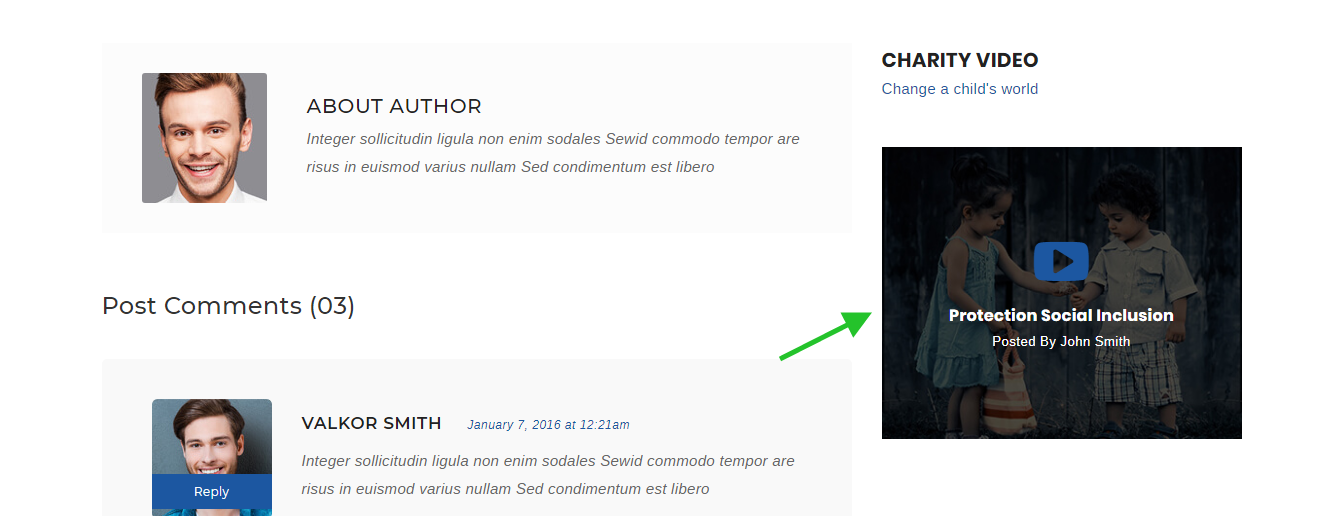
Denorious theme has video enabaled sidebar and footer section.
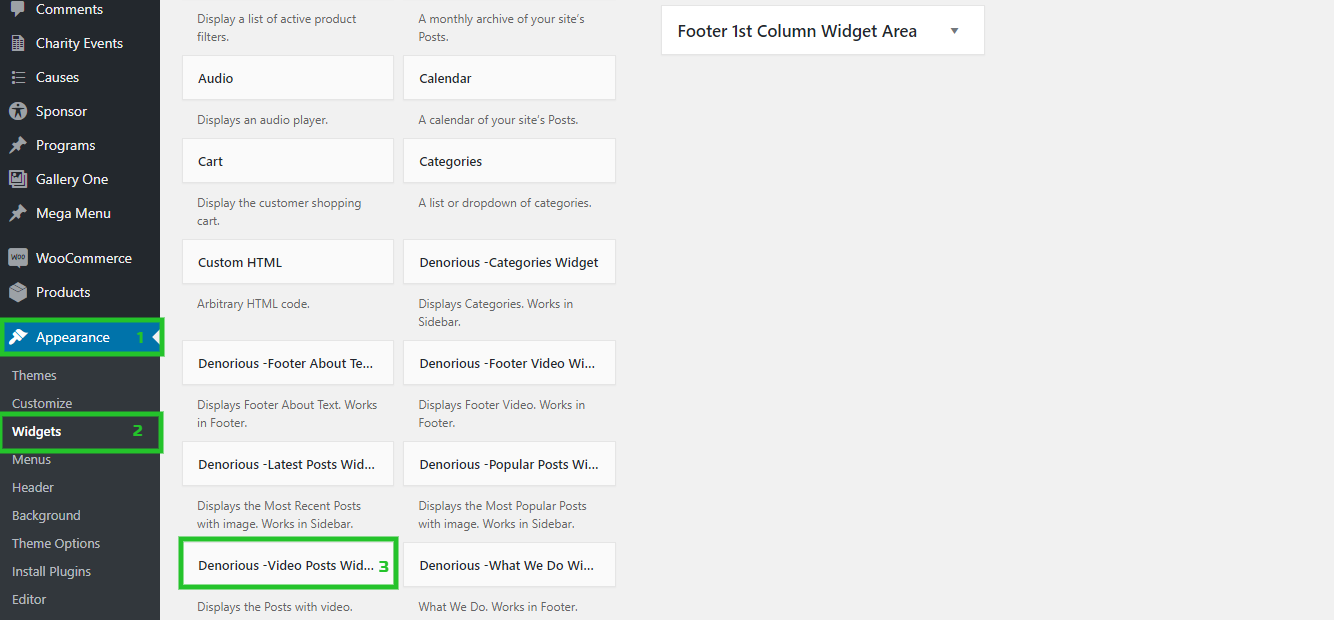
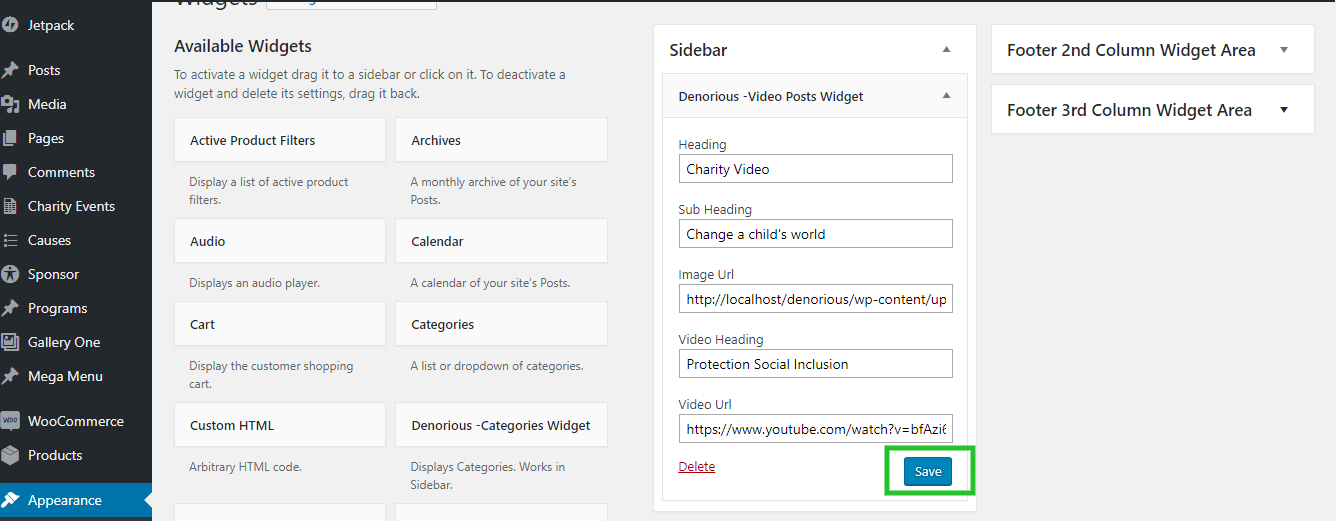
Video widget in Sidebar. Go to Apprearance->Widgets. Drag Denorious- Video Posts Widget and drop above the sidebar widget area. Write video heading, sub heading, insert thumbnail image url, video heading, video url and click save button
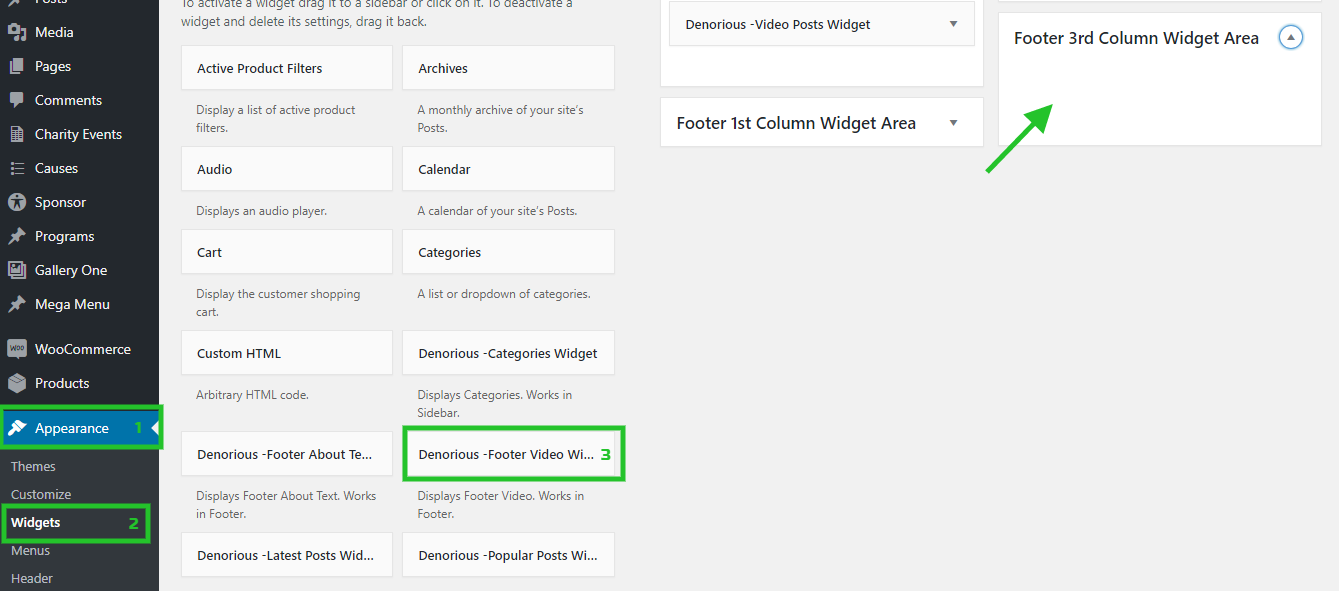
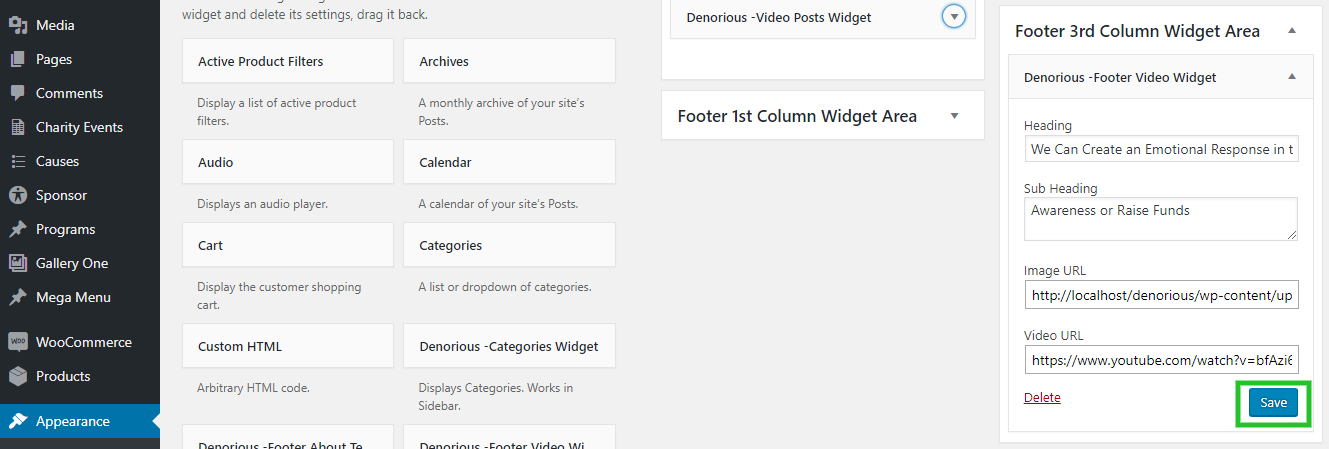
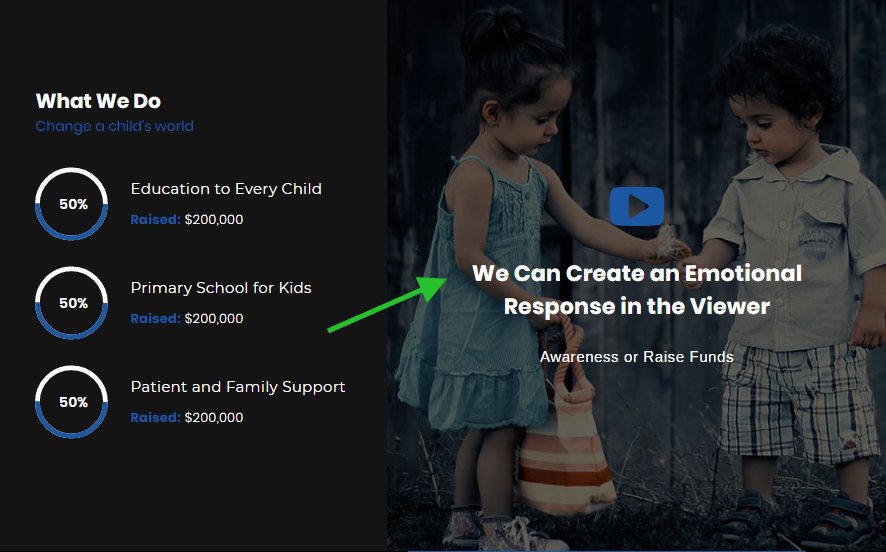
Video widget in Footer. Go to Apprearance->Widgets. Drag Denorious- Footer Video Widget and drop above the Footer 3rd Column Widget Area. Write video heading, sub heading, insert thumbnail image url, video url and click save button
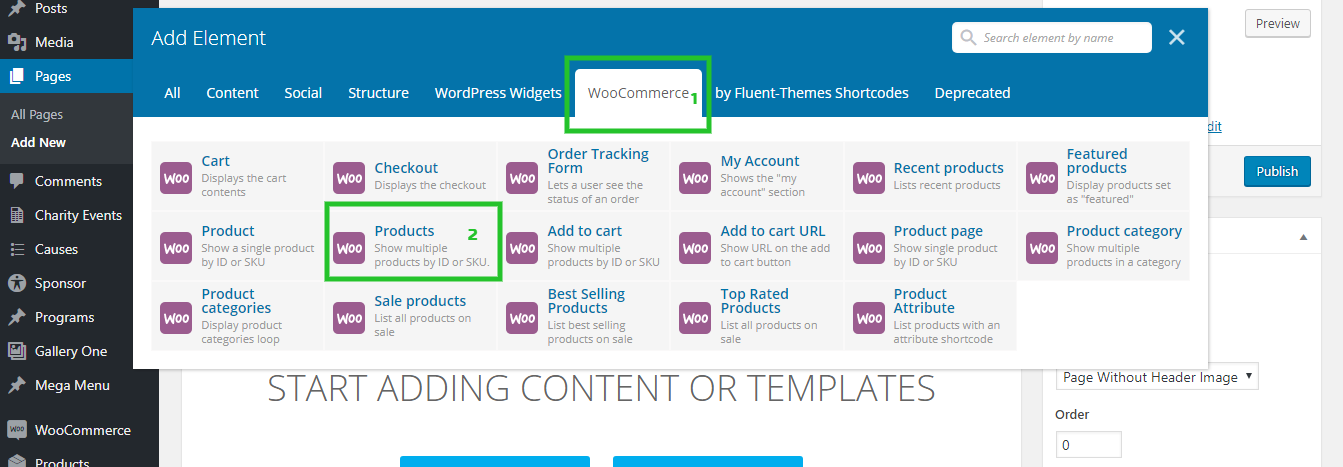
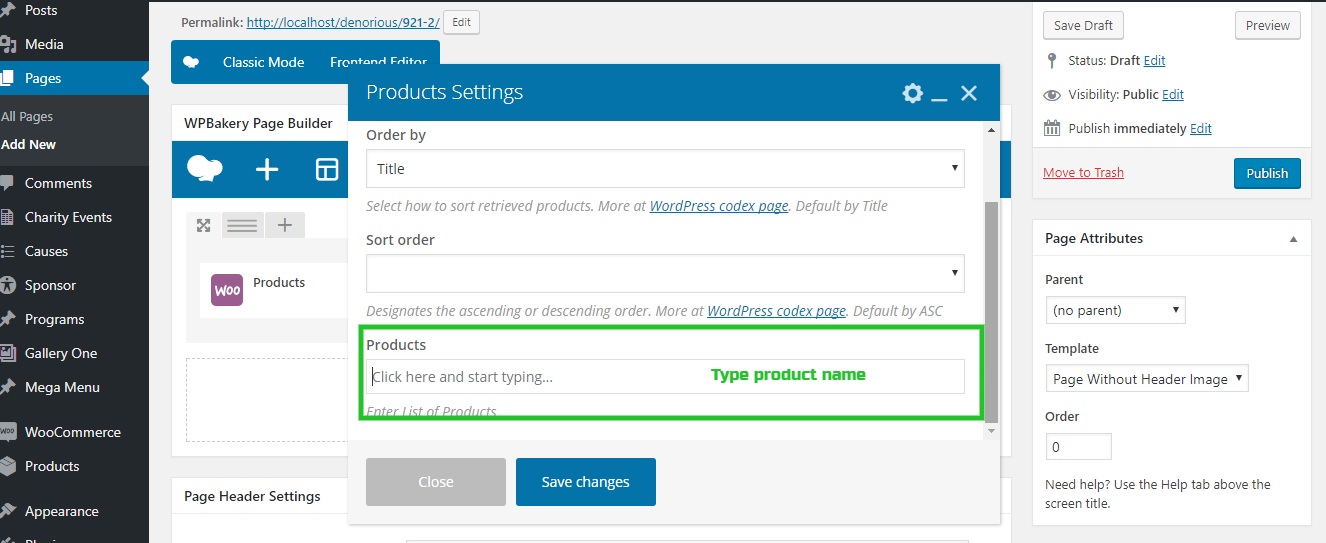
How to add some WooCommerce products in my HomePage?
Go to Pages -> Add New
Support
If you need some help or found a bug or issue with the Theme, You can contact us with your theme purchase code at support@denorious and we will respond to you within a quick turnaround time.
Social Media Settings
Here you can put your social media urls. Don't forget to use http:// before any urls. These Social media urls are effective in the Footer section.